What I'm Drinking: Maple Old-Fashioned Cocktail


Has this week been, like, the longest week ever for anyone else? Or is it just me? Whatever the reason, I am totally ready for 5 o'clock to roll around. TGIF.


And once the work day is over, I'll be reaching for one of these delicious maple old-fashioned cocktails. If I had to choose a classic Northwoods cocktail, it would be the old-fashioned. It's typically my go-to cocktail request when we're out and about; I like to judge the quality of the bar or restaurant by the old-fashioned they make.

This maple old-fashioned is a slight riff on the classic by replacing the traditional sugar cube with pure maple syrup (produced locally, of course!). Dustin helped haul sap for a friend this spring, earning him our annual supply of syrup (which we treat as a precious commodity). I used about an ounce of maple syrup in my cocktail; you can use more or less depending on your preferred level of sweetness. Whatever you do, don't use the fake stuff. That would a tragedy, indeed.

Cheers to the weekend!

Maple Old-Fashioned
makes one cocktail

1 orange round, peel and pith removed
1/2 - 1 oz pure maple syrup
2 oz bourbon (or brandy)
couple dashes bitters
club soda
2 maraschino cherries, for garnish

1. Add the orange round to the bottom of a rocks glass and top with maple syrup. Muddle the orange and maple syrup. Add the bourbon and a couple dashes of bitters and stir to combine.
2. Add ice and top with club soda. Garnish with maraschino cherries and serve.
SHARE:

What's For Dinner: Cast-Iron Skillet Chicken with an Unstuffed Stuffing


After thinking that I had found the perfect way to make a roast chicken (in the slow cooker), I happened upon an episode of Cook's Country in which they cooked a chicken in a cast iron skillet over a base of bread cubes and sauteed vegetables. Genius! Especially since stuffing is one of my favorite things.


This recipe gives you the best of both worlds -- a perfectly-roasted chicken flavored with lemon, garlic, fresh herbs (and plenty of delicious butter!) -- and an evenly-cooked tasty stuffing that gets infused with the juices from the roasting chicken. Yum!

Cast-Iron Skillet Chicken with an Unstuffed Stuffing (printer-friendly version)

makes 4 servings

For the unstuffed stuffing:
2 tablespoons unsalted butter
1 medium onion, chopped fine (about 1 heaping cup)
2 celery ribs, chopped (about 1 cup)
2 medium carrots, peeled and chopped (about 1 cup)
1/2 teaspoon fine sea salt
1/2 teaspoon ground black pepper
1 clove garlic, minced
2 tablespoons minced fresh herbs (rosemary, sage, oregano, thyme)
4 cups 1/2-inch sourdough bread cubes
1/3 cup low-sodium chicken broth [optional]

For the chicken:
1 (4-pound) whole chicken, giblets discarded
1 lemon, quartered
3-4 cloves garlic, smashed
small bunch of fresh herbs
4 tablespoons unsalted butter
2 tablespoons minced fresh herbs (rosemary, sage, oregano, thyme), divided
1 teaspoon fine sea salt
1/2 teaspoon ground black pepper

1. Preheat the oven to 375 degrees.
2. For the stuffing: Add 2 tablespoons of unsalted butter to a large (12-inch) cast iron skillet and heat over medium-high heat.
3. Add in the chopped onion, celery, and carrots. Season with salt and pepper. Saute until the vegetables have softened, 5-7 minutes. Stir in the minced garlic and minced fresh herbs. Saute until fragrant, about 1 minute. Remove the skillet from the heat.
4. For the chicken: pat the chicken dry with paper towels. Stuff the cavity with the quartered lemon, smashed garlic cloves, and bunch of fresh herbs.
5. Melt the butter in a small sauce pot. Stir in the minced herbs, salt, and pepper. Brush the herb butter over the chicken.
6. Set the chicken (breast side up) on top of the sauteed vegetables in the cast iron skillet. Tie the legs together with a short piece of string. Place the bread cubes around the chicken in the skillet.
7. Roast the chicken in the oven for 60-75 minutes, or until a thermometer inserted into the thigh registers 165 degrees. Rotate the skillet halfway through the cooking period.
8. Remove the chicken from the skillet, set it on a cutting board, and tent it with a piece of aluminum foil.
9. Stir together the bread cubes and vegetables, cover, and let stand for 10 minutes. After 10 minutes, if you would like the stuffing to be more moist, stir in 1/3 cup chicken stock. Carve the chicken and serve with the stuffing.
SHARE:

What's On the Side: Asian Tri-Color Coleslaw Salad


Right before Easter, I bought a giant head of red cabbage to make a natural dye for eggs, but then we had a little egg shortage, and I decided our few egg-buying friends would probably rather purchase non-dyed eggs. So . . . long story short, I had a red cabbage on my hands just waiting to be used in a recipe.


Ergo, this tri-color Asian coleslaw. The bright colors come from the red/purple cabbage, green Brussels sprouts, and orange carrot. First, I shredded the vegetables in my food processor using the metal blade attachment. Then, I made a simple Asian-inspired dressing to add a jolt of flavor to the shredded vegetables. A quick toss in the dressing, a garnish of black sesame seeds, and you've got a stunning coleslaw salad to add to your dinner table.

Asian Tri-Color Coleslaw Salad (printer-friendly version)
makes 2-4 servings

For the coleslaw:
1 cup shredded carrot (about 1 large carrot)
1 cup shredded Brussels sprouts (about 10 small-medium Brussels sprouts)
1 cup shredded red cabbage (about 1/2 small head of cabbage)

For the dressing:
1/4 cup fresh lime juice
1/2 tablespoon rice wine vinegar
3 tablespoons low-sodium soy sauce
2 tablespoons toasted sesame oil
2 tablespoons brown sugar

fine sea salt and freshly ground black pepper, to taste
black sesame seeds, for garnish

1. Add the shredded carrot, Brussels sprouts, and red cabbage to a large bowl.
2. In a separate bowl, whisk together the lime juice, rice vinegar, soy sauce, sesame oil, and brown sugar.
3. Pour the dressing over top the shredded vegetables. Stir to combine. Season to taste with salt and pepper. Garnish with black sesame seeds.
4. Chill in a covered container in the fridge until ready to serve.
SHARE:

Made From Scratch: Maple-Dijon Vinaigrette


While I might not be too stoked about our recent snowfall and the fact that our temperatures are still bouncing around the below-freezing mark, one benefit of this weather is that it is prime conditions for sugaring season. Up here in the Northwoods, you'll spy metal pails, plastic buckets, blue bags, and clear bags hanging from sugar maple trees, all collecting sap to be evaporated down into maple syrup.


It typically takes about 40 gallons of sap to make one gallon of syrup -- making the final product a bit of a labor of love. We have several sugar maple trees on our property and planned to tap them this spring, but unfortunately we neglected to mark the trees before all the leaves fell off in the autumn. So, next year! Luckily, Dustin has a friend that taps a huge sugarbush (sugar maple grove) near town, so through the time he puts in helping to collect sap, he "earns" several jugs of finished syrup that last us the year.

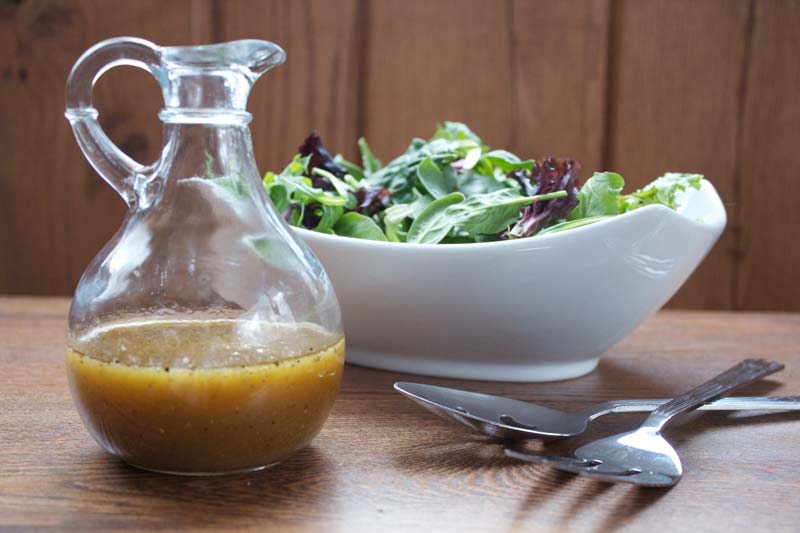
While I primarily use our maple syrup for pancakes, it also makes a great alternative sweetener. And, with a few other ingredients, you can use it to make a delicious salad dressing or glaze. I recently used this maple-Dijon vinaigrette as both a marinade for salmon roasted in the oven and as a dressing for a salad of spring greens. The maple syrup adds a complex smoky sweetness to the vinaigrette which balances the robust bite of the mustard and vinegar.

What is your favorite way to use maple syrup?

Maple-Dijon Vinaigrette (printer-friendly version)
makes about 1 cup

2 tablespoons pure maple syrup
1/2 tablespoon Dijon mustard
2 tablespoons sherry vinegar
4 tablespoons extra virgin olive oil
1/4 teaspoon black pepper
1/2 teaspoon fine sea salt

1. In a small jar with a tight lid, add together the maple syrup, Dijon mustard, sherry vinegar, pepper, and salt. Place the lid on the jar and shake vigorously to combine. Alternately, place all the ingredients in a shallow bowl and whisk to combine.
2. The dressing can be stored in the refrigerator for several weeks.
SHARE:

On the Radio: Maple Syrup and Cold Weather's Silver Lining


My latest WXPR segment is now available online. This month I talk about sugaring season, which occurs when winter transitions into spring, and one of my favorite ways to use maple syrup. You can listen to (or read) the story by clicking here
SHARE:

What's Baking: Blueberry Crumb Cake


It snowed again last night, and while the tree branches caked with snow admittedly do look kind of lovely, I am so ready for spring to arrive and stay for the long haul.


So, instead of basking outside in the warm sunshine of spring, I am getting my springtime fix in the kitchen by baking this blueberry crumb cake and reliving memories of picking blueberries last summer in Bayfield.


For me, coffee cake is quintessential weekend food. My love for blueberry coffee cake can be traced back to the Sunday morning breakfasts of my childhood. While my Dad cooked up eggs ("a little bit leaky" for me, please!) and hashbrowns, I would help my Mom make a blueberry coffee cake. My job typically involved making the crumble topping, which I took very seriously. Particularly since, after the coffee cake was baked, I would attempt to surreptitiously pick off and eat all the giant crumbles. 

I still love those giant cinnamon-sugar crumbles, but I try to restrain myself from picking them off the top of my freshly-baked coffee cake. In addition to a tasty crumble topping, this cake is generously studded with juicy blueberries and gets a zing of citrus flavor from a generous amount of fresh lemon zest.

The cake tends to get moister as the days progress, but it is best eaten within three days of baking. 

Blueberry Crumb Cake (printer-friendly version)
makes 8-10 servings

For the topping:
5 tablespoons unbleached all-purpose flour
1/4 cup granulated sugar
1/4 cup brown sugar
1 teaspoon ground cinnamon
1/4 teaspoon ground nutmeg
4 tablespoons unsalted butter, softened

For the cake:
2 cups minus 1 tablespoon unbleached all-purpose flour
2 teaspoons baking powder
1/2 teaspoon fine sea salt
4 tablespoons unsalted butter, softened
3/4 cup granulated sugar
zest of 1 lemon
1 egg
1 teaspoon vanilla extract
1/2 cup organic 1% milk
2 1/2 cups fresh or frozen blueberries

1. Preheat the oven to 375 degrees. Grease the bottom and sides of a 9" springform pan with butter or cooking spray. Line the bottom of the pan with a parchment round. Set aside.
2. To make the topping, in a small bowl, whisk together the flour, granulated sugar, brown sugar, cinnamon, and nutmeg. Use a pastry blender, two forks, or your fingers to incorporate the butter into the flour mixture until large crumbles form. Set aside.
3. In a medium bowl, whisk together the flour, baking powder, and salt.
4. In the bowl of an electric mixer, cream together the sugar, lemon zest, and butter until light and fluffy. Beat in the egg until combined. Then beat in the vanilla.
5. Reduce the speed to low and stir in about 1/3 of the flour mixture, followed by about 1/4 cup milk. Repeat, finishing with the flour mixture. Beat until just combined. Gently fold in the blueberries.
6. Spoon the batter into the prepped pan, and use the back of a spoon or rubber spatula to smooth out the top. Sprinkle evenly with the crumble topping.
7. Bake in the oven for 40-45 minutes, or until a toothpick inserted into the center of the cake comes out clean.
8. Remove from the oven and set on a wire rack. Let cool in the pan for 10 minutes. Then insert a knife around the edge of the pan to gently release the cake from the sides. Carefully flip the cake over to remove the pan bottom and parchment paper. Set the cake right-side up on the wire rack and allow to cool completely.

(lightly adapted from this Smitten Kitchen recipe)
SHARE:

What's For Dinner: Cast Iron Skillet Pizza


When it comes to lazy-night dinners, pizza is first on the list. Back in the day, for ultimate laziness, we would rely on the frozen variety, but after realizing how simple it is to make pizza dough, these days our pizzas are made from scratch. 


However, as much as I love pizza, I H-A-T-E stretching out the dough. Pretty much every single time I attempt to make a pizza, I let loose with a string of words that would make a sailor proud (and that no amount of Life Buoy could make clean) when holes form and the dough stubbornly refuses to stretch into the shape I want it to. 


However, on a recent episode of The Splendid Table podcast, J. Kenji Lopez-Alt, managing culinary director of Serious Eats, described a method for making pizza in a cast iron skillet. I heard this recipe while walking the dogs in the afternoon, and since I happened to have some pizza dough in the fridge, I immediately set to making a cast iron skillet pizza for dinner later that night. 


This is just the technique I was looking for -- no more pizza dough drama, as you just pat the dough into the bottom of the skillet, and voila, it's ready to be topped. The crust cooks up nice and thick and golden brown; if you find the bottom hasn't been cooked crisp enough, after taking the pizza out of the oven, you can cook the pizza in the skillet over the stovetop for a few minutes to achieve the crispness you desire. Like any pizza, the flavor combinations are endless. Though I am partial to a margherita with tomato and basil, for this pizza I went a little more savory with sliced mushrooms and black olives. And cheese. Never forget to use lots of cheese. (Because pizza is really just an excuse to eat a whole lotta cheese, right? That's why I tend to top my pizzas with a ton of vegetables, so I don't feel quite as bad about the massive cheese intake.)  


Cast Iron Skillet Pizza with Mushrooms and Black Olives (printer-friendly version)
makes one 10-inch round pizza

For the crust: 
1 1/2 cups unbleached all-purpose flour
1/4 teaspoon active dry yeast
3/4 teaspoons coarse sea salt
3/4 cup water, plus an additional tablespoon or two if necessary

1. In a large bowl, stir together the flour, yeast, salt, and water. The dough will be pretty shaggy and sticky; if it seems too dry, add in a bit more water. Cover the bowl with plastic wrap and set in a warm place and let the dough rise for six hours, or until doubled in size. The dough can be refrigerated up to three days before using.

To make the pizza:
1/4 cup pizza sauce
1 cup aged mozzarella, shredded (sold in bricks, not balls)
2 cups sliced mushrooms, sauteed
1/4 cup sliced black olives
1-2 tablespoons finely grated Parmesan

1. Preheat the oven to 550 degrees.
2. Add about 1 tablespoon olive oil to the cast iron skillet and swirl or brush to coat the sides and bottom of the skillet.
3. Press the prepared pizza dough into the skillet, completely covering the bottom.
4. Spread 1/4 cup of the pizza sauce over the pizza dough.
5. Top with about 1 cup of shredded mozzarella cheese, 2 cups sauteed mushrooms, and 1/4 cup sliced black olives.
6. Bake in the oven for 10-15 minutes, or until the cheese is bubbly and the crust is golden brown. Remove from the oven and grate 1-2 tablespoons of Parmesan cheese over top the pizza. Let cool for a few minutes before slicing and serving.
SHARE:
© A Less Processed Life. All rights reserved.
BLOGGER TEMPLATE MADE BY pipdig