What's Baking: Chewy Chocolate Chip Cookies


I keep meaning to make healthier recipes, but then I wake up in the morning and find out it's -15 degrees out (yet again), and all I want is a plate of warm chocolatey carbs. The best I can do at this point is to at least halve the cookie recipe I make so that my waistline stands half a chance of making it through the winter unscathed. (Although, let's face it, given the cold temps of late, I'm glad I have that extra layer of fat to keep me warm...)

But, let's switch the focus to the cookies and not my current body measurements, shall we? These cookies are perfectly chewy and get a nice little flavor enhancement from the addition of a bit of flaky sea salt after coming out of the oven. Now, if I could only keep myself from eating the whole batch in one sitting. (Who am I kidding; even the cookie dough doesn't stand a chance...)

Chewy Chocolate Chip Cookies (printer-friendly version)
makes 1 1/2 dozen cookies (if you don't eat a ton of cookie dough...)

1 cup + 2 tablespoons unbleached all-purpose flour
1/4 teaspoon baking soda
1/2 teaspoon kosher salt
1/2 cup (1 stick) unsalted butter, room temperature
1/4 cup granulated sugar
1/2 cup packed brown sugar
1 large egg
1 teaspoon pure vanilla extract
1 cup (about 6 ounces) semisweet chocolate chips
flaky sea salt

1. Preheat the oven to 350 degrees.
2. In a small bowl, sift together the flour, baking soda, and salt. Set aside.
3. Using an electric mixer, cream together the butter and sugars until they are light and fluffy. Beat in the egg. Add the vanilla extract and stir to combine.
4. Add the dry ingredients in small portions to the wet ingredients. Stir to combine between additions.
5. Stir in the chocolate chips by hand.
6. Use a spoon or small scoop to drop cookie dough in rounded portions onto a nonstick baking sheet. Set each cookie about two inches apart.
7. Bake for 9-13 minutes, or until cookies have set on top and are slightly browned around the edges.
8. Remove the cookies from baking sheet, garnish with a sprinkle of flaky sea salt, and place on wire rack to cool.

(adapted from this Martha Stewart recipe)
SHARE:

What's Baking: Baked Buttermilk Chocolate Donuts


When I was little, my favorite part of a donut was the icing and sprinkles. In fact, after ordering a donut (the most chocolatey and sprinkle-covered, of course), I would often lick off all the icing and sprinkles, and leave the rest of the donut behind. Terrible, I know. I have long since amended my ways and now enjoy eating the whole donut -- though I still go for the most chocolatey and sprinkle-covered ones. 


I recently came across Joy's recipe for double chocolate donuts and made sure to bookmark the recipe immediately. As its name suggests, this donut is full of chocolate flavor and gets an extra boost from a rich chocolate icing. I tend to make small batches of donuts, as I really don't need a dozen sitting around the house, but this recipe is easily doubled or tripled if you'd like to make more. 


Baked Buttermilk Chocolate Donuts (printer-friendly version)
makes six donuts

For the donuts:
1 cup unbleached all-purpose flour
1/4 cup unsweetened cocoa powder
1/2 teaspoon baking soda
1/4 teaspoon fine sea salt
1/2 cup light brown sugar, packed
1/2 cup low-fat buttermilk
1 large egg
2 tablespoons unsalted butter, melted and browned
2 tablespoons nonfat Greek yogurt
1 tablespoon brewed coffee, cooled
1 teaspoon pure vanilla extract

For the chocolate glaze:
1 1/4 cup powdered sugar, sifted
3 tablespoons unsweetened cocoa powder, sifted
pinch of salt
3 to 4 tablespoons organic skim milk
2 teaspoons pure vanilla extract
colored sprinkles

1. Preheat the oven to 325 degrees. Spray a donut pan with cooking spray and set aside.
2. Whisk together the dry ingredients.
3. In a separate bowl, stir together the buttermilk, egg, browned butter, yogurt, coffee, and vanilla extract. Stir the wet ingredients into the dry ingredients until evenly combined.
4. Carefully spoon the donut batter into the prepared baking pan. Fill each cavity about 3/4 full.
5. Bake for 9-12 minutes, or until the donuts just spring back when touched.
6. Allow the donuts to cool in the pan for five minutes. Then remove the donuts from the pan and let cool completely.
7. While the donuts are cooling, make the glaze: In a medium bowl, whisk together the powdered sugar, cocoa powder, salt, milk, and vanilla extract. Continue stirring until the mixture is smooth.
8. Use the glaze immediately to coat the top of each donut. Decorate with sprinkles.
9. Donuts are best eaten immediately or within a couple of days.

(adapted from this Joy the Baker recipe)
SHARE:

What's On the Side: Twice-Baked Potatoes


Ordering a twice-baked potato is my favorite indulgence when eating at our local supper club. I mean, why get a plain baked potato when you can get one stuffed with cheesy goodness? Last week, D requested a meat-and-potatoes dinner for his birthday, and he specifically asked for twice-baked potatoes on the side. Of course I couldn't say no! These twice-baked potatoes are full of buttery and cheesy flavor. Sauteing the green onions in the butter helps to lend them a slightly caramelized flavor, and thus lessens the "bite" that raw onions sometimes have. If you're feeling extra-indulgent, I'd recommend adding a bit of chopped crispy cooked bacon to the potatoes; we'd eaten bacon with our breakfast that day, so I figured we'd already met our bacon allowance for the day.

Twice-Baked Potatoes (printer-friendly version)
makes 4 servings

olive oil
fine sea salt
freshly ground black pepper
4 medium russet potatoes, scrubbed and dried
4 green onions, chopped
4 tablespoons unsalted butter
1/2 teaspoon fine sea salt
3 tablespoons plain non-fat Greek yogurt
1/2 cup grated cheddar cheese, plus more for topping the potatoes
2-3 tablespoons chopped fresh chives

1. Preheat the oven to 400 degrees.
2. Poke the potatoes all over with a fork. Rub the potatoes with olive oil, then sprinkle generously with salt and pepper. Place on a baking sheet and bake in the oven for one hour, or until a toothpick inserted into the potatoes comes out easily. Remove from the oven and let cool for at least 15 minutes.
3. Once cool enough to handle, carefully slice the top quarter off each potato. Use a fork to spoon the potato flesh into a bowl (leave about a 1/4-inch of flesh remaining around the edges of the skin so that the potatoes don't collapse). Don't forget to spoon the flesh from the cut-off tops, and then discard the skins.
4. Melt the butter in a small sauce pot over medium-high heat. Once the butter has melted, add in the chopped green onions and saute until lightly browned. Remove from the heat and carefully pour into the bowl with the potatoes. Stir to combine. Stir in the sea salt, yogurt, and cheese.
5. Spoon the mashed potatoes back into the potatoes, completely filling the potato shells. Once they are filled, mound any remaining mashed potatoes on top. Sprinkle each potato with extra cheddar cheese (about 2-3 tablespoons per potato).
6. Bake in the oven for 15 minutes, or until the cheese has completely melted. Garnish with chopped chives and serve.

(adapted from this No Recipes recipe; check out the post for great step-by-step photos)
SHARE:

What's Baking: Pineapple Upside-Down Cake


It was D's birthday earlier this week, and he requested a pineapple upside down cake for his special day. I searched through a variety of recipes before settling on one from Smitten Kitchen. Since Deb's recipes never let me down, I felt pretty confidant that this cake recipe would be no different from the rest. I have to admit I was kind of hoping to find some fresh pineapple rings in the produce section of one of our grocery stores, but to no avail. I knew that canned pineapple would just not do, so for the first time in my life, I bought a whole pineapple. (Wild and crazy, I know!)


So, step one of baking my cake was searching YouTube for videos instructing how to slice a whole pineapple into rings, since I don't have one of those fancy pineapple coring/slicing tools. The process was actually fairly simple -- cut off the top and bottom of the pineapple, then carefully slice off the eyes. Then cut the pineapple into circles, and either use an apple corer, a (very) small round cookie cutter, or a knife, to cut the core out of each circle to form a ring.


Prepping the pineapple was the most difficult part of making this cake. (And really, cutting the pineapple wasn't really hard at all.) After that, it was just a matter of making a caramel, then making the cake batter. D requested the cake have maraschino cherries, but since only one whole pineapple ring fit on my cake, I just used one in the center pineapple ring. 


Perhaps the most nerve-wracking part of making this cake was flipping it out of the pan at the end. I was quite nervous that it would stick and my hopes for a perfect birthday cake would be ruined. (Let's just say that I have a history of birthday-cake disasters; back in our Laramie days I attempted to make D a carrot cake for his birthday; it ended up a mushy partially-baked mess -- baking at high-altitude is not easy!) Happily, the pineapple upside-down cake slid right out of the skillet without incident. 

Even more importantly, the cake turned out fabulously -- and D thoroughly enjoyed his special homemade birthday cake.  

Pineapple Upside-Down Cake (printer-friendly version)
makes one 10-inch cake 

For the topping:
6 tablespoons unsalted butter
3/4 cup packed light brown sugar
1/2 medium pineapple, peeled, sliced into 3/8-inch circles, and cored to make rings
1 (or more) maraschino cherries, optional

For the cake batter:
1 1/2 cups unbleached all-purpose flour
2 teaspoons aluminum-free baking powder
1/4 teaspoon fine sea salt
6 tablespoons unsalted butter, softened
1 cup granulated sugar
2 large eggs
1 teaspoon vanilla
1 tablespoon dark spiced rum
1/2 cup unsweetened pineapple juice
1/2 - 1 tablespoon dark spiced rum for sprinkling over cake

1. Preheat the oven to 350 degrees.
2. Melt the butter in a well-seasoned 10-inch cast iron skillet. Add the brown sugar, and, while stirring constantly, simmer over medium-heat until slightly darkened and bubbly, 4 minutes. Remove from the heat.
3. Place a pineapple ring in the center of the skillet, then add halved pineapple rings around the center pineapple ring (arch-side facing out, see photo). If desired, add quartered pineapple pieces around the edges of the skillet (again, see photos). Place a maraschino cherry in the middle of the central pineapple ring, if using.
4. Sift together the flour, baking powder, and sea salt in a medium bowl. Set aside.
5. Using an electric mixer, cream the butter until light and fluffy. Gradually add in the granulated sugar. Beat in the eggs one at a time, then beat in the vanilla and spiced rum.
6. Add half of the flour mixture to the mixer and stir on slow speed to combine. Stir in the pineapple juice. Then beat in the rest of the flour mixture.
7. Spoon the batter evenly over top the pineapple pieces in the skillet. Bake the cake in the oven for 40-45 minutes, or until a toothpick inserted into the center of the cake comes out clean. Let cool in the skillet for 5 minutes.
8. Place a plate over top the skillet, then carefully flip the skillet over, inverting the cake onto the plate. Place any pineapple pieces that stuck to the skillet back onto the cake if necessary. Sprinkle the cake with 1/2 to 1 tablespoon of rum, then let cool on the plate set on a wire rack until ready to serve.
9. Serve warm or at room temperature. Any leftover cake can be refrigerated for up to 3 days.

(adapted from this Smitten Kitchen recipe)
SHARE:

What's For Dinner: Lasagna Soup


I am a total sucker for soups that include pasta in them. (I'm looking at you, tortellini soup.) So when I happened across a recipe for lasagna soup, I knew that sooner or later, it would make its debut on my stovetop. A snowstorm on Monday proved to be the perfect time to try out this recipe. This soup does not disappoint -- it is hearty, full of flavor, and completely satisfying.  My favorite part is the dollop of ricotta cheese that's added at the end; it really does help to make this soup taste just like lasagna. One tip: make sure you have some crusty bread on hand to serve on the side -- you'll definitely want to sop up every last bit.


Lasagna Soup (printer-friendly version)
makes 6-8 servings

4-5 lasagna noodle sheets
2 tablespoons olive oil, divided
4 (0.5 - 0.75 pounds) Italian sausages (if skinless, chop into small pieces; if not skinless, remove from casing and crumble with the end of a wooden spoon while cooking)
1 white onion, diced
3 garlic cloves, minced
2 carrots, peeled and diced
2 celery stalks, diced
2 teaspoons salt
2 teaspoons freshly cracked black pepper
2 tablespoons tomato paste
1 (15 ounce) can fire-roasted crushed tomatoes
4 cups low-sodium vegetable stock
2 cups filtered water
2 dried bay leaves
2 small handfuls baby spinach leaves
1/4b cup parmesan cheese, plus more for sprinkling
2 tablespoons fresh basil, chopped
1 tablespoon ricotta cheese per serving

1. Bring a large pot of salted water to a boil. Cook the lasagna noodles 1-2 minutes short of the manufacturer's instructions. (The lasagna noodles will fully cook once added to the soup at the end.) Drain the noodles and place on a baking sheet. Drizzle the noodles olive oil to prevent them from drying out, then cut each noodle in half lengthwise (leaving a curled side on each noodle), then cut into  2-3" segments. Set aside.
2. Heat 1 tablespoon of olive oil in a large heavy-bottom stock pot over medium-high heat. Add the Italian sausage and cook until browned (or heated through if already fully cooked). Place the cooked sausage in a small bowl and set aside.
3. Add the remaining tablespoon of oil to the stock pot. Add in the onion and saute until softened and golden, 3-5 minutes. Add in the garlic and saute until fragrant, about 30 seconds. Stir in the carrots, celery, and mushrooms. Sprinkle with salt and pepper. Cook until softened, 5-7 minutes.
4. Stir in the tomato paste and cook until slightly darkened, about 2 minutes. Stir in the cooked sausage, crushed tomatoes, vegetable stock, and filtered water. Add in 2 bay leaves. Cover the pot and bring to a simmer. Once the soup begins to simmer, remove the cover and reduce the heat to low. Continue simmering for 10-20 minutes, or until slightly thickened.
5. Stir in the cooked lasagna noodles, baby spinach leaves, and Parmesan and simmer for 3 minutes. Season with additional salt and pepper if necessary.
6. Spoon the soup into individual bowls. Garnish with chopped basil, ricotta cheese, and additional Parmesan before serving.

(adapted from this recipe from The Candid Appetite, which was adapted from a recipe in Food Network Magazine)
SHARE:

What's For Dinner: Soba Noodle Bowls


I came across a recipe for soba noodle bowls in a recent issue of Oprah magazine. The bowls looked good, but I thought adding in some mushrooms for a bit of umami (savory flavor) and tofu cubes would make them even better. This colorful noodle dish gets its bright hues from a generous combination of edamame, purple cabbage, and carrots. The original recipe calls for thinly sliced cabbage and julienned carrots; I went the easy (dare I say lazy?) route by purchasing a package of broccoli slaw. I'm sure I paid a premium to buy the pre-sliced veggies, but I'll admit sometimes convenience trumps all. The sweet-and-sour dressing is full of flavor and adds just the right amount of zest and spice to the dish. I have a tendency to go light when it comes to adding dressing; add as much or as little as you like to the dish; you really can't go wrong.

Soba Noodle Bowls (printer-friendly version)
makes 4 servings

8 ounces soba noodles (if you are gluten-free, be sure the soba noodles are made with 100% buckwheat; many brands include wheat flour)
1 clove of garlic, minced
3 tablespoons toasted sesame oil
2 1/2 tablespoons low-sodium soy sauce
2 tablespoons rice wine vinegar
2 teaspoons honey
2 teaspoons Sriracha chili sauce
zest and juice of 1 lime
1 package extra-firm tofu, drained, and cut into 1" cubes
2 cups roughly chopped mushrooms (I used baby bellas)
4 cups broccoli slaw (a packaged mix of julienned broccoli, cabbage, and carrots)
1 small bunch (4-6) green onions, chopped, whites and greens separated
2 cups cooked shelled edamame
1/2 cup chopped fresh cilantro
2 tablespoons black sesame seeds
salt and pepper, to taste

1. For the noodles: bring a large pot of water to a boil. Add the noodles and cook according to the manufacturer's instructions. Once cooked, drain, rinse with cold water, and set aside.
2. For the dressing: in a medium mason jar, add together the minced garlic, toasted sesame oil, soy sauce, rice wine vinegar, honey, Sriracha, lime zest, and lime juice. Place the lid on the jar and shake until combined. Season to taste with pepper. Set aside.
3. For the tofu: heat a large saute pan over medium-high heat. Add in about half the tofu cubes. Brown on each side (about one minute per side) then set aside in a bowl. Repeat with the remaining cubes.
4. Add a few teaspoons of toasted sesame oil to the heated saute pan. Add in the mushrooms and saute over medium-high heat until softened and browned. Reduce the heat to medium-low and add in the broccoli slaw and white parts of the green onions. Saute until slightly softened. Add the tofu cubes back to the pan and cook until just re-warmed.
5. In a large bowl, combine the cooked noodles, sauteed mushrooms, broccoli slaw, green onions (including the green parts), tofu cubes, cooked edamame, and cilantro. Add the dressing and toss to combine. Season to taste with salt and pepper. Garnish with black sesame seeds before serving.

(adapted from this recipe from Oprah magazine)
SHARE:

What's Baking: Baked Strawberry Donuts


It's Valentine's Day! Or as I like to call it, "How many conversation hearts can I eat in one sitting?" Day. But, before putting myself into a Valentine's-candy induced sugar coma later today, I thought I'd start the morning by baking up a batch of strawberry donuts. I love the sweet flavor the strawberries lend to the donuts and a bit of strawberry puree in the glaze gives it a lovely pink hue. Topped with festive sprinkles, these baked donuts make an excellent -- and not terribly bad for you -- holiday treat.


Baked Strawberry Donuts (printer-friendly version)
makes six donuts

For the donuts:
1/2 cup unbleached all-purpose flour
1/2 cup whole wheat pastry flour
1/3 cup granulated sugar
1 teaspoon baking powder
1/4 teaspoon kosher salt
1/4 cup finely chopped strawberries (about 3 medium-large strawberries)
2 tablespoons nonfat plain Greek yogurt
1/4 cup low-fat buttermilk
1 egg
3 tablespoons canola or vegetable oil
1/2 teaspoon vanilla extract

For the strawberry glaze:
1 cup powdered sugar, sifted
2 tablespoons pureed strawberries (about 3-4 medium strawberries), strained to remove most seeds
2-3 tablespoons skim milk
1/2 teaspoon vanilla extract

1. Preheat the oven to 350 degrees. Spray a donut pan with cooking spray and set aside.
2. Whisk together the dry ingredients.
3. Add in the chopped strawberries, yogurt, buttermilk, egg, oil, and vanilla extract. Stir until smooth.
4. Carefully spoon the donut batter into the prepared baking pan. Fill each cavity about 3/4 full.
5. Bake for 9-12 minutes, or until the donuts just spring back when touched.
6. Allow the donuts to cool in the pan for five minutes. Then remove the donuts from the pan and let cool completely.
7. While the donuts are cooling, make the glaze: In a medium bowl, whisk together the powdered sugar, strawberry puree, milk, and vanilla extract. Continue stirring until the mixture is smooth.
8. Use the glaze immediately to coat the top of each donut.
9. Serve (or deliver to friends) immediately.


SHARE:

What's For Breakfast: Vanilla Chia Seed Pudding


I could have just as easily categorized this as a "What's For Lunch" or "What's For Dessert" post, as it works just as easily for those meals. Heck, vanilla chia seed pudding would even make a nice filling mid-afternoon snack. Truth be told, I've eaten this pudding as lunch for the past two days -- it makes an excellent post-workout meal. (I like to pop out over the lunch hour to catch a class at the local Y --  I currently have a nice four-day-a-week class schedule going this session with a 30-minute boot camp class on Mondays and Wednesdays, a weight-training class on Thursdays, and a spin class on Fridays. I should probably skip over the fact that I have dubbed my class-free Tuesdays as "Muffin Tuesday" as I head out in the early morning for a quick trip to Golden Harvest for some groceries, my favorite "healthy" morning glory muffin, and then get a latte from Crimson Cafe (I'm on a nonfat hazelnut latte kick of late, though -- rather embarrassingly, I must admit -- I miss my nonfat pumpkin spice lattes with a passion.))

But I digress ... I recently picked up Giada De Laurentiis's new cookbook, Giada's Feel-Good Food: My Healthy Recipes and Secrets from the library. Along with Giada's tips for healthy living, the bulk of this book is dedicated to delicious recipes. The first recipe that caught my eye was for chia seed pudding. I am a huge fan of chia seeds -- they are an excellent source of omega-3 fatty acids and fiber -- and typically mix them into my yogurt and granola breakfast bowls. If you plan to eat this pudding for breakfast (which I highly recommend), you should prep the pudding the night before for the best texture. Chia seeds turn a bit gel-like when mixed into a liquid (apparently they can absorb up to 10 times their weight in liquid?!) which makes for a lovely pudding texture with just a teensy bit of crunch.

I can't tell you how excited I was to see a ginormous display of organic strawberries at Golden Harvest the other day; I happily grabbed two pints. (I like to think that the arrival of strawberries is a harbinger of spring; though our just-barely-over 0-degree temperatures of late don't quite jibe with that wish.) After hulling, quartering, and giving them a quick mash, fresh strawberries make an ideal topping for a serving of vanilla chia seed pudding. You can even opt to layer the pudding and strawberries for an even more fruit-filled treat.


Vanilla Chia Seed Pudding (printer-friendly version)
makes 4 servings

1 cup vanilla-flavored unsweetened almond milk
1 cup plain nonfat Greek yogurt
2 tablespoons pure maple syrup
1 teaspoon pure vanilla extract
1/8 teaspoon fine sea salt
1/4 cup chia seeds
1 cup hulled and chopped strawberries, lightly mashed
ground cinnamon
chopped nuts (pecans, almonds, hazelnuts)

1. In a medium bowl, whisk together the almond milk, Greek yogurt, maple syrup, vanilla, and sea salt. Stir in the chia seeds. Let stand for 30 minutes. Stir to redistribute the seeds, then cover the bowl with plastic wrap and chill in the refrigerator over night.
2. Spoon the pudding into 4 small glass jars or bowls. Top with the strawberries. (Alternately, you could alternate layers of pudding and strawberries.) If desired, garnish with chopped nuts and a sprinkle of cinnamon before serving.

(adapted from this Giada De Laurentiis recipe)
SHARE:

What's For Breakfast: Banana Nut Baked Oatmeal


It appears that the banana theme from last week is still running strong over here, but let's just roll with it, shall we? When it comes to weekday breakfasts, I kind of just want to eat whatever is quickest to make -- a bowl of yogurt and granola or a bowl of 5-minute oatmeal easily fits that bill. When it comes to the weekend, I've got a bit more room to breathe, and will often take the time (after sleeping in, of course) to make a batch of hashbrowns, scrambled eggs, and if I'm feeling really wild and crazy, I'll even fry up a batch of bacon on the side.

On Sunday, I decided to give a recipe for baked oatmeal a try. I have had my eye on doing another baked oatmeal for awhile, and was thrilled with Tracy of Shutterbean posted the recipe for banana walnut baked oatmeal, which originates in the book Whole-Grain Mornings. I took a few liberties with the recipe by swapping out the nuts for different varieties (the recipe Tracy used calls for walnuts and sliced almonds), adding in a bit of shredded coconut, and swapping walnut oil for coconut oil.

Let me tell you, this banana nut baked oatmeal is delicious. The bananas get caramelized in the oven, lending a bananas foster-like flavor to the dish. The oatmeal bakes to a soft chew, the nuts add a bit of crunch, and the spices complement this dish's savory-sweet flavor well.

For me, the best part of this baked oatmeal dish is that it makes a lot -- meaning I have a ready-made breakfast for the upcoming workweek. Guess that means I can sneak in a few extra z's before it's time to get my day started. Yay!


Banana Nut Baked Oatmeal (printer-friendly version)
serves 6 to 8

2 cups rolled oats
1/2 cup chopped pecans, toasted and cooled
1 cup chopped hazelnuts, toasted and cooled
1/4 cup unsweetened shredded coconut
3 tablespoons ground flaxseeds
1 teaspoon baking powder
1 1/4 teaspoons ground cinnamon
1/4 teaspoon ground ginger
1/4 teaspoon ground nutmeg
1 teaspoon kosher salt
1 1/2 cups organic skim milk
1/3 cup buttermilk
1/2 cup applesauce (I used a homemade chunkier kind, and it worked well)
1/3 cup pure maple syrup
1 large egg, beaten
1 tablespoon pure vanilla extract
3 ripe bananas, cut into 1/2-inch slices
2-3 teaspoons walnut oil (for drizzling), plus more for greasing the pan

1. Preheat the oven to 350 degrees. Line a baking sheet with parchment paper or a silpat. Add the chopped nuts in an even layer onto the baking sheet. Toast the nuts in the oven for 5 minutes, or until lightly browned. Remove from the oven and let cool.
2. Increase the oven temperature to 375 degrees. Grease the bottom and sides of an 8x8 baking dish with walnut oil. Cover the bottom of the dish with sliced bananas (this should use up two bananas). Set aside.
3. In a large bowl, stir together the oats, cooled nuts, shredded coconut, ground flaxseeds, baking powder, cinnamon, ginger, nutmeg, and salt.
4. In a medium bowl, whisk together the milk, buttermilk, applesauce, maple syrup, egg, and vanilla extract.
5. Pour the wet ingredients into the dry ingredients and fold together quickly with a rubber spatula. Spoon the mixture evenly over the banana slices in the prepped baking dish. Top with the remaining banana slices. Drizzle with walnut oil.
6. Bake in the oven for 40 minutes, or until bubbly and golden brown. Remove from the oven and let cool for 15 minutes.
7. Serve with toppings such as additional cinnamon, brown sugar, dried fruit, or milk. Leftovers can be kept in an airtight container in the refrigerator for up to one week.

(adapted from this Shutterbean recipe, which is adapted from a recipe in Whole-Grain Mornings)
SHARE:

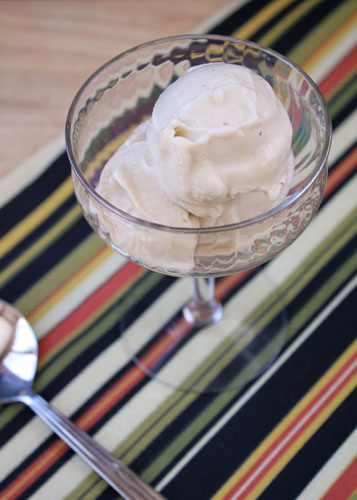
What's For Dessert: Banana Soft Serve


I cannot claim banana soft serve as my own invention (as much of an invention as tossing a frozen banana into a food processor can be) -- but I can vouch for how delicious it is. I have unfortunately trained myself to crave a little something sweet after dinner, and, while I could just simply ignore the craving, I instead have started to look for healthier options than a handful of chocolate chips or a bowlful of vanilla ice cream.


Banana soft serve -- basically, banana "ice cream" satisfies my desire for dessert. And, even better, it's super simple to make. All you need to do is peel and slice up a banana, stick it in the freezer for at least 30 minutes, and then toss it in your food processor. Though you may become a little concerned when the consistency starts to resemble little granules, don't be afraid. Just keep on processing, and soon you'll have a creamy frozen treat on your hands. The initial consistency is equivalent to soft-serve ice cream; if you'd prefer a slightly firmer texture, pop it into a freezer-safe container and let it chill for at least 20 minutes before scooping into serving bowls.

This recipe is endlessly adaptable -- crave a little vanilla flavor? Add in a touch of vanilla extract. Prefer caramel or chocolate? Whir in a tablespoon of caramel or fudge sauce (preferably homemade!). Or, if you're feeling particularly decadent, stir in a spoonful of crumbled sandwich cookies for a little cookies-n-cream action, or a spoonful of peanut butter and some chopped peanuts for a treat Elvis would approve of.


Banana Soft Serve (printer-friendly version)
makes 2 servings

2 bananas
1/2 teaspoon vanilla extract [optional]

1. Peel and then slice the bananas. Place the banana slices on a plate or in a plastic sandwich bag and freeze for at least one hour.
2. Place the frozen banana slices in a food processor with the steel blade attached, or in a blender. Process/blend until the bananas achieve a creamy soft-serve texture. Then add in the vanilla extract (if desired) and blend until combined.
3. Serve immediately or freeze for 20 minutes for a firmer texture.
SHARE:

What's For Dinner: Baby Bella Mushroom Sliders


Though meat is back on my menu these days, when I was a vegetarian, one of my favorite meat substitutes was the humble mushroom. I was never a fan of packaged vegetarian foods that promised to taste just like the real thing as (1) I never really missed the taste of meat and (2) as a vegetarian, I never understood the desire to eat something that tasted like meat. Wasn't the whole point of being a vegetarian that you didn't want to eat animals? (Okay, fine, I suppose some people go vegetarian solely for health reasons, but still...) In addition, meat substitutes, be it a veggie burger or "chik'n" are typically chockfull of artificial ingredients and preservatives. Meh, no thanks.

But, throw a portobello mushroom my way and I'm all about it. Toss it in a marinade, grill it or roast it, and you have all the umami (savory flavor) you need without a bit of meat. I made these baby bella mushroom sliders to share during our game day celebration yesterday and they were a hit. Look for the largest baby bella mushrooms that you can find -- you'll want them to be as big as your slider bun as possible. Feel free to play around with the marinade; I'm a sucker for balsamic vinegar, but there are plenty of other options out there. If you don't have fresh herbs, you can easily sub in dried varieties. This recipe is easily multiplied to make more servings. If you're serving a large group, I think it would be fun to set out a toppings bar so that everyone can dress their slider as they please -- just set out some greens, sliced tomatoes and other veggies, condiments (mayo, ketchup, mustard), a variety of cheeses, avocado slices or guacamole, and any of your other favorite toppings (maybe even a little bacon??) and let your guests go to town.

Baby Bella Mushroom Sliders (printer-friendly version)
makes 4 sliders

2 tablespoons olive oil
3 tablespoons balsamic vinegar
1 teaspoon red wine vinegar
1 teaspoon chopped fresh rosemary
1 teaspoon chopped fresh thyme
1 clove garlic, minced
1/4 teaspoon ground black pepper
1/4 teaspoon fine sea salt
4 baby bella mushrooms, stemmed
4 small smoked provolone rounds (I used a small round cookie cutter to cut circles from a couple slices of cheese)
4 thin tomato slices
4 slider-sized pieces of romaine lettuce or baby spinach
4 pretzel (or other) slider buns

1. In a shallow bowl, add together the olive oil, balsamic vinegar, red wine vinegar, rosemary, thyme, garlic, pepper, and salt. Stir to combine. Add the mushrooms, and carefully toss to coat. Let marinate at room temperature for an hour, or in the fridge for up to 6 hours.
2. Preheat oven to 400. Line a baking sheet with parchment paper or aluminum foil.
3. Drain the mushrooms for 10 minutes on a wire rack placed over a bowl, and then place the mushrooms curved-side down on the lined baking sheet and roast in the oven for 10 minutes.
4. After 10 minutes, remove the mushrooms from the oven. If there is excess liquid in the caps, carefully drain into a bowl (and discard), then flip the mushrooms over and roast for an additional 10 minutes.
5. Remove the roasted mushrooms from the oven. Reduce the oven temperature to 350 degrees.
6. Remove the lining from the baking sheet. Split the buns in half. Set both halves on the baking sheet. Place a roasted mushroom curved-side up on top of each bun bottom. Top with a provolone round. Bake in the oven for about 3 minutes, or until the buns are warmed and the cheese has melted. Remove from the oven, add lettuce and tomato, and top each with the other half of the bun. Serve immediately.

(inspired by this Vegetarian Times recipe)
SHARE:
© A Less Processed Life. All rights reserved.
BLOGGER TEMPLATE MADE BY pipdig