What I'm Wishing You: A Merry Christmas and Happy New Year!


Merry Christmas!

Leroy made out like a bandit with Christmas gifts this year -- the benefit of being an Only Puppy. He has already de-squeakerized one toy, and I'm sure some others don't have long to live. I think the gift he was most excited about was the container of new tennis balls. It doesn't take much to entertain him. 

This morning after opening gifts, we gathered together for a breakfast of waffles and a multitude of toppings -- I contributed Grandma Berg's vanilla sauce to the mix.

Since I am unplugging from work this week (I purposely left my work laptop at home...), I think I'm going to take a holiday break from the blog as well. Best wishes for a happy holiday season and all the best for 2013. 
SHARE:

What I'm Giving: Roasted Rosemary Almonds


I thought I'd start off the week with one more round of roasted nuts. These roasted rosemary almonds  make an excellent snack to munch on during any Christmas Eve present-wrapping marathons. (I'm about to head out for a little last-minute shopping myself...) These roasted nuts are a delicious savory foil to the candied pecans recipe I posted on Saturday. And they are super-simple to make -- they take just about 30 minutes from start to finish.  

Roasted Rosemary Almonds (printer-friendly version)
makes 2 cups

2 cups whole almonds
1 tablespoon extra virgin olive oil
1 tablespoon finely chopped fresh rosemary
1 teaspoon chili powder
3/4 teaspoon kosher salt
fresh ground pepper

1. Preheat an oven to 325 degrees. Cover a rimmed baking sheet with aluminum foil and set aside.
2. In a medium-size bowl, stir together the almonds, olive oil, chopped rosemary, chili powder, salt, and pepper.
3. Place the coated almonds in a single layer onto the prepped baking sheet.
4. Roast in the oven for 20 minutes, or until the almonds are lightly browned. Let cool completely on the baking sheet before packing in an airtight container.

(from this Shutterbean recipe)
SHARE:

What I'm Giving: Bourbon-Vanilla Candied Pecans


I fully intended to post this yesterday to finish out my homemade gift-giving ideas, which should have been easy to do, given it was supposed to be my first day of holiday vacation. Unfortunately, our production schedule at work barrels through the holidays, so instead of sleeping in, lazily making breakfast, and finishing this post, I instead spent 11 hours glued to my laptop and iPad reviewing items. I'll spare you the details -- let's just say that "spotchecking" doesn't go over so well with this not-so-reformed perfectionist. 

But, let's get back more interesting topics and the focus of this post -- bourbon-vanilla candied pecans! I will be the first to admit that these are dangerously, dangerously good. So good, in fact, that I am glad that we are set to give these as gifts to others, as neither D nor I can be trusted around them. 

One of my favorite websites, A Practical Wedding (which I first started reading during the days of my own wedding planning back in 2009, and still read today) recently featured free downloadable favor or gift labels, which I took full advantage of in packaging my candied pecans. You can download the labels here and here (there are two different styles to choose from).

The candied pecans themselves come together pretty quickly. You'll need a candy thermometer to monitor the temperature of the sugar mixture. You can find these at cooking or home goods specialty shops, some grocery stores, and online. (I bought mine from Amazon.)


Bourbon-Vanilla Candied Pecans (printer-friendly version)
makes 3 cups

3 cups pecan halves
1 cup granulated sugar
1/2 cup filtered water
1/2 teaspoon kosher salt
1/2 teaspoon ground cinnamon
1 teaspoon vanilla extract
1 teaspoon bourbon

1. Preheat the oven to 325 degrees.
2. Place the pecans in an oven-safe container and place in the oven to warm.
3. In a large sauce pot, combine together the sugar, water, salt, and cinnamon. On low heat, stir until the sugar has dissolved.
4. Increase the temperature to medium-high and cook (do not stir) until the temperature reaches 236 degrees (use a candy thermometer to monitor the temperature). Depending on your range, this should take between 5 and 20 minutes.
5. Take the sugar mixture off the heat and stir in the vanilla and bourbon. Add in the warmed pecans and stir until evenly coated.
6. Pour the coated pecans onto a parchment- (or silpat-) lined baking sheet. Bake in the oven for 30 minutes, stirring every 10 minutes.
7. Spread the pecans onto a large sheet of parchment paper to cool.
8. Package the candied pecans in an airtight container.

(adapted from this Taste of Home recipe)

SHARE:

What I'm Giving: Basil-Infused Olive Oil


Basil-infused olive oil reminds me of Francesca's, one of my favorite restaurants in Chicago. Francesca's was the place to go for special occasions -- it was where D and I had our first official one-on-one date and where we ate the night we got engaged. Given its nearby neighborhood location (we frequented the Bryn Mawr outpost), it was also where we went to celebrate events or accomplishments with friends and family  --- including three successful completions of the Chicago Marathon (I'm all for pre- and post-race carbo-loading).

Francesca's was the first place I enjoyed dipping freshly-baked bread into basil-infused olive oil, and it remains one of my favorite things. And, it turns out, it's actually quite easy to make infused olive oil at home. All you need is a good quality olive oil and a bunch of fresh herbs. From there you can add other flavors, such as garlic or red pepper flakes.

To give as a gift, simply package your infused olive oil in a pretty glass jar, and tie it with a ribbon. If you're giving it to someone nearby, I'd recommend pairing it with a freshly-baked loaf of bread. In addition to gift-giving during the holidays, this infused olive oil would also make an excellent host/hostess gift.


Basil-Infused Olive Oil (printer-friendly version)
makes about 1 cup

1 cup extra virgin olive oil
1 1/2 cups (2/3 oz package) tightly packed fresh basil leaves, rinsed and dried
1 garlic clove, peeled and smashed

1. Chop the basil leaves finely.
2. Add the olive oil, chopped basil leaves, and smashed garlic clove to a medium sauce pan.
3. Heat over medium-high heat for five minutes, until small bubbles form in the oil.
4. Remove from the heat and let steep for at least one hour.
5. Strain through a fine-mesh sieve into a jar or other container with an airtight lid.
6. Store for up to one month (if it lasts that long!).

(adapted from this Shutterbean recipe)
SHARE:

What I'm Giving: Mulling Spices


Drinking mulled wine makes me think of Paris. Three years ago, D and I spent our Thanksgiving holiday on a quick jaunt to London and Paris. One cold evening, we walked along the Champs-Elysées, which was lit up with dazzling lights and lined by Christmas chalets (booths) selling a variety of goods. I couldn't help but stop at one booth to order a nutella crepe, and not much farther along, we indulged in vin chaud (literally "hot wine," or what we would call "mulled wine"). There's nothing quite like a cup of warm spiced red wine to take off the winter chill.

This year, I thought I'd re-create that moment by making my own mulled wine, and giving pre-made sachets filled with mulling spices as gifts. All of these spices should be easily gathered at your local grocery store. I ordered reusable muslin bags from Amazon. Prior to using the pouches, be sure to wash them (don't use a scented detergent or dryer sheet). Mine needed a bit of an ironing after being washed, too.

Making the mulling spice sachets is simple -- just add all your spices to your bag, and voila! To give as a gift, I'd recommend packaging the mulling spice sachet along with a bottle of red wine. I prefer to use an inexpensive table red, such as Cupcake Red Velvet. Tie the mulling spice pouch and a festive ribbon around the neck of the bottle, pop it in a bag, and boom! -- your gift-giving is done.


Mulling Spices (printer-friendly version)
makes one spice sachet

1 cinnamon stick
8 allspice berries
3 whole cloves
1/2 teaspoon coriander seeds
4 cardamom pods, gently crushed
2 star anise petals
1/2 teaspoon granulated orange peel [optional]

(adapted from this Serious Eats recipe)


Mulled Wine (printer-friendly version)
makes about 3 cups

1 bottle red wine
1 mulling spice sachet
1/4 cup granulated or brown sugar (or maple syrup)
1 tablespoon brandy

1. Bring the wine to a simmer in a saucepot over medium heat.
2. Pour the wine into the bowl of a crockpot. Add the mulling spice sachet. Cover and simmer over low heat for 2 hours.
3. After 2 hours, sweeten with sugar and add the brandy. Simmer for another half-hour before serving.
SHARE:

What I'm Giving: All-Purpose Spice Rub


Okay -- this is an easy one. But I think it still looks pretty impressive all dolled up with a ribbon and a label. This all-purpose rub can be used to spice up beef, pork, poultry, or seafood dishes. Or, if meat's not your thing, you could use it to flavor a plateful of roasted vegetables -- or add a little spiciness to a rice or quinoa dish -- yum!

All-Purpose Spice Rub (printer-friendly version)
makes about 1 1/4 cups

1/4 cup kosher salt
1/4 cup packed light brown sugar
1/4 cup paprika
1 tablespoon ground black pepper
1 tablespoon dried oregano
1/2 tablespoon dried thyme
1/2 tablespoon dried parsley
1 teaspoon onion powder
1 teaspoon garlic powder
1 teaspoon ground mustard
1 teaspoon ground ancho chile pepper [optional]

1. In a small bowl, mix together all of the ingredients, being careful to incorporate the brown sugar evenly into the mixture.
2. Store in an airtight container until ready to use. If stored in a dark spot away from the heat, this seasoning should remain fresh for up to six months.

(adapted from this Martha Stewart recipe)
SHARE:

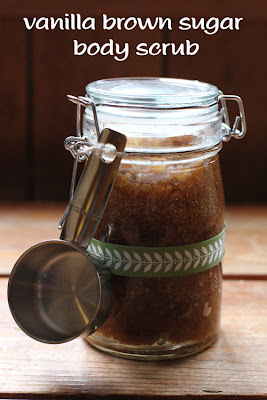
What I'm Giving: Vanilla Brown Sugar Body Scrub


It's one week until Christmas Eve, and I am so not prepared. Leaving my Christmas shopping to the very last minute is not a new thing for me -- in the past I've been a rather successful Christmas Eve power shopper. However, now that my family is spread across the country, waiting to shop until the night, let alone the week, before Christmas doesn't quite work so well given the additional time needed to allow for shipping.

Also, given that these days the nearest large shopping district is much greater than a five-minute walk away, any shopping I do either needs to involve some major strategizing, or it needs to be done online (insert angst about last-minute shipping rates here). : )

Since I can't take advantage of all those last-minute holiday sales, I think I instead need to grab the reins and think outside the box for holiday gifts this year. I thought I'd put together a week of handmade, less-processed gift ideas that can easily be made in the comfort of your own home from easily-obtained materials -- many of which may already be in your kitchen cupboards. Some of these ideas will be food-based while others will not.

I thought I'd start off the week with a not-edible, but rather tasty-smelling vanilla brown sugar body scrub. I love these scrubs -- but I don't love the price and some of the ingredients that can be found in store-bought versions. My body scrub contains the basics -- brown sugar, oil, and vanilla extract -- plus a few additional ingredients (jojoba oil and vitamin E oil) to make your skin super-soft and smell delicious.


Vanilla Brown Sugar Body Scrub (printer-friendly version)
makes enough to fill one 8-oz jar*

1 cup brown sugar
1/4 cup almond oil
1 tablespoon honey
1/2 teaspoon jojoba oil
~10 drops vitamin E oil
1/2 teaspoon pure vanilla extract

1. Add the brown sugar to a small bowl. Mix in the almond oil, honey, jojoba oil, vitamin E oil, and vanilla. Stir to combine.
2. Spoon the mixture into a container with a lid.
3. To give as a gift, wrap the jar with a ribbon and tie on a little scoop.

*Use a shatter-proof container if you intend to keep this in your bath/shower.
SHARE:

The Great Food Blogger Cookie Swap 2012

I had a great time searching for inspiration and baking up three dozen cookies for The Great Food Blogger Cookie Swap -- a million thanks to Lindsay and Taylor of Love & Olive Oil and Julie of The Little Kitchen for making it happen. This year, 576 bloggers from around the globe swapped cookies -- which equates to more than 20,000 cookies exchanging hands! And, over $4,400 was raised for Cookies for Kids' Cancer -- amazing!

On Friday, links were posted to all these delicious cookie recipes. You can find part one here, and part two here. Meanwhile, if you'd like to participate next year (which I highly recommend!), you can sign up to be notified about next year's event here.
SHARE:

What's For Dinner: Slow-Cooker Chicken Tikka Masala


Of all the types of cuisine I miss most now that we live up in the Northwoods, I think the top position goes to Indian food. We were a bit spoiled in Philadelphia, as a great Indian restaurant (literally named "Indian Restaurant") was located less than a block from our apartment. I think we had a feeling that our food choices were going to become quite limited following our change of address, as I'm pretty sure we ordered Indian takeout at least once a week in the month prior to our move to the Upper Midwest.

Now, if we want a little curry and naan for dinner, the nearest Indian restaurant is just a short (ha!) three-hour jaunt south to Madison. Given that a six-hour roundtrip for dinner is not quite the best use of our time and resources, I suppose the second-best option would be to try to make it myself. So, that's what I set to do yesterday when I tried my hand at making chicken tikka masala for dinner.

I've never actually had chicken tikka masala before. We're a little boring in that we nearly almost always just order mattar paneer (peas and cheese) when we eat at an Indian restaurant. According to a quick search on Wikipedia, tikka masala translates to "chunks of roasted meat" (tikka) in a "spicy" (masala) sauce.  All I know is, this is perhaps one of the best dishes I have ever eaten, and I honestly was surprised that it tasted so good. (I've tried making mattar paneer at home, and it has never turned out as well as this recipe did.) Long story short, I highly recommend trying out this recipe. Even if you're lucky enough to live close to an Indian restaurant, you may be surprised (as I was) at how good it can be when you make it yourself in your own kitchen.


Slow-Cooker Chicken Tikka Masala (printer-friendly version)
makes 6-8 servings

For the chicken:
1 tablespoon ground coriander
1 tablespoon ground cumin
1 teaspoon kosher salt
1 pound whole boneless, skinless chicken thighs, cut into 1" cubes
1 cup nonfat plain Greek yogurt
1 whole jalapeno pepper, stem removed, and pepper pierced several times with sharp knife

For the sauce:
2 tablespoons unsalted butter
1 white onion, chopped
6 cloves garlic, minced
1 teaspoon kosher salt
3 tablespoons garam masala
1 2" piece fresh ginger, peeled and grated (a microplane grater is excellent for this)
4 cups fire-roasted crushed tomatoes
1 tablespoon sugar

3 tablespoons organic heavy cream
chopped fresh cilantro, for garnish

1. In a medium bowl, combine together the coriander, cumin, and salt. Add in the cubed chicken and gently toss to coat.
2. Add in the Greek yogurt and stir until the chicken is evenly covered.
3. Place the yogurt-covered chicken in the bottom of a 6-qt slow-cooker bowl. Place the pierced jalapeno on top of the chicken.
4. Melt the butter in a large skillet over medium-high heat. Add the onion, garlic, and salt and saute (stirring constantly) until the onion is softened and lightly golden in color, about three to five minutes.
5. Stir in the garam masala and ginger and cook until fragrant, about one minute.
6. Carefully add in the crushed tomatoes and sugar and stir to combine. Cook until the sauce begins to boil. Then remove from the heat and carefully pour the sauce over the chicken in the slow cooker.
7. Place the lid on the slow-cooker and cook on low for about 5 hours, or until the chicken is tender.
8. After the chicken is tender, stir in the heavy cream, replace the lid, and let cook for an additional 10 minutes.
9. Spoon the chicken tikka masala over jasmine rice; garnish with fresh chopped cilantro. Serve with wedges of warmed naan.

(adapted from this Tasty Kitchen recipe)


SHARE:

What's Baking: Rosemary-Lemon Butter Cookies


Back in mid-October, I saw a tweet about The Great Food Blogger Cookie Swap, and I was immediately intrigued. It took me about two seconds to decide to participate. (Really, they had me at "cookies.") This event, which is in its second year, brings together food bloggers from around the world with one mission -- to swap delicious cookies. This year, the swap also partnered with Cookies for Kids' Cancer to raise money for pediatric cancer research.

Each participant was matched with the names and addresses of three other food bloggers. Our instructions were to send each of our matches a dozen cookies; in return we'd receive a dozen cookies from three different bloggers too. I received delicious espresso chocolate chip shortbread cookies from Sarah of Cooker Girl, honey-basil shortbread and chocolate mocha cookies from Justine at A Half-Baked Life, and peppermint crunch chocolate cookies from Denise at Addicted to Recipes. They were all delicious and I have to admit, none of them lasted very long in our house. I may or may not have had to fight D for the last espresso chocolate chip shortbread cookie.

My three batches of cookies went to Michelle of From Calculus to Cupcakes, Rosalynda of This Mama Can Cook!, and Janet from Simply So Good. I had a tough time deciding what cookies to bake for the swap. The only "rule" was that we were to bake a cookie that we hadn't featured on our blog before. After searching through a pile of recipes, I decided to give a Martha Stewart recipe for rosemary butter cookies a whirl. But of course, I had to add my own little spin to them -- I figured a little bit of lemon flavor would complement the savory taste of rosemary. Also, instead of following Martha's instructions for rolling the dough into a log and cutting circular slices, I chose to roll out the cookies and cut them into small flower shapes. Wild and crazy, I know.

I really liked how these cookies turned out -- they are the perfect complement to a warm cup of tea. I hope that you will give these a try -- they are definitely worth the effort.

Rosemary-Lemon Butter Cookies (printer-friendly version)
makes about 45 cookies (output depends on size of cookie cutter used)

1 cup (2 sticks) unsalted butter, softened
3/4 cup raw sugar
1 large egg
1 teaspoon pure vanilla extract
1 teaspoon fresh lemon juice (feel free to add a bit more if you'd like a stronger lemon flavor)
2 1/2 cups sifted unbleached all-purpose flour
1 tablespoon finely chopped fresh rosemary
3/4 teaspoon kosher salt
1 teaspoon lemon zest
coarse sanding sugar for sprinkling

1. Preheat the oven to 350 degrees.
2. Stir together the flour, rosemary, salt, and lemon zest in a small bowl. Set aside.
3. Use an electric mixer with the paddle attachment to cream together the butter and sugar until light and fluffy, about two minutes. Use a spatula to scrape down the sides of the mixing bowl as needed.
4. Stir in the egg, vanilla, and lemon juice at medium speed.
5. Turn the speed to low and add the flour mixture. Continue stirring until the dough just comes together.
6. Turn the dough out onto a lightly-floured workspace. Pat into a 6" round. Cover with plastic wrap and chill for at least 10 minutes. (Alternately, you can stop at this point, and chill the dough in the fridge for up to three days until ready to bake. Let the dough stand at room temperature for about 10 minutes to slightly soften before rolling it out.)
7. Place the chilled dough on a lightly-floured workspace. Use a rolling pin to roll the dough out into a large circle of about 1/4" thickness. Use a cookie cutter to cut the cookies into your desired shape.
8. Place the cookies on a parchment-lined baking sheet. Sprinkle each cookie with coarse sanding sugar.
9. Bake in the oven for 20-22 minutes. or until the cookies are lightly golden on the edges.
10. Place the cookies on a wire rack to cool. Once cooled, store the cookies in an airtight container at room temperature for up to three days.

(adapted from this Martha Stewart recipe)


SHARE:

What's For Dinner: Slow Cooker Veggie Bean Chili


Another day, another chili recipe. I know, I know. But chilis are just so darn easy to make! And this week I actually had my act together and got the chili started in the morning so that it could cook low and slow all day long -- it was ready just in time for the evening's Packers game. Because, that's how we do it here in Wisconsin!


Slow Cooker Veggie Bean Chili (printer-friendly version)
makes 6-8 servings

1 white onion, chopped
2 cloves garlic, minced
1 15-oz can kidney beans, rinsed and drained
1 25-oz can black beans, rinsed and drained
1 15 oz-can no-salt added diced organic tomatoes
1 small can low-sodium vegetable juice
1/2 cup salsa
2 teaspoons ground cumin
1 teaspoon ground ancho chile powder
1/2 teaspoon dried oregano
1 tablespoon cocoa powder

1. Add the chopped onion and minced garlic into the 4-qt bowl of a slow cooker.
2. Stir in the rinsed beans.
3. Pour in the diced tomatoes (including the juices), vegetable juice, and salsa.
4. Season with cumin, ancho chile powder, oregano, and cocoa powder.
5. Place the cover onto the bowl and cook on low for 6-8 hours.
6. Serve with toppings such as crackers, shredded cheese, Greek yogurt, or freshly chopped chives.
SHARE:

Made From Scratch: Hokey Pokey Candy


One of the candy bars that my friend brought back for me from New Zealand was a Whittaker's Hokey Pokey Milk Chocolate bar. It was among my favorites, and I immediately had the idea of making a chocolate chip hokey pokey cookie. I gave the cookies a whirl this past weekend, and let's just say, I have some more work to do -- shockingly (ha!), the bits of sugar don't bake quite so well. Luckily, the hokey pokey is enjoyable just as it is. But I'm still going to make that cookie idea work!

You might be wondering what exactly hokey pokey is. It is a toffee-like candy with a spongy texture. Depending on where you live, you may be familiar with it as honeycomb, puff candy, sponge candy, sea foam, or fairy food. Traditionally, hokey pokey is made with golden syrup (which is made from cane sugar). I bought golden syrup at World Market during a recent trip to Madison; you may be able to also find it at well-stocked grocery stores or you can order it online. Otherwise, you could substitute in dark corn syrup.

Hokey Pokey (printer-friendly version)
makes about 2 cups

1/2 cup granulated sugar
4 tablespoons golden syrup (alternately, you can use dark corn syrup)
1 1/2 teaspoons aluminum-free baking soda (the fresher, the better)

1. Place a large rectangle of parchment paper (just over 16" in length) on your countertop.
2. Stir together the granulated sugar and golden syrup in a small sauce pot.
3. Heat the contents over medium-high heat. Carefully swirl the pot over the burner to ensure even heating. Do not stir the sugar mixture.
4. The contents of the pot will first melt, then turn into a bubbling mass. When the contents turn the color of maple syrup (amber brown) after about three minutes, remove the pot from the heat and immediately whisk in the baking powder.
5. Carefully pour the contents of the pot onto the prepared sheet of parchment paper. Let the hokey pokey cool (about 30-45 minutes).
6. Bash at the candy with a rolling pin or other hard object to break it into shards. Store in an airtight container.

(adapted from this Nigella Lawson recipe)
SHARE:

What I'm Gathering: Holiday Party Cocktail Ideas


Since the holiday party season is upon us, I thought I'd do a round-up of holiday cocktail ideas. Two year ago, D and I took the trip of a lifetime (though I totally would go back in a heartbeat!) to Nepal, and during our three-week absence, I posted a number of different cocktail recipes on the blog. So, here they all are in one fell swoop. Please forgive some (okay, many) of the poor-quality photos. I'd like to think my blog photography is better these days -- though I have to admit I definitely rely on Instagram way more often than I should. 

What is your favorite cocktail (or non-alcoholic festive beverage) to drink during the holiday season?
SHARE:

Made From Scratch: Bourbon-Vanilla Caramel Sauce


I made a batch of caramel sauce last summer, and this time I thought I'd take it up a notch by adding in some bourbon and a pinch of salt. This caramel sauce would make an excellent present -- all you need to do is tie a ribbon around the jar and you've got a homemade gift ready to be given. (Or, bring a gallon of vanilla ice cream along with the caramel sauce to a holiday party, and you've got an instant-sundae bar!)

Bourbon-Vanilla Caramel Sauce (printer-friendly version)
makes about 2 cups (enough to fill three 8-oz jars)

2 cups raw sugar
1/2 cup filtered water
1 cup organic heavy cream
1 vanilla bean, split in half lengthwise, beans scraped out and reserved
2 teaspoons freshly squeezed lemon juice
2 tablespoons unsalted butter
2 tablespoons bourbon
pinch sea salt

1. Add the sugar and water to a 2-quart sauce pot. Cook until the mixture is dark amber in color, gently swirling the pot (do not stir) over the burner. This process should take about 20 minutes.
2. Reduce the heat to low. While stirring vigorously, slowly add in the heavy cream. Then add in the vanilla beans, vanilla bean pod, lemon juice, butter, and bourbon. Stir to combine. Add in a pinch of sea salt.
3. Pour the sauce through a fine-mesh sieve into (cleaned and dried) jars. The caramel sauce will keep, refrigerated, for up to one week. Reheat before using.

(adapted from this Martha Stewart recipe)
SHARE:

What's For Dinner: Mushroom Soup


I saw a recipe for mushroom soup on Pinterest last week, and I couldn't wait to try it out. I've been on a soup-making kick of late, and this recipe doesn't disappoint. The worst part (for me, anyway) is the amount of time necessary to chop all the garlic and mushrooms. But once that's done, the rest of the soup comes together rather quickly. Please pardon the less-than-stellar image of this soup; the downside of blogging on the fly is that I often don't complete these recipes until way after the sun has set -- and now that the sun is setting not long after 4 o'clock, I'm left with zero natural light for photography. If I get the chance tomorrow, I'll try to give this soup a chance to be a bit more photogenic.

Mushroom Soup (printer-friendly version)
makes four servings

1 tablespoon extra virgin olive oil
1 tablespoon unsalted butter
6 cloves garlic, minced
4 cups fresh mushrooms, cleaned and chopped [I used 2 cups of white mushrooms and 2 cups of cremini mushrooms]
2 teaspoons dried thyme
2 bay leaves
2 teaspoons sherry vinegar
2 cups organic chicken stock [to make this recipe vegetarian, simply substitute veggie broth]
3 tablespoons flour dissolved in 3 tablespoons filtered water
fine sea salt (to taste)
dash of nutmeg
freshly ground black pepper to taste
1 cup organic half-and-half
1 cup organic skim milk
sprig of fresh thyme for garnish [optional]

1. Add the olive oil and butter to the bottom of a medium-sized stockpot. Heat over medium to medium-high heat.
2. Once the butter has melted, add the garlic and saute until fragrant, about 30 seconds.
3. Add in the chopped mushrooms, dried thyme, bay leaves, and sherry vinegar. Cook, stirring often, until the moisture has been removed from the mushrooms, about 10-15 minutes.
4. Pour in the chicken broth and bring to a boil. Then reduce the heat to medium-low and simmer for 10 minutes.  
5. After 10 minutes, remove the bay leaves, and then stir in the flour-water mixture and continue stirring until the soup thickens. Season to taste with salt, pepper, and nutmeg.
6. Stir in the half-and-half and milk. Bring back to a simmer, then turn off the heat.
7. Serve immediately. Garnish each bowl with a sprig of fresh thyme, if available.

(adapted from this Season with Spice recipe)
SHARE:

What I'm Searching For: Slow-Cooker Recipes


I'm always on the lookout for new dinner ideas -- and I'm pretty sure I've proclaimed my love for my slow cooker on more than one occasion. Tonight I took some time to pin some tasty-looking recipes onto my "Things to Eat" board on Pinterest. (Feel free to follow along.) I'm particularly intrigued by the slow-cooker dessert recipes. Brownies, chocolate cake, or cheesecake made in my slow cooker? Don't mind if I do!
SHARE:

What's For Lunch: Slow Cooker Veggie Chili


The thing I love about chili is that once you know the general ingredients (beans, diced/chopped tomatoes, onion, garlic, cumin), you can pretty much riff off the original as many times as you want. Switch up the beans, add more veggies, add in some chicken or ground beef, change up the spices -- the options are endless.

What I love about making chili in the slow cooker is that, once all the ingredients are combined, my work is pretty much done. Just give it a stir after about 5 hours, and spoon it into some bowls. I like to leave out a few options for toppings -- for my lunch today I just topped my chili with some shredded monterey jack cheese and a few chopped chives. Yum!

Slow Cooker Veggie Chili (printer-friendly version)
makes 6-8 servings

1 white onion, chopped
2 cloves garlic, minced
1 15-oz can kidney beans, rinsed and drained
2 15 oz-cans black beans, rinsed and drained
1 15 oz-can no-salt added diced organic tomatoes
1 cup organic low-sodium vegetable broth
1/2 cup salsa
2 teaspoons ground cumin
1 teaspoon ground ancho chile powder
1/2 teaspoon dried oregano
1 tablespoon cocoa powder

1. Add the chopped onion and minced garlic into the 4-qt bowl of a slow cooker.
2. Stir in the rinsed beans.
3. Pour in the diced tomatoes (including the juices), veggie broth, and salsa.
4. Season with cumin, ancho chile powder, oregano, and cocoa powder.
5. Place the cover onto the bowl and cook on high for 4.5 to 5 hours.
6. Serve with toppings such as crackers, shredded cheese, Greek yogurt, or freshly chopped chives.
SHARE:
© A Less Processed Life. All rights reserved.
BLOGGER TEMPLATE MADE BY pipdig