What's For Dinner: Oven-Baked Chicken Breasts

A simple dinner for a rainy evening -- oven-baked chicken breasts, au naturel aside from the addition of some olive oil, sea salt, and freshly ground black pepper.

Oven-Baked Chicken Breasts (printer-friendly version)
makes 2 servings

2 chicken breasts
olive oil
fine sea salt
freshly ground black pepper

1. Preheat the oven to 375 degrees.
2. Drizzle some olive oil in the bottom of a glass baking dish.
3. Place the chicken breasts in the dish. Drizzle with olive oil and season generously with salt and pepper.
4. Flip the breasts over and season with salt and pepper.
5. Cover the dish with aluminum foil and place in the oven.
6. Wash your hands!
7. Bake for 30-45 minutes, or until a meat thermometer inserted into the thickest part of the meat registers a temperature of 168 degrees.
8. Serve! Our entrees consisted of a bed of brown rice for the chicken and a small green salad on the side.

SHARE:

Snacktime: Sweet-n-Salty

Sometimes simplicity is the way to go -- and that's exactly how my latest snack came about. Inevitably, if I snack on something sweet, soon after I will crave something salty. So this little mix is the best of both worlds. To put together this little bowl of goodness, I just combined together some broken pretzel sticks, raisins, peanuts, raw cashews, and a few dark chocolate and white chocolate chips. Couldn't be easier, and definitely hits both my cravings at once.
SHARE:

What's For Dinner: Roasted Winter Vegetables Served Over Quinoa


One of the perks of working for a publishing company is that I can get trade books for 50 percent off the list price at any time of the year, and once a year I get a certain allotment of money to spend on books. Last year one of the books I opted to get was The Flexitarian Table by Peter Berley. This cookbook features "inspired, flexible meals for vegetarians, meat lovers, and everyone in between" -- kind of the perfect cookbook for our household. Admittedly, aside from paging through the book when it arrived on my doorstep, I haven't really had the chance to delve into the book's content. A few weeks ago I again looked through the book and tagged a couple of recipes that I'd like to try. One such recipe was for roasted winter vegetable salad with red onion vinaigrette. The following meal is inspired by that recipe; I took a few liberties with the ingredients, adding some in and omitting others. Rather than serve it as a side as featured in the cookbook, I instead served it as a main entree over a bed of quinoa.

Roasted Winter Vegetables (printer-friendly version)
makes 4+ servings

2 cups cubed butternut squash
4 medium carrots, peeled, halved and halved again
6 red potatoes, quartered
2 tablespoons olive oil
coarse sea salt
freshly ground black pepper
dried rosemary
1 tablespoon olive oil
1 yellow onion, sliced
1 t fresh thyme leaves
1 1/2 tablespoons organic dijon mustard
1 tablespoon honey
2 tablespoons red wine vinegar

1. Preheat the oven to 400 degrees.
2. Add the cubed butternut squash, quartered red potatoes, and cut carrots into a large bowl.
3. Drizzle the olive oil over the veggies. Season with salt, pepper, and rosemary. Toss to evenly coat all the veggies.
4. Pour the seasoned veggies out onto a rimmed baking sheet.


5. Bake in the oven for 30-45 minutes, or until the veggies are lightly browned and a knife inserted into the veggies comes out easily. Flip the veggies about halfway through the cooking time.
6. While the veggies are roasted, heat a tablespoon of olive oil in a large skillet over medium-high heat.
7. Add the chopped onions and fresh thyme. Saute until the onions are lightly browned and softened, about 2-3 minutes.
8. In a small bowl, stir together the dijon mustard, honey, and red wine vinegar. Pour over the onion-thyme mixture. Stir to combine.
9. Once the veggies are roasted, transfer them into a large bowl. Pour the onion mixture over top and stir to combine.


10. Let the veggies sit together for about 3-4 minutes to let the flavors combine.
11. Serve over a bed of quinoa or brown rice.
SHARE:

What's For Dinner: Baked Cod with Quinoa and a Salad

D is all about adding more protein to our diet, and while I have become more and more uncomfortable with eating farm animals, I haven't quite figured out where I stand when it comes to eating fish. So, for now, they're still on the table (as it were). For tonight's dinner, I threw together a simple baked cod dish, served alongside some quinoa cooked in the rice cooker and a side salad.

makes 2 servings

olive oil cooking spray
2 cod fillets
all-purpose seasoning (or the seasoning of your choice)
lemon, thinly sliced

1. Preheat the oven to 350 degrees.
2. Line a baking sheet with aluminum foil. Lightly spray the foil with cooking spray.
3. Place the filets on the baking sheet. Generously flavor with the seasonings of your choice. I opted to use an all-purpose seasoning we had an hand, along with enough thin slices of lemon to cover each filet.
4. Bake in the oven for 20 minutes, or until the fish is flaky. When fully cooked, a meat thermometer should read 145 degrees.
5. Remove from the oven and serve immediately.
SHARE:

What's Baking: Dark Chocolate Chunk Cookies

D needed a treat to bring in to share at work, and I needed an excuse to get rid of some chocolate chips in the house -- so I decided to whip up a couple batches of chocolate chips cookies. (I may have accidentally consumed some cookie dough in the process, but what can you do?)


Dark Chocolate Chunk Cookies (printer-friendly version)
makes 24 cookies


1/2 cup unsalted organic butter
1/2 cup light brown sugar
1/2 cup granulated sugar
1 whole egg
1 egg white
1/2 teaspoon vanilla
1 1/4 cup oatmeal, ground
1 cup unbleached all-purpose flour
1/4 teaspoon salt
1/2 teaspoon aluminum-free baking powder
1/2 teaspoon baking soda
1 cup dark chocolate chunks

1. Preheat the oven to 375 degrees.
2. Cream together the butter and sugars.
3. Stir in the egg and egg white until completely combined.
4. Stir in the vanilla extract.
5. In a separate bowl, stir together the ground oatmeal (you can ground the oatmeal in a food processor or blender) and flour.
6. Stir in the salt and baking powder.
7. Combine together the wet ingredients and the dry ingredients.
8. Stir in the chocolate chunks.
9. Place generous spoonfuls on a non-stick baking sheet.
10. Bake in the oven for 8-10 minutes, or until lightly browned.
11. Remove from the oven and let cool on a cooling rack.
SHARE:

Philly Takeout: Di Bruno Bros.

When D and I came to town for a weekend last November to find a place to live, we started out our mornings with a fresh pastry and coffee (er, hot chocolate for me) at Di Bruno Bros., a specialty grocery store located just a couple blocks from the hotel we were staying at on Chestnut Street. The other night when I couldn't find any inspiration in the kitchen, we decided to go for a walk and find something for takeout. We ended up at Di Bruno Brothers, and found some great options to take home for dinner.

I picked up a Mediterranean wrap sandwich,
which featured a filling of cabbage, olives, hummus, and feta.

D picked up a chicken caesar salad.

And we also picked up a Swiss cheese vegetable quiche to share.

Once home we heated up the quiche and dug in. I actually made myself a salad on the side with some spinach, strawberries, and Parmesan cheese we had in the fridge, and managed to fill myself up to the point where I saved the wrap sandwich for lunch the next day.

The food was excellent - and a nice change from our standard takeout fare of Qdoba or Jimmy John's. Next time, though, we will definitely have to pick up something for dessert from the pastry case!
SHARE:

Snacktime: Pretzel Sticks and Mustard

When I get the late afternoon munchies, one of my favorite things to grab is some pretzels and something to dip 'em in. Though admittedly one of my favorite dipping combinations is a generous scoop of peanut butter and strawberry jam, a healthier (yet still tasty) dipping option would be a big ol' squirt of dijon mustard. The bite of the mustard pairs well with the saltiness of the pretzels, and the combination usually does the trick to tide me over until dinnertime.
SHARE:

What's On The Side: Roasted Garlic and Bread

I'm not quite sure why I don't make roasted garlic more often, as it is really easy to make, and is a super-delicious spread over a fresh loaf of bread. I served this roasted garlic alongside yesterday's slow-cooker lasagna dish. Molto bene!

Roasted Garlic (printer-friendly version)
1 garlic head
olive oil
aluminum foil

1. Preheat the oven to 400 degrees.
2. Use a sharp knife to chop about 1/2 - 1" off the top of the garlic head, so that all of the clove are exposed.
3. Place the garlic on a large square of aluminum foil and generously douse with olive oil.
4. Wrap the aluminum foil tightly around the garlic head.
5. Roast in the oven for 20-30 minutes, or until the garlic is lightly browned and the cloves are soft.
6. Serve with sliced bread or just eat 'em plain.
SHARE:

What's For Dinner: Slow-Cooker Spinach and Ricotta Lasagna

I saw a few recipes for lasagna made in a crock pot last year, but never got the chance to try it out for myself. But, then the March issue of Real Simple arrived in my mailbox, and what should I see, but a recipe for slow-cooker spinach and ricotta lasagna! Since I already had the lasagna noodles on hand as well as marinara sauce and ricotta cheese, all I needed to pick up from the store over the weekend were two packages of frozen spinach and some shredded mozzarella cheese. If you are not a super fan of spinach, you may just want to use one 10-oz package of spinach, though the recipe calls for both boxes.

The instructions are to cook the lasagna on low for 3 1/2 to 4 hours, but given that I got a late start putting the meal together (due to an unforeseen need to rush out for another jar of marinara sauce when I noticed that the safety button on my unopened jar had popped), I ended up cooking the lasagna on high for about two hours, before turning it back down to low for another hour or so after D called up and told me he was still at work and would be home late. Luckily, none of these factors seemed to noticeably affect the taste of the final result (though some of the layers shifted so that I served up more of a "deconstructed lasagna"), and I would definitely try this recipe again, maybe with a few more veggie additions.

SHARE:

What's For Dessert: Dark Chocolate Peanut Butter Cups

Another chocolate-inspired dessert, since I had a bit of melted dark chocolate left over from making chocolate-covered strawberries. Though I used dark chocolate, I think milk chocolate would actually taste even better. These are definitely a rich (but oh-so-delicious) treat.

Dark Chocolate Peanut Butter Cups (printer-friendly version)
makes 6 cups

1/2 cup dark chocolate chips
2 tablespoons smooth peanut butter
2 tablespoons raw peanuts, chopped
raw peanuts to garnish

1. Melt the dark chocolate using a double boiler.
2. Stir in the peanut butter and chopped peanuts.
3. Spoon the melted chocolate into silicone or paper mini muffin holders.
4. Add a peanut half on top of each cup.
5. Chill in the fridge to set.
SHARE:

What's For Dessert: Chocolate-Covered Strawberries


I decided to make a fun (and ridiculously easy) treat for Valentine's Day. Really, it's a bit of a no-brainer -- melt some chocolate, dip strawberries in it, then chill until set. Simple, but elegant.

Chocolate-Covered Strawberries (printer-friendly version)
makes 8 servings

1/2 cup dark chocolate chips, melted (I used 365 Everyday Value chips, Whole Foods' house brand)
8 organic strawberries, rinsed and dried

1. Line a flat plate with wax paper.
2. Fill a small sauce pot with about 1 inch of water. Bring to a boil.
3. Place a heat-resistant bowl on top of the sauce pot The bottom of the bowl should not hit the water.
4. Place the chocolate chips into the bowl.


5. Stir the chocolate until it is completely melted and smooth.


6. Grab a strawberry by its leaves and dip it into the melted chocolate. Twist to cover completely. Let the excess chocolate drip off. Place on the wax paper-covered plate.
7. Repeat step five until all strawberries have been covered in chocolate.


8. Place the strawberries in the fridge and let cool until chocolate sets.
9. Share with your valentine, or eat 'em yourself. (Note: allowing the chocolate-covered strawberries to chill longer than an hour can cause condensation to form on the chocolate.)
SHARE:

Guilty Pleasure: Green & Black's Organic Milk Chocolate Bar

It's been one of those kind of weeks (deadlines looming left and right!) -- so I think I need to pick up another one of these chocolate bars, stat. Really tasty, very smooth, and an excellent companion to a nice glass of red wine. Hopefully I'll be able to refrain from eating the whole bar at one sitting . . .
SHARE:

What's For Dinner: Easy Lentil-Vegetable Soup


The following soup recipe is loosely based on one I saw on a recent episode of Mad Hungry with Lucinda Scala Quinn. It came together rather quickly and made a nice hearty meal for a cold winter's night.

Easy Lentil-Vegetable Soup (printer-friendly version)
makes 6+ servings


 tablespoon olive oil
1 yellow onion, chopped
2 cloves garlic, minced
4 medium carrots, peeled and chopped
4 stalks celery, rinsed and chopped
1 28-oz can crushed tomatoes
2 cups organic vegetable broth
2 cups water
2 cups lentils
1 bay leaf
fresh thyme leaves (about 1 teaspoon)
freshly ground black pepper

1. Add the olive oil to the bottom of a large stockpot. Heat over medium-high heat.
2. Add in the onion, carrots, celery, and garlic. Saute until softened, about 2-3 minutes.
3. Stir in the crushed tomatoes.
4. Stir in the veggie broth and water. Reduce the heat to low.
5. Stir in the lentils.
6. Add in a bay leaf.
7. Add in the fresh thyme leaves.
8. Season with freshly ground black pepper.
9. Add the lid to the pot and simmer for 30-40 minutes, or until the lentils have softened.
10. Serve with freshly grated Parmesan cheese. (Let cool before diggin' in, it will be hot!!)
SHARE:

What's On the Side: A Big Ol' Salad

OK, so case in point -- I couldn't think of anything creative for dinner last night, so I popped a frozen pizza in the oven. (First, though I had to regulate the oven temperature back down to 400 degrees by leaving the door open for a few minutes, as apparently 300 degrees now equals 500 degrees. Awesome.)

However, alongside my two small slices of pizza, I also had a big ol' green salad with some spinach leaves, spring mix, sliced almonds, dried cranberries, and slivered carrots, all topped with a light (all-natural) honey mustard dressing and some fresh Parmesan cheese shavings. Not only was the salad packed full of nutrient goodness, but it also helped to fill me up and prevent me for going back for more pizza -- win-win for sure.
SHARE:

What's For Breakfast: Convenience

Sometimes I just don't feel like making anything from scratch. There's a definite reason why I don't post every single meal I eat, because, let's face it, after a while you'd catch on (and get a little bored with the fact) that I eat the same thing quite often and also that I eat a bit more frozen pizza than I really should. (Although with frozen pizzas at a whopping $8 at the grocery stores here compared to Laramie's $4 price, that will likely quickly change!)

And while most days a bowl of oatmeal or fancified Greek yogurt sounds good to eat in the morning, sometimes nothing in the fridge or the pantry is enticing when breakfast time rolls around. One of the bonuses in being back in the city is that there are a number of options for grabbing a quick breakfast located just a short walk from home. The last time I was at Whole Foods I took a gander at the bakery case, and a particular muffin caught my eye. And what's located just around the corner from Whole Foods? Why, a Starbucks of course! So, there you have it -- a nonfat raisin-apricot muffin and a grande nonfat chai. Breakfast of champions? Maybe not. But a breakfast of convenience? Absolutely.
SHARE:

What's For Dinner: Super Bowl Chili


The big game goes hand-in-hand with a slow cooker full of chili. To appease D, I chose to make a meaty chili this time around. We picked up some ground sirloin at Whole Foods and luckily already had most of the rest of the ingredients already on hand. The crockpot was cooking away by noon so by game time we were ready to eat. As a nod to my Cincinnati heritage, I added in some cacao powder as one of the seasonings. The result was pretty delish!

Super Bowl Chili (printer-friendly version)
makes 6+ servings

1/2 tablespoon olive oil
1/2 lb lean ground sirloin (preferably grass-fed)
1/2 red onion, chopped
1 yellow onion, chopped
3 cloves garlic, minced
1 15-oz can kidney beans, rinsed and drained
1 15 oz-can pinto beans, rinsed and drained
1 15 oz-can diced tomatoes (preferably no salt added)
1 1/2 cups tomato juice (2 small cans; preferably reduced salt)
1 small can chopped green chiles, rinsed
1 teaspoon ground cumin
1 teaspoon chili powder
1 tablespoon cacao powder

1. Heat the olive oil in a large skillet over medium-high heat.
2. Add the ground beef and cook until browned, about 3-5 minutes.
3. Cover a plate with a paper towel and spoon the cooked ground beef onto the plate. Set aside.
4. Add the chopped onion and minced garlic into the 4-qt bowl of a slow cooker.
5. Stir in the rinsed pinto and kidney beans.
6. Pour in the diced tomatoes (including the juices), tomato juice, and chopped green chiles.
7. Season with cumin, chili powder, and cacao powder.
8. Place the cover onto the bowl and cook on high for 4.5 to 5 hours.
9. Serve with toppings such as oyster crackers, shredded cheese, and Greek yogurt.
10. Eat (and cheer on your team)!
SHARE:

What's For Dinner: Another Roast Vegetable Sandwich

Similar to yesterday's recipe for stuffed shells, there are also endless options when it comes to making a roast vegetable sandwich. The other night D was in charge of dinner, and he opted to make sandwiches. My only request was to add some fire-roasted red peppers that we had in the pantry onto my sandwich. The sandwich above includes my requested red pepper, plus roasted eggplant, zucchini, and portobello mushrooms. The sourdough bread was lightly toasted and spread with some goat cheese. The result? A delicious dinner and a bunch of dirty dishes for me to clean up. Not too shabby!
SHARE:

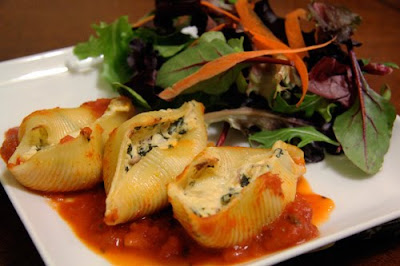
What's For Dinner: Stuffed Shells

I happened to catch an episode of Mad Hungry with Lucinda Scala Quinn (a spin-off from Everyday Food) and was instantly drawn to the following recipe for stuffed shells. Though her recipe features pancetta, I opted to make my shells vegetarian, and also decreased the portions from 8-10 to 4-6. I think this recipe may be one of my new favorites! Plus, the stuffing options are kind of endless, which means I don't have to make the exact same thing every time. I ♥ variety!

Stuffed Shells (printer-friendly version)
makes 4+ servings

1/2 box jumbo pasta shells (about 14-16)
1 tablespoon extra-virgin olive oil
2 garlic cloves, minced
1/2 red onion, chopped
1 cup baby spinach leaves, roughly chopped
1 teaspoon red wine vinegar
coarse salt
freshly ground pepper
1/2 container part-skim ricotta cheese (15 oz)
1 cup fresh mozzarella cheese, cut into small pieces
2 cups pasta sauce
finely grated Parmesan cheese

1. Preheat the oven to 375 degrees.
2. Bring a large pot of water to boil. Season generously with salt.
3. Cook the jumbo pasta shells for ten minutes.
4. Once cooked, drain and rinse with cold water. Place the shells in a bowl and drizzle with olive oil. Set aside.
5. Heat a large skillet over medium-high heat. Add in the olive oil.
6. Saute the red onion until softened and lightly browned, about 3-5 minutes. Add in the garlic and continue to saute 1 minute more.
7. Stir in the chopped spinach and saute until just wilted.
8. Add in the red wine vinegar and stir. Season with salt and pepper.
9. Remove the skillet from the heat and let cool.
10. Stir in the ricotta and mozzarella cheese.
11. Pour enough pasta sauce to cover the bottom into a 2-quart dish to cover the bottom.
12. Place the shells in the pasta sauce.
13. Generously stuff each shell with about 1 tablespoon of the cheese mixture.


14. Cover the dish with aluminum foil and bake in the oven for 45 minutes.
15. Remove the baking dish from the oven and uncover. Increase the oven heat to 425 degrees. Continue baking for another 15 minutes, or until the shells are lightly browned and the cheese is bubbly.


16. Serve the shells with additional heated pasta sauce. Garnish with finely grated Parmesan cheese.

 (adapted from this Mad Hungry with Lucinda Scala Quinn recipe)
SHARE:

What's For Dinner: Mushroom-Black Bean Tortilla Casserole


I was planning to make another round of enchiladas for dinner when I happened to page through the January/February issue of Everyday Food and came across a recipe for mushroom-black bean tortilla casserole. Since I had all of the ingredients on hand, I decided to make this instead. Though the original recipe calls for button or cremini mushrooms, I substituted in some chopped portobello mushrooms instead. I also added in some chopped onion to add in some additional flavor.

Mushroom-Black Bean Tortilla Casserole (printer-friendly version)
makes four servings

1 tablespoon olive oil
1 pkg sliced portobello mushrooms, chopped
1 yellow onion, chopped
2 garlic cloves, minced
1/4 teaspoon cayenne pepper
coarse salt
freshly ground pepper
1 can (15.5 ounces) no-salt-added black beans, rinsed and drained
8 corn tortillas, warmed and halved
2 cups salsa
1 cup shredded mozzarella cheese
small bunch cilantro leaves, rinsed and patted dry
Greek yogurt [optional]
avocado, sliced [optional]

1. Preheat the oven to 400 degrees.
2. Heat the olive oil in a large skillet over medium-high heat.
3. Add in the chopped onions and mushrooms and saute until softened and browned, about 5-7 minutes. Stir constantly.
4. Add in the chopped garlic and cayenne pepper. Stir to combine. Season to taste with salt and pepper.
5. Stir in the black beans and cook until warmed, about 2-3 minutes.
6. Warm the tortillas by placing them on a microwave-safe plate, covering with a moistened paper towel, and nuking in the microwave for about one minute.
7. Put the tortillas in a pile and cut in half.
8. Pour a small amount of salsa in the bottom of a 2-quart casserole dish. Place five tortilla halves along the bottom of the dish. Top with half of the black bean mixture, about 1/2 C salsa, and sprinkle with mozzarella cheese.
9. Repeat the layering with tortilla halves, the rest of the black bean mixture, salsa, and cheese.
10. Complete the layering with the remaining tortilla halves, salsa, and cheese.
11. Cover with aluminum foil and bake for 10 minutes.
12. Remove the foil and cook for another 10 minutes, or until the cheese is bubbling and lightly browned.
13. Top casserole with fresh cilantro leaves and cut into slices to serve.
14. Garnish each serving with Greek yogurt, avocado slices, or other items as desired.

(based on this recipe originally published in the January/February 2011 issue of Everyday Food)
SHARE:

What's For Dinner: Pad Thai with Shredded Chicken


After cooking up some stir fried noodles last week, I was in the mood for some more southeast Asian cuisine. I opted to make up a batch of pad thai, to which we added some shredded chicken to add in some additional protein. This noodle dish always hits the spot for me and usually takes only about 15 minutes to put together.

Pad Thai with Shredded Chicken (printer-friendly version)
makes 4 servings

8 oz wide rice noodles
1 small bunch green onions, chopped into thin slices, green and white parts separated
2 cloves garlic, minced
2 teaspoon sesame oil
2 1/2 tablespoons fresh lime juice (1 1/2 limes)
4 tablespoons tamari sauce
3 tablespoons dark brown sugar
2 eggs, lightly beaten
1/4 cup cilantro leaves, rinsed and patted dry
1/4 cup unsalted peanuts, chopped
1 1/2 cups pre-cooked organic chicken breast, shredded

1. Cook the rice noodles according to the manufacturer's instructions. (I boiled my rice noodles for 15 minutes. Other types may just require soaking in hot water for a certain amount of time.)
2. Whisk together the lime juice, tamari sauce, and brown sugar. Set aside.
2. Add the vegetable oil to a skillet and heat to medium-high.
3. Add the chopped green onions (white parts only) and garlic cloves. Cook, stirring constantly, for 30 seconds.
4. Add the lightly-beaten eggs to the skillet. Use a rubber spatula to agitate the eggs. Cook until just set, about 30-45 seconds.
5. Remove the egg mixture from the skillet and place on a plate.
6. Add the cooked noodles to the skillet. Pour the lime-tamari-brown sugar mixture over the noodles. Use tongs to evenly coat the noodles with the sauce. Cook for 1-2 minutes.
7. Add the egg mixture to the noodles, Use tongs to break up the eggs and evenly distribute the ingredients. Cook for 1-2 minutes longer. Stir in the green parts of the remaining green onions. Add in the pre-cooked shredded chicken.
8. Serve up the noodles on individual plates. Top each portion with cilantro leaves and chopped peanuts. Garnish with a lime wedge.

(adapted from Everyday Food magazine)

SHARE:
© A Less Processed Life. All rights reserved.
BLOGGER TEMPLATE MADE BY pipdig