What's Baking: Lemon Cupcakes with Chocolate Hazelnut Ganache Frosting

I have never made a chocolate ganache icing before, but the first recipe that came to mind when taste-testing the Ghirardelli Luxe milk chocolates was that the hazelnut flavor would make a great icing ingredient. (Let's face it, I was also jonesing for some cupcakes, too.) I managed to find a small batch cupcake recipe (because, um, I really don't need one or two dozen cupcakes laying around the house) and made a few changes to make the recipe my own. I figured the light citrus flavor would meld well with the chocolate ganache icing; turns out I was right!

Lemon Cupcakes (printer-friendly version)
makes six cupcakes

1/3 cup unbleached all-purpose flour
1/3 cup organic pastry flour
1/2 teaspoon aluminum-free baking powder
1/8 teaspoon fine sea salt
5 tablespoons unsalted butter, softened
1/3 cup raw sugar
1 farm egg
2 tablespoons organic heavy cream
2 tablespoons organic skim milk
1/2 teaspoon vanilla extract
1/2 teaspoon lemon zest

1. Preheat the oven to 350 degrees.
2. Add six liners to a cupcake tin. Set aside.
3. In a medium-sized bowl, use a whisk to mix together the flours, baking powder, and salt. Set aside.
4. Stir together the heavy cream, milk, and vanilla extract in a small bowl. Set aside.
5. Cream together the butter and sugar using an electric mixer. Continue mixing until the mixture is light yellow to white in color. Beat in the egg just until combined.
6. Add in the cream mixture and continue mixing until combined.
7. Add in the dry ingredients in small batches, stirring between additions. Gently stir in the lemon zest. Do not overmix.
8. Spoon the batter into the cupcake liners. Pour water into the empty cupcake holders.
9. Bake in the oven for 15-20 minutes, or until a toothpick inserted into the center of a cupcake comes out clean.
10. Cool on a wire rack. Allow to cool completely before icing.

(adapted from this recipe)


Chocolate Hazelnut Ganache
makes enough to frost six cupcakes

3 oz Ghirardelli Luxe Milk Hazelnut bar
1/4 cup + 1 tablespoon organic heavy cream

1. Chop the chocolate bar into small pieces.
2. Bring the heavy cream to a boil over medium-high heat in a small saucepan.
3. Once the cream begins to boil, turn off the heat and stir in the chocolate. Continue stirring until the chocolate is completely melted.
4. Let the ganache cool for at least 15-20 minutes to allow it to thicken up.
5. When the ganache has thickened, spoon it over each cupcake. (To avoid making a big mess, put the cupcakes on a wire rack with a paper towel underneath it.)

SHARE:

Made from Scratch: Bread Crumbs


Plain Bread Crumbs
makes about five cups

9 slices of bread

1. Preheat the oven to 300 degrees.
2. Lay out nine slices of bread on a baking sheet.

3. Bake the bread slices in the oven for 15 minutes; flip each piece halfway through baking. Doing this will dry out the bread slices.
4. Tear the bread slices into small pieces and place in a food processor. (I did two batches, with five pieces of bread in the first batch and four pieces in the second.)


5. Process the bread until coarse bread crumbs form.

6. Repeat the process with the remaining bread slices.
7. Spoon the bread crumbs into a jar and store in the pantry or in the freezer until ready to use.

SHARE:

Tastemaker: Nature's Pride Bread

As part of the Foodbuzz Tastemaker Program, I recently received two loaves of Nature's Pride OvenClassics bread. One loaf was 100 percent whole wheat and the other loaf was oatmeal. According to information provided by Foodbuzz, the OvenClassics 100% Whole Wheat Bread "provides a good source of fiber, 25% less sodium than regular whole wheat bread, 19 grams of whole grains and 5 grams of protein per slice. The OvenClassics oatmeal bread "includes 40% less sodium than regular oatmeal bread, 8 grams of whole grains, and 4 grams of protein per slice."

D and I both gave each loaf of bread a try. To be honest, neither of us were impressed. Though the promotional material touts the bread's "smooth texture," we both agreed that the texture is one of the bread's main downfalls. As is the rather bland taste. For those who prefer a plain-tasting bread, this probably wouldn't be a problem. I much prefer a heartier bread for toast and sandwiches. For example, the bread we have on hand now is full of walnuts, hazelnuts, Brazil nuts, cashews, and almonds.

However, one plus of bland bread is that it makes for excellent bread crumbs. In the next post, I'll show you how to transform half a loaf of bread into bread crumbs perfect for multiple uses.
SHARE:

What's On The Side: Roasted Garlic-Rosemary Fingerling Potatoes

I picked up a bag of organic fingerling potatoes (Purity brand) at the grocery store and decided they'd make an excellent accompaniment to our venison steaks. One bonus of roasting fingerling potatoes in the oven is that, unlike baked potatoes, they don't take that long to cook, and when tossed in a few ingredients beforehand, they come out super-tasty.

Roasted Garlic-Rosemary Fingerling Potatoes (printer-friendly version)
makes 2 servings

12 fingerling potatoes (try to choose ones that are about the same size)
1-2 tablespoons olive oil
2 cloves garlic, minced
1/2 teaspoon dried rosemary
fine sea salt
freshly ground black pepper

1. Preheat the oven to 500 degrees.
2. Wash and dry the fingerling potatoes to remove any dirt.
3. Place the potatoes in a large bowl. Drizzle with olive oil.
4. Add in the minced garlic and rosemary. Season with the sea salt and black pepper.
5. Toss to combine. Make sure the potatoes are evenly coated with the olive oil and seasonings.
6. Gently pour the seasoned fingerling potatoes onto a rimmed baking sheet.
7. Roast in the oven for 15-20 minutes, or until the potatoes are fork tender.
8. Allow to cool for a few minutes, then serve.
SHARE:

What's For Dinner: Venison Steaks

Well, venison and roasted fingerlings, to be specific. Since we're moving at the end of the year, the time is right to start using up everything in the freezer. And one thing we definitely don't want to go to waste is the venison we have in there. I put D to work on cooking up the venison steaks and I cooked up the roasted fingerling potatoes (recipe coming tomorrow). Long story short, it's a fairly simple meal that's full of flavor.

Venison Steaks (printer-friendly version)
makes 2 servings

2 6 oz venison steaks
2 tablespoons olive oil
fine sea salt
freshly ground black pepper

1. Preheat the oven to 350 degrees.
2. Heat the olive oil in a large oven-safe skillet over medium-high heat.
3. Season the steaks liberally with salt and pepper.
4. Sear each side of the steak in the heated skillet for two minutes per side.
5. Place the skillet into the oven and cook for an additional six minutes.
6. Place the steaks on a cutting board and let rest for five minutes.
7. Cut each steak against the grain into slices and serve.
SHARE:

What's Baking: Pumpkin Streusel Bread


With Halloween right around the corner, 'tis the season for pumpkin bread! I followed a new recipe for this bread, which has a pecan streusel topping. The next time I make this recipe, I think I will at least double the streusel amount, as most of the streusel was absorbed by the bread during cooking. Since I had homemade apple butter on hand, I opted to use it as a substitution of the oil called for in the recipe. If you do not have any apple butter (or applesauce) to use as a substitute, you can use vegetable oil.

Pumpkin Streusel Bread (printer-friendly version)

For the topping:
1/4 cup chopped pecans
2 tablespoons brown sugar
1 1/2 tablespoons chilled unsalted butter, cut into small pieces
1/4 teaspoon  ground cinnamon

For the bread:
2 cups unbleached all-purpose flour
1/2 cup raw sugar
1 teaspoon baking soda
1 teaspoon salt
1/2 teaspoon ground cinnamon
1/2 teaspoon ground cloves
1/2 teaspoon ground nutmeg
1 cup canned organic pumpkin
1/2 cup nonfat Greek yogurt
1/2 cup honey
1/4 cup homemade apple butter (or substitute vegetable oil)
2 large eggs
cooking spray

1. Preheat the oven to 350 degrees.
3. In a small bowl, combine the chopped pecans, brown sugar, cinnamon, and butter pieces. Use a pastry blender or fork to form the topping into small crumbles. Set aside.
4. In a large bowl, combine the flour, sugar, baking soda, salt, cinnamon, cloves, and nutmeg. Use a whisk to stir the ingredients together. Make a well in the center of the mixture.
5. In a medium bowl, stir together the pumpkin, yogurt, honey, apple butter (or oil), and eggs.
6. Pour the wet ingredients into the dry ingredients. Stir until just combined.
7. Spray a 9" x 5" bread pan with cooking spray. Spoon the batter into the pan.
8. Carefully spread the streusel topping evenly over the batter.
9. Bake in the oven for 50-60 minutes, or until a toothpick inserted into the center of the bread comes out clean.
10. Remove from the oven and let cool in the bread pan for 10 minutes.
11. Remove the bread from the pan and allow to cool completely on a wire rack.

(adapted from this Cooking Light recipe)
SHARE:

Cocktail Hour: Chocolate Martini


Chocolate Martini
makes one cocktail

2 oz Grey Goose vodka
1 oz creme de cacao
1 oz Bailey's Irish Cream
Ghiardelli Luxe Milk Hazelnut chocolate bar

1. Place a martini glass in the freezer to chill.
2. Add ice cubes to a cocktail shaker.
3. Pour in the vodka, creme de cacao, and Bailey's Irish Cream.
4. Shake, shake, shake!
5. Pour into the chilled martini glass.
6. Finely grate the hazelnut chocolate bar over top (about 1/2 teaspoon) as a garnish.
SHARE:

What's For Dinner: Teriyaki Salmon Burgers

A rash decision in the seafood section of Whole Foods resulted in our purchasing a pack of salmon burgers. My main motivation for the purchase was curiosity -- as I'd never tried a salmon burger before but was intrigued by the idea of it. These pre-made patties had an interesting ingredient list as well, and included salmon (obvs), green onions, soy sauce, sugar, garlic, ginger, sesame oil, onion, breadcrumbs, and white sesame seeds.

I put D in charge of pan-frying the patties since he had previous experience cooking up homemade salmon burger patties. To cook the patties, he first pan fried them in a few tablespoons of olive. He cooked the patties for five minutes on one side, flipped and cooked them for another three minutes, then finished them in a 350-degree oven for another four minutes. We served up the burgers on a bed of baby spinach and arugula along with a side of mac-n-cheese.
SHARE:

Made From Scratch: Peanut Butter

I am a huge fan of natural peanut butter -- though until now, I never attempted to make it on my own. Making peanut butter is actually ridiculously simple. Just whirl the peanuts in a food processor until peanut butter forms, and season to taste. It really is just as simple as that!

Homemade Peanut Butter (printer-friendly version)
makes about 1 cup

2 cups organic unsalted dry roasted peanuts
1/2 teaspoon fine sea salt
1 teaspoon honey

1. Add the peanuts to the bowl of a food processor. Process until peanut butter forms, about 1-2 minutes.
2. Stir in the salt and honey by hand.
3. Season with additional salt (or honey) to taste.
4. Store in a covered container.
SHARE:

Tastemaker: Ghirardelli Luxe Milk Chocolates


As part of the Foodbuzz Tastemaker Program, I occasionally have the chance to opt-in to review products. When the opportunity to try the new Ghirardelli Luxe Milk line of chocolate products popped up in my inbox, I immediately responded with a resounding "yes!"

Recently I received three Ghirardelli chocolate squares to sample -- milk chocolate, hazelnut, and almond. I have to admit that when I am tempted to buy a chocolate bar in the grocery store I typically choose a darker chocolate, and only grab a milk chocolate bar when I have plans for s'mores. However, these milk chocolate squares did not disappoint my tastebuds. The chocolate was velvety smooth and each paired quite well with a glass of malbec. (A guilty pleasure of mine is having a piece of chocolate and a glass of red wine for dessert.) I let D in on the taste test, and I was a little dismayed in the fact that he was faster at eating the chocolate than I was and I only got a small taste of each! We both agreed that the hazelnut version was our favorite.

I currently have some recipe ideas whirling around in my brain -- hopefully this weekend I'll have a chance to put my ideas to play. First, though, I need to find a full Ghirardelli Luxe Milk hazelnut bar! The local Safeway doesn't appear to carry the new line; hopefully I'll have better luck when I stop by Albertson's tomorrow. So -- stay tuned -- I have a feeling the upcoming recipe will be a good one!

SHARE:

Made From Scratch: Applesauce v. 2.0


A few days after I made my first batch of applesauce (and subsequently turned it into apple butter), I decided to make another batch. This time around I used my handy-dandy apple corer/peeler/slicer machine to peel the apples. I saved the peels and pureed them in the food processor, and then added them into the slow cooker bowl along with the apple slices. This time around I just seasoned the apples with some brown sugar and a couple of cinnamon sticks. I let the apples cook on low for about five hours. This recipe makes a nice chunky apple sauce --a great option for the mid-afternoon munchies.

Homemade Applesauce 2.0 (printer-friendly version)
makes about 5 cups

3 lbs organic apples (about 10 small apples), washed, cored, peeled, and sliced
1/2 cup hot water
juice from organic lemon
1 tablespoon brown sugar
2 cinnamon sticks

1. Wash the apples. Core, peel, and slice each apple.
2. Save the peels and puree them in a food processor.
3. Place the diced apples in a 4 qt slow cooker bowl. Add in the pureed peels.
4. Pour in the water and lemon juice.
5. Add in the brown sugar and cinnamon sticks. (Or season to your preference.)
6. Put the lid on the slow cooker and cook on low for 4-6 hours.
7. Remove the cinnamon sticks.
8. Spoon into a jar and store in the fridge.


SHARE:

What's Baking: Peanut Butter Chip Cookies

Another request from D -- peanut butter chip cookies. I used Reese's peanut butter chips in this recipe -- they are kind of way-too-delicious. (The taste like super-miniature peanut butter cups -- yum!) This is basically the same recipe as my chocolate chip cookies, with the peanut butter chips replacing the chocolate chips. Somehow, though, these cookies are even more delish than the chocolate chip version. Long story short, I can't be trusted with them around the house, so it's good that D took a whole bag of them on a recent work trip!

Peanut Butter Chip Cookies (printer-friendly version)
makes 24 cookies

1/2 cup unsalted butter
1/2 cup raw sugar
1/2 cup brown sugar
2 eggs
1/2 teaspoon vanilla extract
1/2 teaspoon baking soda
1/4 teaspoon fine sea salt
1 3/4 cups unbleached all-purpose flour
1 cup peanut butter chips

1. Preheat the oven to 350 degrees.
2. In a small bowl, sift together the flour, baking soda, and salt. Set aside.
3. Use an electric mixer to cream together the butter and sugars until light and fluffy.
4. Beat in the eggs one at a time.
5. Stir in the vanilla extract.
6. Slowly add in the flour mixture to the wet ingredients, stirring between additions.
7. Stir in the peanut butter chips by hand.
8. Use a spoon to drop the cookie dough in rounded portions onto a baking sheet.
9. Bake for 12-14 minutes, or until the cookies are lightly browned around the edges and set on top.
10. Remove the cookies from the baking sheet and let cool completely on a wire rack.
SHARE:

What's For Dinner: Homemade Macaroni and Cheese


I asked D if he had any requests for dinner and he asked for homemade macaroni and cheese. A quick Internet search for Martha's recipe, and I was ready to prepare it for dinner. This mac and cheese recipe is actually fairly simple, just be prepared to grate a whole lotta cheese during the prep phase! The resulting mac and cheese was super-creamy (even though I didn't add the whole amount of cheese sauce the recipe asked for) and full of cheesy goodness. A perfect recipe for a crisp fall evening.

Homemade Macaroni and Cheese (printer-friendly version)
makes 6+ servings

3 slices white bread
3 tablespoons unsalted butter
2 1/2 cups organic skim milk
1/4 cup unbleached all-purpose flour
3/4 teaspoon kosher salt
1/8 teaspoon ground nutmeg
1/8 teaspoon ground black pepper
1/8 teaspoon cayenne pepper
2 cups sharp white cheddar cheese, grated
1 1/4 cups pecorino Romano cheese, grated
1 1/2 cups whole wheat macaroni cheese

1. Preheat the oven to 375 degrees.
2. Lightly toast the three slices of bread. Remove the crusts. Tear each slice into small pieces and put them into the bowl of a food processor. Process the bread until breadcrumbs form. Set aside.
3. Pour the milk into a small saucepan and heat over medium to medium-high heat.
4. In a medium-sized saucepan, melt the butter. Once the butter begins to bubble, stir in the flour. Stir to combine.
5. Pour the hot milk into the saucepan with the flour-butter mixture. Whisk constantly until bubbles form and the mixture thickens.
6. Remove from the heat. Stir in the salt, nutmeg, black pepper, and cayenne pepper. Add in 1.5 cups of the cheddar cheese and all of the pecorino Romano cheese. Stir to combine. Set the cheese mixture aside.
7. Bring a large pot of water to a boil. Add in the elbow macaroni and cook until al dente, about 1-2 minutes prior to the cooking time listed on the package.
8. Once the macaroni is cooked, drain in a colander and rinse with cold water.
9. Pour the macaroni into a large bowl. Stir in one cup of the cheese sauce.
10. Spray a 2 quart glass container with cooking spray. Spoon the macaroni cheese into the dish. Cover with the remaining 1/2 cup of cheddar cheese. Sprinkle the top with the bread crumbs.
11. Bake in the oven for 30 minutes, or until the bread crumbs are lightly browned and the cheese sauce is bubbling.
12. Remove from the oven and let cool on a wire rack for about five minutes before serving.

(adapted from this Martha Stewart recipe)

SHARE:

What's For Dinner: Parmesan-Crusted Tilapia

Another trip to Whole Foods, another pre-prepared tilapia filet. Since Dustin and I weren't that hungry once dinner time rolled around, we decided to share one filet. I baked the filet in a 400 degree oven for about 15 minutes (cooking time should average between 12 and 15 minutes). I served haricots verts aside the tilapia. To make the haricots verts, I blanched fresh green beans in boiling water for 2 minutes, then removed them from the water and placed them in a bowl. I topped the green beans with a few dots of butter and seasoned them with several hefty sprinkles of a parmesan pesto seasoning from Boulder's Savory Spice Shop.

One aspect I like about trying pre-seasoned fish filets is that doing so gives me the chance to figure out what combinations of seasonings I like. Then, later on I can make my own seasoned filets using the pre-seasoned filets I've eaten as inspiration. The parmesan-crusted tilapia was definitely a winner, and I will have to try to make my own version someday soon -- there are already a few tilapia filets in the freezer just waiting to be a part of a creative recipe!


SHARE:

Made From Scratch: Apple Butter


After cooking up a big vat of applesauce, I decided to keep the train going and continue cooking the applesauce on low until it turned into apple butter. (Is there anything better with fresh biscuits or a slice of hearty bread than warm apple butter?)

Apple Butter
makes about one cup

1. Start out with a slow cooker full of applesauce.
2. Add in a couple of cinnamon sticks.
3. Cook on low for 4-6 hours.
4. Place in a container with a lid and store in the fridge.
SHARE:

Snacktime: Baked Pita Chips

We had a pile of pita rounds hanging around as leftovers from last week's tabbouleh dinner, so I decided to make them into one of my favorite snacks -- pita chips. Seasoned with a little sea salt, black pepper, and dried rosemary, these chips are the perfect accompaniment to a dish of freshly-made hummus.

Baked Pita Chips (printer-friendly version)
makes about 48 chips

6 pita rounds
2 tablespoons olive oil
1/4 teaspoon fine sea salt
1/4 teaspoon dried rosemary
freshly ground black pepper.

1. Preheat the oven to 325 degrees.
2. Stack the pita rounds.
3. Cut the pitas in half. Then cut each half into half again, and repeat once more. (You should end up with 8 wedges per pita round, for a total of 48 wedges.)
4. Place the wedges in a large bowl.
5. Drizzle the olive oil over the wedges and season with salt, rosemary, and black pepper. Toss to combine.
6. Spread the seasoned wedges out over a rimmed baking sheet.
7. Bake in the oven for 25-30 minutes, or until the pita chips are lightly browned and crisp.
8. Remove from the oven and place the chips on a wire rack to cool.
SHARE:

What's For Dinner: Apple, Cheddar, and Dijon Mustard Sandwich


Martha Stewart was on a recent episode of The Oprah show, and on that episode one of the segments was about "How to Throw a Grilled Cheese Party" -- the inspiration for this dinner. For my party of one, I opted to make a grilled cheese sandwich that featured a Granny Smith apple, cheddar cheese, and a little dijon mustard. I've heard of serving apple pie with a slice of cheddar on top -- and after this sandwich, I think I totally get it -- the sharpness of the cheddar cheese really works well with the sweet and tart flavor of the apple. Yum!


Apple, Cheddar, and Dijon Mustard Sandwich (printer-friendly version)
makes one sandwich

unsalted butter
2 slices whole wheat bread
Tillamook Vintage White Cheddar cheese, cut into several thin slices
2 teaspoons organic dijon mustard
1 Granny Smith apple, peeled, cored, and sliced thinly

1. Heat a large skillet over medium heat.
2. Generously slather one side of each bread slice with unsalted butter.
3. Spread one teaspoon of dijon mustard on the unbuttered side of each slice of bread.
4. Add a layer of sliced apple on top of the mustard.
5. Place a layer of cheddar cheese on top of the apples.
6. Repeat the process on the other slice of bread.
7. Carefully place both halves of the sandwich together.
8. Place on the heated skillet and cook until lightly browned.
9. Carefully flip the sandwich over and brown the other side.
10. If the cheese has not melted completely, remove the sandwich from the skillet, place it on a baking sheet, and heat in the oven under the broiler setting for about five minutes.
11. Serve immediately.
SHARE:

Made From Scratch: Applesauce

This past weekend it appeared that a lot of my friends were hitting up the local apple orchards, as a lot of Facebook status updates mentioned apple butter, applesauce, and apple cider. Though there aren't any apple orchards near to Laramie, I didn't let this fact thwart me. Instead, I headed to the local Safeway and bought a bag of organic gala apples. Once home I set to work making applesauce -- I decided to use my slow cooker as I didn't have any desire to babysit a big pot of sauce simmering away on the stovetop. I set the slow cooker to "low" around 5 p.m. and let it cook overnight -- wow, the house smelled great in the morning! A quick whirl of the immersion blender, and the applesauce was ready to eat. It tasted just like a mouthful of Autumn.


Homemade Applesauce (printer-friendly version)
makes about 5 cups

3 lbs organic apples (about 10 small apples)
1/2 cup hot water
juice from organic lemon
1 tablespoon brown sugar
1/8 teaspoon ground cloves
1/8 teaspoon ground allspice
1/8 teaspoon ground nutmeg
1/8 teaspoon anise seeds
2 cinnamon sticks

1. Wash the apples. Core and quarter each apple. (You can also peel the apples if desired.) Place the diced apples in a 4 qt slow cooker bowl.
2. Pour in the water and lemon juice.
3. Add in the brown sugar, cloves, allspice, nutmeg, anise seeds, and cinnamon sticks. (Or season to your preference.)
4. Put the lid on the slow cooker and cook on low for 8-10 hours.
5. Remove the cinnamon sticks. Use a food ricer or immersion blender to puree the applesauce to a smooth texture, or leave chunky.


SHARE:

What I'm Drinking: Red Wine

I am a sucker for a good bottle of red wine. Give me a square of good chocolate and a glass of red wine, and I am good to go when it comes time for dessert (or an afternoon snack . . .). I've found a few new favorites via Coal Creek and Front Street Tavern here in town. However, paying $6-7 per glass of wine is a little steep in my book. So, it's quite nice that I can pick up most of these bottles (all $12 and under) at stores in town.
SHARE:

What's For Dinner: Tabbouleh

Since we had some leftover pita pockets in the house, it was inevitable that they would make a reappearance at dinner time one night this week. Along with stuffing the pitas with hummus, baby spinach leaves, and arugula, I also made up a fresh batch of tabbouleh to use as an additional filling.

makes about four cups

1 cup bulgur
2 cups water, boiling
1 cucumber, peeled, seeded, cut into half and quartered
1 medium tomato, diced
1 bunch scallions, chopped (green and white parts)
1/4 cup fresh flat-leaf parsley, roughly chopped
juice of one lemon
1/2 teaspoon fine sea salt
freshly ground black pepper
1 tablespoon olive oil

1. Bring two cups of water to a boil in a small saucepot over high heat.
2. Once the water begins to boil, stir in the bulgur, remove the pot from the heat and cover with its lid. Let sit 20 minutes or until all the water is absorbed.
3. Spoon the cooked bulgur into a large lidded container.
4. Pour in the lemon juice and stir to combine. Stir in the chopped cucumber, tomato, and parsley. Season with salt and pepper.
5. Drizzle with the olive oil.
6. Make sure all ingredients are evenly combined, then put the tabbouleh into the refrigerator and let the flavors meld for at least an hour or longer.
SHARE:

What I'm Drinking: Mocha Hot Chocolate

The temperatures lately here in the Rocky Mountain region have been rather high -- when D and I arrived in Denver this past Sunday evening, the temperature was 20 degrees higher (79) than what we had left in Chicago. Here in Wyoming daytime temps have averaged in the mid to upper 70s. But come on now, it's October! I am so ready for temps in the low to mid 60s. I love "sweater weather." I have to admit I'm a bit worried we're going to jump from summer straight to dreary and gloomy winter weather. Fingers crossed we don't just skip over autumn! Anyway, regardless of the weather outside, I was definitely in the mood for a cold-weather pick-me-up in the afternoon. Though my standard hot drinks are typically either a chai latte or green tea, today I decided to make a mocha hot chocolate by combining a shot of espresso with hot chocolate. The end result was just what I was looking for -- gotta love a jolt of caffeine in the mid-afternoon!

Mocha Hot Chocolate (printer-friendly version)
makes one serving

1 teaspoon espresso powder
3 oz boiling water
1 cup organic skim milk, warmed
2 teaspoons Dagoba cacao powder
3 teaspoons raw sugar

1. Bring a small pot of water to a boil over high heat.
2. Place a heaping teaspoon of espresso powder in a small bowl.
3. Pour three ounces of boiling water over the espresso powder (I used a shot glass to measure out the three ounces) and stir to combine.
4. Heat the milk in a microwave-safe mug in the microwave.
5. Pour the espresso into the warmed milk. Stir to combine.
6. Add in the cacao powder and raw sugar. Stir to combine. Add in more sugar if necessary.
7. Serve immediately -- with marshmallows if you have some on hand!
SHARE:

What's On the Side: Butternut Squash Stew served over Pearled Couscous


I loved this side dish so much, I decided it deserved a post all its own. Though the following recipe supposedly makes four servings, I'd say it makes at least double that amount. Long story short, I think I'll be eating a lot of butternut squash and pearled (Israeli) couscous this week for lunch. But that's okay -- I think it's delish!

Butternut Squash Stew served over Pearled Couscous (printer-friendly version)
makes 8 servings

2 tablespoons olive oil
2 yellow onions, chopped
2 cloves garlic, minced
1/4 teaspoon ground cayenne
1/8 teaspoon ground nutmeg
1/8 teaspoon ground cinnamon
1 can organic diced tomatoes
1 butternut squash, peeled, halved lengthwise, seeded, and diced into 3/4" pieces
3 cups organic vegetable broth
1 teaspoon salt
1 can garbanzo beans, drained and rinsed

1. Cook the couscous in a rice cooker (I cooked up a massive amount -- 2 cups couscous in 3 cups water and 1 cup veggie broth.) Alternately, cook the couscous on the stovetop according to the manufacturer's instructions. If you cook the couscous on the stovetop, you can wait until after you have started to cook the butternut squash stew to start cooking the couscous. (Using a rice cooker takes a significantly longer amount of time, but it's nice to set it up and forget about it.)
2. In a large stockpot, heat the olive oil over medium heat. Saute the onions in the oil until softened and translucent, about 5 minutes.
3. Stir in the minced garlic, cayenne, nutmeg, and cinnamon. Cook until fragrant, about 1 minute.
4. Add in the diced tomatoes (including the juices), diced butternut squash, vegetable broth, and salt. Bring the stew to a simmer.
5. Once the stew begins to simmer, stir in the garbanzo beans.
6. Place the lid on the stockpot and cook for 10 minutes.
7. Uncover the pot and continue to cook until the squash is fork tender. (The recipe says this should take about 10 minutes, in my experience it took at least double, if not triple, that amount of time.)
8. Once the stew is ready, make a bed of the pearled couscous on a long platter, and spoon the butternut squash stew over it. Serve immediately.

(adapted from this Food & Wine recipe)

SHARE:

Project Food Blog Challenge #3: Host a Luxury Dinner Party

So, don't get too excited -- I didn't actually make it to the third round of Project Food Blog. (Let's face it, when this thing started I had five loyal readers; so as far as popularity contests go, I'm not quite there yet.) But, I do want to send a shout-out to all those who voted for me -- thank you! And, on the positive side, I did get a lot of great exposure for the blog, and I also added another eight readers (welcome!) -- so that's definitely a good thing. Anyway, because Foodbuzz wasn't set to announce who advanced to the next round until Friday at 12p Pacific time, the next challenge's post would have to be up by 3p Pacific time on Sunday, and I was heading out of town for a wedding, I decided that I would take on challenge three just in case I made it to the next round. So, on Monday I pulled together a guest list and then worked through some ideas for a menu.

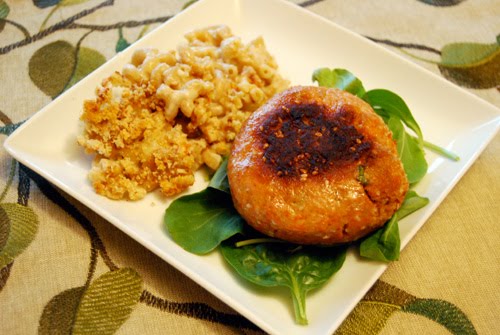
Though my original thought was to celebrate the flavors of Wyoming (e.g., bison or beef), I decided that since (a) I am not the resident grillmaster, nor have either of use ever grilled bison meat, (b) bison meat (especially choice cuts) can be quite expensive, and (c) bison meat is not easily accessible in this town, I opted to feature salmon as the main dish instead. I briefly considered going with my standard mustard-roasted salmon with lingonberries entree, but opted to branch out instead and try a new recipe. (Something that is quite a no-no when hosting a dinner party, I think -- always nice to know that a recipe tastes good and/or works before foisting it upon unsuspecting dinner guests!)

Since the challenge instructed bloggers to introduce their guests to "exotic flavors," I scoured the Internet and came up with this Food & Wine recipe for pomegranate-glazed salmon. I followed this recipe pretty much to the T, though I decreased the salmon portions from eight fillets to six and subbed in extra lemon juice for lime juice in the marinade. Also, since Laramie isn't home to a Middle Eastern grocery store, I had to make my own pomegranate molasses; I used this Alton Brown recipe. It took me about two hours of simmering on low (compared to Alton's suggested 70 minutes) to get the sauce to thicken to the right consistency.


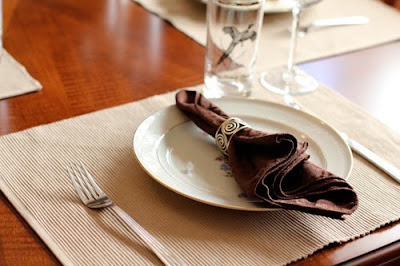
As to the rest of the menu, I opted to start the meal with an appetizer platter with hummus, pita wedges, and fresh veggies. The meal itself included a organic baby spinach and arugula salad with bosc pears and a balsamic vinaigrette dressing (shown above), green beans with pine nuts in a shallot-butter sauce, butternut squash served over pearled couscous, and the aforementioned salmon.

The original plan for dessert was to serve individual 
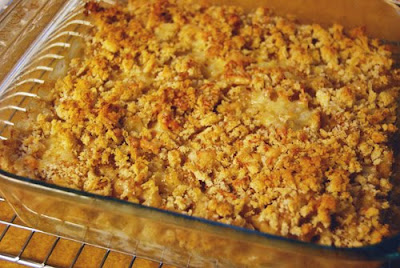
molten mocha chocolate cakes, but right before I was about to make the batter I happened to double-check my ramekin situation, and found that I only had three ramekins of the right size, when I needed six. Time for Plan B! Since I had some apples on hand (the salad was originally going to feature both pears and apples), I decided to throw together a quick apple crisp to serve with vanilla bean ice cream. Not exactly the sophisticated dessert I was going for, but it definitely worked in a pinch.

As to the dinner party itself, I think it turned out better than expected. I ended up not figuring out my timing well (again, a result of making all of these recipes for the first time that evening), and we ended up sitting for dinner about 30 minutes later than I had planned. All of my guests were extremely gracious however, and did not seem to mind the wait for food.

Admittedly, I can count on one hand the number of dinner parties I have hosted, and this one brings up the grand total to two. The dining room set you see in the pictures here was my first "Big Girl" purchase that I made when I was living in Chicago. Prior to my move to Wyoming, I invited my best friends over for a little dinner party shindig (which featured the afore-mentioned mustard-roasted salmon with lingonberries recipe!) to make use of the lovely table (bought from Carson Pirie Scott, which no longer exists in downtown Chicago).

I am shy by nature, so hosting a dinner party is a bit nerve-wracking for me, and I was queasy all day long just thinking about all that I needed to accomplish in order to end the evening with happy guests. I made numerous trips to the grocery store during the day, remembering at the last minute one more ingredient that I had neglected to purchase during the previous shopping trip. I spent some time early in the morning prepping a few ingredients, including the pomegranate molasses, the salmon marinade, and the salad dressing. Everything else was started around 4 p.m. I think the major learning lesson from this challenge was twofold: (1) Use tried-and-true recipes (thankfully, all of my dishes turned out well, but I could have greatly diminished my stress level by practicing the recipes beforehand instead of making my guests the guinea pigs) and (2) Stay organized -- having all the ingredients on hand at the beginning would have significantly decreased my needing to return to the grocery store seemingly every other hour.

In the end, given that my guests said they would gladly welcome another invite, I think the dinner party was a success. (Thanks for coming!)
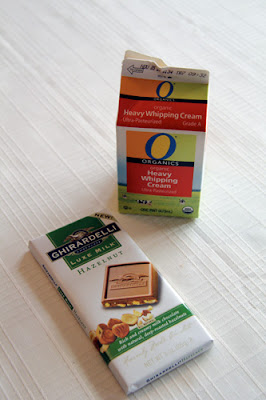
SHARE:

What's On the Side: Balsamic Vinaigrette with Dijon, Rosemary, and Oregano

Happy October everyone! I am off early this a.m. on a flight headed to Chicago, so I've just got a quick post for today. Last night I hosted a dinner party for a group of friends. Though I had some balsamic vinaigrette in the fridge, I decided the "less processed" thing to do would be to make my own for a salad I was serving. I based this dressing recipe off my standard balsamic vinaigrette recipe, but added in a few extra seasonings.

Balsamic Vinaigrette with Dijon, Rosemary, and Oregano (printer-friendly version)
makes about 3/4 cup of dressing

1/4 cup balsamic vinegar
1/2 cup olive oil
1 tablespoon organic Dijon mustard
1/4 teaspoon finely chopped dried rosemary
1/2 teaspoon dried oregano
1/2 teaspoon black pepper
1/2 teaspoon fine sea salt

1. Whisk together the balsamic vinegar, olive oil, and Dijon mustard. Stir in the rosemary, oregano, black pepper, and salt. Use immediately or chill in the fridge until ready to use. Stir thoroughly before using this to dress your salad.
SHARE:
© A Less Processed Life. All rights reserved.
BLOGGER TEMPLATE MADE BY pipdig