What's For Dinner: BBQ Chicken

Over the weekend D and I found ourselves once again in Fort Collins. While at our requisite visit to Whole Foods, we picked up two organic whole chicken legs for a little barbecuing action. Since we were out of charcoal, I opted to cook the chicken legs in the oven with a generous helping of barbecue sauce leftover from my adventures in pulled pork a week or two ago. I served the bbq'd chicken legs over a bed of wild and basmati rice and also had some steamed broccoli florets (seasoned with salt and pepper, and covered with grated white cheddar cheese) on the side.

Oven-Baked Barbecue Chicken
makes 2 servings

2 organic whole chicken legs

1. Preheat the oven to 350 degrees.
2. Place the chicken legs in a glass baking dish.
3. Cover each leg liberally with the barbecue sauce. (Make sure to cover both sides of the leg.)
4. Bake in the oven for 60 minutes, or until the chicken is fork-tender. Baste with barbecue sauce (either with what's in the baking dish or with some fresh sauce) about half-way through the cooking time.
5. Let rest for a few minutes and then serve.
SHARE:

What's For Dinner: Broccoli, Mushroom, Spinach, and Cheddar Quiche


D has been clamoring for a quiche of late, so I told him to pick the ingredients and I'd make one for him. I had a big bag of broccoli laying around, so I decided to add in a couple of handfuls of broccoli, too. However, I didn't really want large clumps of broccoli in the quiche, so I opted to use my food processor to chop the florets into little bits. The resulting quiche was pretty delish, and definitely chock full of veggies!

Broccoli, Mushroom, Spinach, and Cheddar Quiche (printer-friendly version)
makes 8 servings

2 eggs
2 egg whites
1 cup organic half-and-half
1/2 teaspoon ground cumin
1/4 teaspoon ground coriander
fine sea salt
freshly ground black pepper
1 tablespoon unbleached all-purpose flour
1 tablespoon olive oil
1/2 cup sliced crimini mushrooms
1 cup baby spinach leaves
2 cups broccoli florets, chopped fine
1 cup white cheddar cheese

1. Preheat the oven to 350 degrees.
2. In a medium-sized bowl, whisk together the whole eggs, egg whites, and half-and-half. Stir in the cumin and coriander. Season with salt and pepper. Add in the flour and stir to combine. Set aside.
3. Heat about 1 tablespoon of olive oil in a large skillet over medium heat. Saute the mushrooms in the oil until softened. Add in the spinach leaves cook until wilted, stirring occasionally. Add in the chopped broccoli and stir to combine; saute for another 30 seconds. Remove from the heat and pour the contents of the skillet into a large mixing bowl.
4. Add the cheddar cheese into the mixing bowl and stir to combine.
5. Spray a 10" glass baking dish with cooking spray. Then spoon the veggie mixture into the bottom of the dish. Cover with the egg mixture.
6. Place in the oven and bake for 45 minutes, or until the middle of the quiche has set.
7. Remove from the oven and let cool for 10 minutes before serving.
SHARE:

What's For Dinner: Deconstructed Taco Salad

D and I opted to head up to Happy Jack for a quick hike after work this evening, so we didn't get home until after 8p. By then I was a little hungry (to say the least), but luckily I had set some rice to cook in the rice cooker before we left home, so at least we wouldn't have to start dinner from scratch. Since I had some leftover onion and red pepper from last night's pasta primavera, I decided to saute them up with some mushrooms to add to a taco salad. While I sauteed up the veggies, D browned up some chorizo sausage on the stovetop. To make my deconstructed salad, I started with a bed of baby spinach leaves, added shredded mozzarella cheese, some crumbled tostada shells, chopped heirloom tomato, and sauteed veggies and mushrooms. I topped the whole thing with the chorizo sausage, salsa, and a small spoonful of Greek yogurt. I also plopped a scoop of fresh guacamole and refried beans on the side.
SHARE:

What's For Dinner: Pasta Primavera

We had a bunch of veggies lying around the kitchen (so lazy!), so I decided to cook them all up together in a pasta primavera dish. When I made this entree, the sauce was a little too light for my taste, so I've doubled the proportions below. What's great about this recipe is you can substitute in whatever veggies you have on hand . . . making it a perfect way to cook up fresh summer vegetables.

Pasta Primavera
makes 4 servings

2 cups broccoli florets
fine sea salt
4 cups organic whole-wheat gemelli pasta
1 tablespoon olive oil
1/2 cup onion, chopped
1 garlic clove, minced
1 zucchini, sliced into 1/4" rounds
1/4 cup sliced crimini mushrooms
1/2 cup red pepper, sliced
1/4 cup heirloom tomato, chopped
freshly ground pepper
2/3 cup organic half-and-half
1/2 cup dry vermouth (or white wine)
1/2 cup freshly grated Parmesan cheese

1. Bring a large pot of water to boil. Add in a dash of salt and the broccoli florets. Blanch for 3 minutes.
2. Remove the florets from the water and place in a bowl; set aside.
3. Add the pasta to the same water. Cook according to the manufacturer's directions.
4. Meanwhile, add 1 T olive oil to a large skillet and heat over medium heat. Saute the garlic and onion together; about two minutes. Add in the zucchini slices, mushrooms, red pepper, and heirloom tomato and saute until softened; another 5 minutes or so.
5. Stir in the dry vermouth and half-and-half to the veggie mixture. Season with freshly-ground black pepper.
6. Once the pasta is cooked to al dente, drain off the water and place the pasta in a large bowl.
7. Pour the prepared sauce and veggies over the pasta. Add in the grated Parmesan cheese and mix to combine.
8. Serve immediately.

(loosely based on this Cooking Light recipe)
SHARE:

What's For Lunch: Greek Yogurt with Strawberries and Kashi Cereal

This has become my standard lunch -- or breakfast -- of late: Greek yogurt sweetened with a spoonful of local honey, some fresh fruit (in this case sliced strawberries), a dash of cinnamon, and a handful of Kashi GOLEAN Crunch!. What I love best above Kashi is that it is an excellent source of protein, with each one-cup serving providing 9 grams of protein, 8 grams of fiber, and 17 grams of whole grains. Plus the ingredient list is fairly short, and is quite pronounceable, earning another high mark from me. When I'm too lazy to make my own crunchy granola, I find that Kashi is a worthwhile substitute.

Greek Yogurt with Strawberries and Kashi Cereal
makes 1 serving

1 spoonful local honey
ground cinnamon
4-6 whole strawberries, sliced
1/2 C Kashi cereal

1. Add the Chobani Greek yogurt to a bowl. (Chobani has been quite hard to find in town of late; apparently it's quite popular! Whenever the grocery store is stocked up, I make sure to pick up at least 2 large containers of the stuff.)
2. Stir in the spoonful of honey. Sprinkle with a dash of ground cinnamon.
3. Top with sliced strawberries (or other fruit of your choice) and Kashi cereal.
4. Eat!
SHARE:

What's For Dinner: Tequila-Lime Tilapia with Israeli Couscous and Haricots Verts

Though I've featured a number of salmon recipes on this blog, I've kind of ignored another great fish -- tilapia. Like salmon, tilapia is an excellent source of omega-3 fatty acids and is relatively low in fat. Read more about tilapia's nutritional values here. Over the weekend, D and I found ourselves at Whole Foods in Fort Collins (yet again), and we opted to pick up some marinated tilapia fillets from the seafood counter (makes my life easier!). Compared to fillets of salmon, tilapia is much less expensive, but no less tasty. I served each fillet over a bed of Israeli (or pearl) couscous and with a side of haricots verts dressed lightly with melted butter, salt, and pepper.

Tequila-Lime Tilapia
makes 2 servings

1. Preheat the oven to 375 degrees.
2. Cover a rimmed baking sheet with aluminum foil.
3. Place the fish fillets on the covered baking sheet.
4. Cook in the oven for 15-18 minutes, or until the fish is flaky.

For the Israeli (or pearl) couscous:
makes 3 servings

1 t olive oil
1 shallot, minced
1 C Israeli couscous
2 C organic vegetable broth

1. Turn your rice cooker onto the "quick" setting. Add the olive oil to the rice cooker bowl. Once the bowl has heated up, add the shallot and saute until just softened, about 1 minute.
2. Add in the couscous and toast until fragrant, about 2 minutes.
3. Turn off the rice cooker and add the veggie broth. Cook the couscous on the "regular" setting.
4. Once the cooking cycle is complete, let the couscous stand in the rice cooker for 10 minutes. Fluff with the rice cooker plastic paddle, and serve.
SHARE:

What's For Dinner: Pan-grilled Zucchini and Yellow Squash Sandwiches


I wasn't quite sure what to make for dinner, so decided to page through one of the (many) magazines in the house to find some inspiration. It didn't take too long to find a sandwich that caught my eye in the latest issue of Food & Wine magazine. I cut the original recipe in half (aside from the olivada) and opted to add in some yellow squash as well. We have a lot of olivada left over, but I'm thinking it will make a reappearance sometime later this week in a pasta dish . . . speaking of leftovers, I bought some fairly ginormous ciabatta rolls at Whole Foods, so each sandwich was enough for two servings. I'm definitely looking forward to having leftovers for lunch!

Pan-grilled Zucchini and Yellow Squash Sandwiches (adapted from this Food & Wine recipe)
makes 2 sandwiches

For the olivada:
6 oz pitted green olives
3 garlic cloves, minced
t t lemon zest
freshly ground black pepper
fine sea salt
1/4 C olive oil

1. Add the olives, minced garlic, and lemon zest to the bowl of a food processor. Process until the olives are finely chopped. Add in the olive oil while holding down the "on" button. Season with salt and pepper.
2. Spoon into a small container and set aside.

For the dressing:
1/4 C olive oil
1 T red wine vinegar
1/8 t dried oregano

1. In a small bowl, whisk together the oil, vinegar, and oregano. Set aside.

For the grilled zucchini and yellow squash:
1 zucchini
1 yellow squash
1/4 C olive oil
freshly ground black pepper
fine sea salt

1. Use a mandolin or knife to slice the zucchini and yellow squash into 1/4" slices.
2. Put the slices into a large bowl. Toss the slices with the olive oil, pepper, and salt.

3. Heat a skillet over medium to medium-high heat. Place the slices in the skillet and grill for about five minutes, flipping once mid-way through cooking. The zucchini and yellow squash slices will be tender and slightly charred when they are done.

To put together the sandwiches:
olivada
dressing
grilled zucchini and yellow squash slices
fresh mozzarella, sliced
heirloom tomato, thinly sliced
1/2 C fresh basil leaves

1. Cut a ciabatta roll in half.
2. Spread a spoonful of olivada on each bread slice.
3. Add a small pile of zucchini and yellow squash slices on one bread slice. Drizzle a small amount of dressing on top of the zucchini and squash.
4. Top the zucchini and yellow squash slices with one mozzarella slice and one heirloom tomato slice.
5. Garnish with the fresh basil leaves and a little more of the dressing. Put the other half of the bread on top of the sandwich; cut diagonally into two pieces.
6. Serve with the sides of your choice; I served the sandwich along with a fresh tomato and mozzarella salad (and quite possibly a few sour cream and onion potato chips, too).

SHARE:

What's For Dinner: Pulled Pork Sandwiches


For the finale of Meat Week, I opted to make pulled pork after being inspired by a feature on the dish in a recent issue of Food and Wine magazine. Instead of using the recipe in the magazine, however, I opted to use a different one I found on the Internet -- there's no way I could pass by a recipe that involves root beer! I purchased a couple of pounds of pork shoulder at Whole Foods in Fort Collins and I sourced a bottle of root beer made with natural ingredients at Big Hollow Co-op here in town. Though I was considering just buying a bottle of barbecue sauce to finish off the pulled pork, I decided that would be a bit of a travesty given the provenance of the meat, so I took advantage of an afternoon teleconference and made a batch from scratch. It took a lot of ingredients, but not too much time, and I think the results definitely rival what can be found bottled in a grocery store.


Pulled Pork
makes enough for 8+ sandwiches

2-3 lbs pork shoulder
1 12 oz bottle Virgil's root beer

1. Place the pork shoulder in a slow cooker.
2. Pour a bottle of root beer over the pork. Set the slow cooker to low and cook for 6-7 hours.
3. Use a knife and fork to shred the pork. Drain off the liquid.
4. Stir in about 1-2 cups of barbecue sauce.
5. Serve immediately. I served the pulled pork along with hamburger buns, potato chips, and vegetarian baked beans.


Barbecue Sauce (adapted from this Food and Wine recipe)
makes about 3 cups

1 tablespoon vegetable oil
3 garlic cloves, chopped
1/2 medium onion, chopped
fine sea salt
1/4 cup Maker's Mark whisky
1 1/2 teaspoons chili powder
1/2 tablespoon ground black pepper
1/4 teaspoon ground allspice
1/4 teaspoon ground cloves
1/2 cup light brown sugar
1 cup water
1 cup Simply Heinz ketchup
1/4 cup organic molasses
1/4 cup yellow mustard
1/4 cup cider vinegar
1 teaspoon hot sauce

1. Heat a tablespoon of vegetable oil in a large saucepan over medium heat.
2. Add in the chopped onion and garlic along with a pinch of salt. Cook until softened, about 10 minutes. Stir occasionally.
2. Pour in the whiskey, and simmer for two minutes.
3. Add in the chili pepper, black pepper, allspice, and cloves. Cook for about 3 minutes, or until the spices become fragrant.
4. Stir in the brown sugar, water, ketchup, molasses, mustard, cider vinegar, and hot sauce. Reduce the heat to low/medium-low and simmer for about 30 minutes, or until the sauce thickens.
5. After the sauce has thickened, use an immersion blender to puree the sauce. (Alternately, use a blender, but allow the sauce to cool a bit first before pureeing.)
6. Use immediately, or refrigerate for up to two weeks.


{bbq sauce ingredients -- chili pepper and allspice partially hidden, water and veggie oil MIA}
SHARE:

What's For Dinner: Tostadas with Antelope Chorizo Sausage

Tonight's dinner is another first-degree of separation kind of meal. Well, I suppose second-degree of separation for me; first degree for D since he's the one who dispatched the animal whose meat is featured in the tostadas. D hunted this antelope last year in Wyoming's Shirley Basin (scroll down for a photo of the successful hunt). I have to admit that I'm not a fan of antelope meat on its own -- it definitely has a "gamey" taste, probably due to the antelope's penchant for eating sage on the plain. We learned this the hard way after D dispatched his first antelope in 2008; last year he opted to have the majority of his antelope processed locally into chorizo sausage and breakfast sausage. Antelope meat is relatively low in fat and is a good source of protein, iron, riboflavin, thiamin, and phosphorus. For more nutrition facts about antelope meat, click here.

Tostadas with Antelope Chorizo Sausage
makes 4+ servings

1 lb chorizo sausage

1. Heat a large skillet over medium heat.
2. Add in the chorizo sausage and brown, about 10 minutes. Stir occasionally.
3. Line a colander with a paper towel and spoon the cooked sausage into the colander to soak up any excess fat.
4. Set up a table with all the taco/tostada fixin's -- we had fresh guacamole, refried beans, baby spinach leaves, chopped heirloom tomato, shredded cheese, and Greek yogurt.

{antelope . . . it's what's for dinner}
SHARE:

What's For Dinner: Rosemary Chicken Breasts with Wild Rice and Caprese Salad

Chicken breasts were standard fare when I was growing up -- "chicken with snot" was my nickname for the soup-covered chicken breast entree that had a starring role in many a weeknight dinner. Amazingly, I'm pretty sure that this is the first time that I've cooked chicken breasts on my own. And, full disclosure, it didn't go all that well -- but D helped me salvage the meal. Let's just say that Rachael Ray's instructions to cook the breasts on the stovetop didn't quite work out, but baking them in the oven did rectify my almost-disaster. And a glass of wine in between did wonders to my psyche. (Thank you, Lindeman's 2009 shiraz!) Our chicken breasts were served alongside a caprese salad (made with an ohmygawd so good!! heirloom tomato from Whole Foods) and some wild rice. All in all, it was a good learning experience, and I'm hoping that next time I'll have a little more confidence when cooking chicken!

For the meat itself, I opted to purchase organic boneless and skinless chicken breasts from the Whole Foods butcher. Whole Foods' standards for raising poultry include no antibiotics, no animal byproducts in the feed, no beak trimming, and appropriate litter for comfort and natural foraging. (Read more about Whole Foods' Farm Animal and Meat Quality Standards here.) In addition, animals are raised humanely and "processed with a measure of compassion." Though I still have some qualms about slaughtering (I think purchasing straight from a well-researched farm would be the best), I do feel a lot better purchasing this chicken rather than one raised under factory-farm conditions. And to be honest, when my initial attempts at cooking the chicken breasts seemed to be heading toward failure, I was most concerned that my chicken had died for naught, rather than that I would possibly have ruined dinner for myself and D. A little hippy-dippy? Maybe, but that's my perspective when it comes to eating as a conscientious omnivore!

Rosemary Chicken Breasts (printer-friendly version)
makes 2 servings

2 8 oz organic boneless, skinless chicken breasts
1 tablespoons extra virgin olive oil
1 tablespoon balsamic vinegar
1 clove garlic, pressed
1/2 tablespoon fresh rosemary, chopped
freshly ground black pepper
fine sea salt

1. Preheat the oven to 350 degrees.
2. In a small bowl, mix together the olive oil, balsamic vinegar, and pressed garlic clove.
3. Set the chicken breasts on a plate.
4. Brush each chicken breast with the olive oil mixture. Cover both sides thoroughly.
5. Season with salt and pepper.
6. Sprinkle both chicken breasts with the chopped rosemary.
7. Place in the fridge and allow the chicken to marinate for at least 10 minutes.


{marinating chicken breasts}

8. Place both chicken breasts in a glass baking dish. Cover the dish with aluminum foil.
9. Bake in the oven for at least 30-35 minutes, or until the juices run clear and the internal temperature has reached 170 degrees.
10. Remove from the oven and let rest for a couple minutes, then serve.
SHARE:

What's For Dinner: Oven-Roasted Spicy Salmon Fillet with Lemon-Butter Green Beans

One of the first meats I introduced back into my diet a few years ago was salmon. I prefer wild salmon, though Whole Foods sells a sustainably farm-raised Norwegian salmon. Salmon is an excellent source of Omega-3 fatty acids, vitamins B12, B3, and protein. Sockeye salmon, in particular, is a great source of vitamin D. For a full nutritional profile on salmon, click here.

Oven-Roasted Spicy Salmon Fillet (printer-friendly version)
makes 2 servings

2 6-oz wild sockeye salmon fillets
extra virgin olive oil
1 tablespoon organic Dijon mustard
1/2 teaspoon ground coriander
1/4 teaspoon fine sea salt
1/4 teaspoon ground black pepper
1/4 teaspoon ground cumin
1/8 teaspoon ground cardamom
1/8 teaspoon ground ginger
1/8 teaspoon ground cinnamon

1. Preheat the oven to 425 degrees.
2. Cover a rimmed baking sheet with aluminum foil.
3. Place each fillet skin-side down on the foil.
4. Lightly brush each fillet with olive oil.
5. Brush 1/2 tablespoon of Dijon mustard over each salmon fillet.
6. In a small bowl, mix together the ground coriander, fine sea salt, black pepper, cumin, cardamom, ginger, and cinnamon.
7. Sprinkle the spice mixture over the top of each salmon fillet until both are fully covered.
8. Roast the salmon fillets in the oven for 12-14 minutes, or until the salmon lightly flakes apart with a fork.


Lemon-Butter Green Beans (printer-friendly version)
makes 4 servings

30 green beans, ends trimmed, rinsed, and dried
1 tablespoon unsalted butter
1 tablespoon shallot, minced
1 tablespoon pine nuts
1 teaspoon fresh lemon juice
fine sea salt
freshly ground black pepper

1. Blanch the green beans. To do this, bring a medium-sized pot of salted water to a boil. Add the green beans and boil for about 2 minutes. After the time is up, remove the beans from the boiling water and place in an ice bath. Once the beans have cooled down, remove them from the ice water and place them on a towel to dry. Set aside.
2. Melt the butter in a large skillet over medium heat.
3. Add in the shallots and saute for about a minute.
4. Add in the pine nuts and saute for another minute, stirring constantly.
5. Stir in the lemon juice.
6. Add the green beans into the skillet, and stir to combine all the ingredients. Cook just until the beans are warmed. Serve immediately.

(adapted from this Emeril Lagasse recipe)
SHARE:

What's For Dinner: Venison Backstrap with Mashed Potatoes and Farmers Market Green Beans


One of the first meats I ate when I hopped back on the carnivore train was venison. What I like most about this meat is that I know exactly where it came from, when it was killed, and who killed it. I can be fairly certain that the animal had a good life up until the time it met its end. Though for the most part, the only other types of meat I eat are sustainably and/or organically raised, I still don't have the same connection with those farm-raised animals as I do with the deer in the freezer.

Compared to other meat sources, venison is quite a nutritious option. This meat is high in protein while low in saturated fat. Venison is also an excellent source of B vitamins (B12, B2, and B3 in particular) and iron. You can find a fairly concise description of venison's nutritional profile here. When it comes to cooking venison steaks, I let D take the reins. For this dinner entree, D pan-seared the venison backstraps before finishing them in the oven. According to D, this one of the best pieces of venison he has ever eaten, and I most whole-heartedly have to agree!

Venison Backstrap
makes 2 servings

2 6-oz backstrap fillets
fine sea salt
freshly ground black pepper
2 cloves garlic, pressed
olive oil

1. Preheat the oven to 350 degrees.
2. Generously coat both sides of each fillet with salt and pepper.
3. Heat the olive oil in a large oven-safe skillet over medium-high heat. Add in the pressed garlic and stir.
4. Place the fillets in the skillet. Sear each side of the fillets for two minutes per side.
5. Place the skillet in the oven and cook for an additional 6 minutes.
6. Remove the skillet from the oven.
7. Place the cooked fillets on a cutting board. Let the meat rest for 3-4 minutes.
8. Cut the fillets on the cross-grain (bias cut).
9. Plate up and serve.

SHARE:

Meat Week

Much to D's glee, I have decided to declare this week "Meat Week" -- just like Shark Week, except without the sharks. And hopefully a lot less gore. My own journey with eating meat has been a circuitous one -- from happy-go-lucky carnivore up until my college years, then a decade-long stint as a vegetarian, to just recently adding meat back into my diet. I'm not quite sure exactly how I'd label my role in the food chain these days. Perhaps as a conscientious omnivore?

These days about 80% of my diet remains meat-free. And when I do eat meat, I do so consciously. What does this mean? Basically, I prefer to know where my meat came from, how the animal was raised, and how the animal was killed. These questions are easy to answer for meat procured by my husband, a hunter. However, things get a little more difficult to ascertain when you're talking about farm-raised food. For the most part, when I procure meat I purchase it from Whole Foods, at our local farmers market, or at the local natural foods co-op. Though I am fairly assured that the meat I procure from these places comes from animals that were raised in a humane, sustainable, and sometimes organic manner, I still shudder to think about the last days of the animals' lives, given that most farm-raised animals must be slaughtered in a USDA-approved facility--the same place where factory-farm animals go. Because I am concerned about where my meat comes from and how the animals were raised, it should go without saying that I avoid eating meat at restaurants, particularly fast-food chains. I haven't had a McDonald's hamburger in at least 12 years, and I don't see myself ever going back to eating such things. I think I would consider eating meat at a restaurant if they detailed where the meat came from and how the animals were raised. It is encouraging to know that local food is "in" these days and many restaurants, especially those in the greater Denver area, tout sustainably and humanely raised farm products on their menus.

When I initially became a vegetarian (I was a lacto-ovo vegetarian, meaning I still ate dairy and eggs), it was mostly on a whim -- I gave up meat for Lent during my sophomore year of college. As it so happened, the Lenten period coincided with my taking a course in Environmental Ethics, and learning about factory farming definitely helped put a nail in the coffin of my meat-eating days. After Lent was over I decided to continue to not eat meat. One year turned to two, two turned to five, and I decided that I would continue on a vegetarian diet for 10 years, and then re-evaluate. During that 10-year period, I was a diligent vegetarian. I tried out a vegan diet for about a week, but decided I was too much of an ice-cream fan to ever make the switch. Being a vegetarian these days actually isn't all that hard -- there are so many options for things to eat, and I really never missed eating meat once I took it off my personal menu. I had slowly been phasing meat out of my diet as it was, having decreased the amount of red meat in my diet and not eating all that much chicken or pork either. However, I have to admit I was not the best vegetarian, and often joked that I was a "pasta-tarian." Due to my lackadaisical approach to my vegetarian diet, blood work in 2007 indicated that I was nearly-anemic. I diligently added an iron supplement to my diet, but my iron levels remained fairly low. It was at this point that I decided that maybe it would help to (slowly) add meat back into my diet.

An additional factor that helped in my decision-making was that I was at the time about a year into a relationship with a man (now my husband) who was an avid hunter. To get back to the idea of being a "conscious meat-eater," for me, I could get behind the idea of eating meat that D had procured himself. It took away the middle man and the unknown that to me describes the trays of faceless meat in the standard grocery store. I know a lot of people would prefer not to know where their meat comes from, and much prefer that plastic-wrapped tray of meat over having to think about the cow (or multiple cows when it comes to ground beef), chicken, or pig that the meat came from. I think this is the absolute wrong approach. When it comes to putting something into your body, I think it is key to know where it came from. Ethically speaking, I want to know how it was raised, whether it was able to feed normally, whether it had room to roam. I also want to know what it ate and if it received any antibiotics or hormones during its lifetime. I consider it my personal duty to choose the sustainably-hunted or ethically-raised animal over one that came from a factory farm. I am lucky in that I have that choice and can afford to make that choice. Not everyone has that luxury.

This week I plan to feature posts about meals that feature meat as the main ingredient. When I was purchasing items for this week's meals at Whole Foods today, I realized it was the first time that I've personally purchased meat from the butcher. So, this week will be quite the adventure for me, too, as I attempt to cook things that I haven't personally eaten in years. It should be an interesting (and hopefully tasty) ride!
SHARE:

What's For Dinner: Burgers with Fun Fixins'

OK, I will be the first one to admit that this idea is not rocket science -- but seriously, you can really amp up the flavor of your burgers by choosing interesting toppings. For tonight's round of porkelope burgers, options for fixins' included sliced tomatoes (de-seeded), caramelized onions, and avocado slices. Obviously, these fixins' would work just as well on a veggie or roasted portobello mushroom burger.

As an additional twist, we also experimented with flavors inside the burgers -- and placed a small mozzarella ball in the middle of a couple of burger patties before cooking. Nothing like a little ooey-gooey cheese in the middle of a burger!

Our burgers were served up with a side of sweet potato fries baked in the oven and a few grilled eggplant slices. Admittedly, the three slices on my plate were the only survivors from the grilling experiment -- we'll need to figure out how to get those grilled without overly charring them before they're ready for their own post! But, even with a little char, the eggplant slices were still pretty good -- especially since I had brushed each slice with a little olive oil (and seasoned with some sea salt and freshly ground black pepper) before grilling. Yum!

SHARE:

What's Baking: Road Trip Cookies

Since D was heading out on a road trip to South Dakota for work, I decided to make up a batch of cookies for him to nosh on during his trip. In lieu of making my typical chocolate chip cookies, I opted to mix it up a little bit this time around, and add in a few more ingredients. Turns out if you add in some peanut butter chips, vanilla milk chips, and shredded coconut, the resulting cookie is quite delicious. Who woulda thought?

Road Trip Cookies (aka Almost -- But Not Quite -- Everything Cookies)
makes 24 cookies

1/2 cup unsalted butter
1/2 cup raw sugar
1/2 cup brown sugar
2 eggs
1/2 teaspoon vanilla extract
1/2 teaspoon baking soda
1/4 teaspoon fine sea salt
1 3/4 cups unbleached all-purpose flour
1/2 cup organic unsweetened shredded coconut
1/2 cup chocolate chips
1/2 cup Reese's Peanut Butter Chips
1/4 cup Guittard Choc-Au-Lait (vanilla milk) chips

1. Preheat the oven to 350 degrees.
2. In a small bowl, sift together the flour, baking soda, salt, and coconut. Set aside.
3. Use an electric mixer to cream together the butter and sugars until light and fluffy.
4. Beat in the eggs one at a time.
5. Stir in the vanilla extract.
6. Slowly add in the flour mixture to the wet ingredients, stirring between additions.
7. Stir in the chocolate chips, peanut butter chips, and vanilla chips by hand.
8. Use a spoon to drop the cookie dough in rounded portions onto a baking sheet.
9. Bake for 12-14 minutes, or until the cookies are lightly browned around the edges and set on top.
10. Remove the cookies from the baking sheet and let cool completely on a wire rack.
SHARE:

What's For Dinner: Whole Wheat Pizza with Pesto, Roasted Yellow Zucchini, Tomatoes, Caramelized Onions, and Goat Cheese

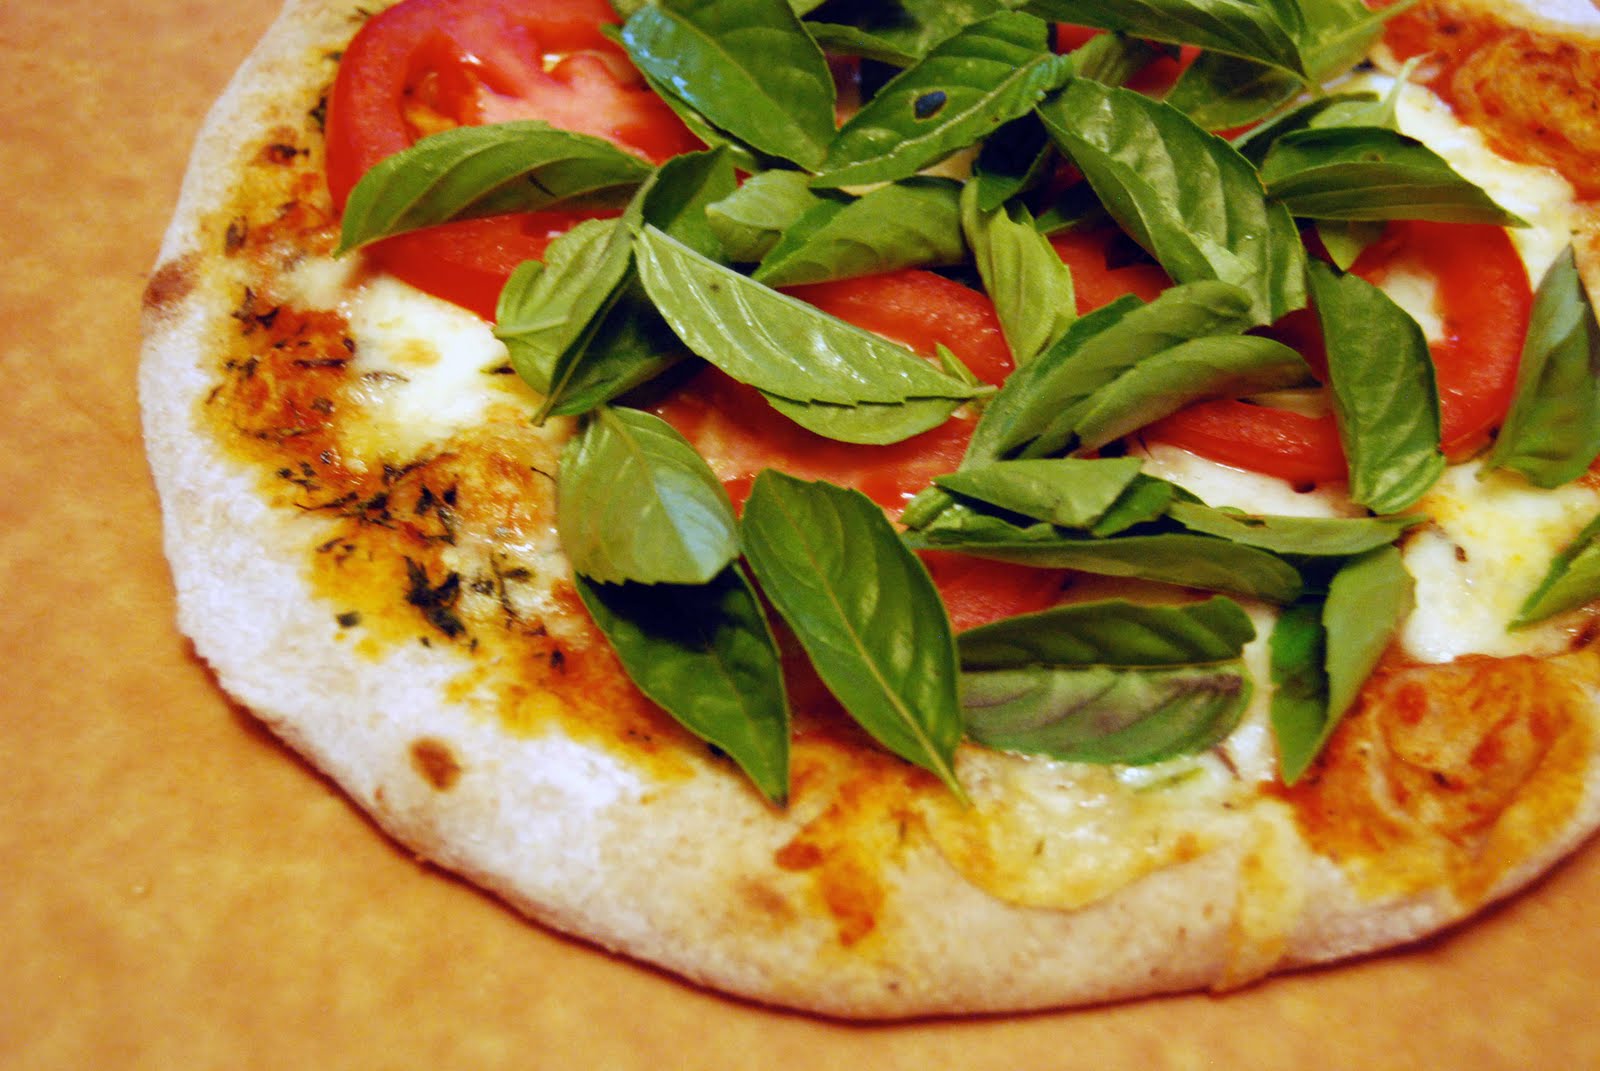
Blah blah blah, another pizza. But, oh, they are so simple to make! For this pizza, I used up the remainder of the yellow zucchini I had leftover from making zucchini bread yesterday by roasting zucchini slices along with a handful of cherry tomatoes. On top of the roasted zucchini and tomatoes I added some caramelized onions I had on hand that I had used as a burger topping over the weekend. To top it all off, I crumbled goat cheese over the top of the pizza. Though when previously making pizzas I've just brushed the crust with some olive oil, today I opted to brush the crust with some basil pesto. The resulting pizza was piled high with veggies and full of flavor -- definitely my kind of dinner.

Whole Wheat Pizza with Pesto, Roasted Yellow Zucchini, Roasted Cherry Tomatoes, Caramelized Onions, and Goat Cheese
makes 8 servings

1. Preheat a pizza stone in the oven to 400 degrees.
2. Brush a whole wheat pizza crust with basil pesto.
3. Add a layer of roasted zucchini slices atop the crust. Add the roasted cherry tomatoes over the zucchini slices.
4. Spread caramelized onions evenly atop the zucchini and tomatoes.
5. Crumble goat cheese over the top of the pizza.
6. Bake in the oven for about 20 minutes.
7. After removing the pizza from the oven, let it cool for about 5 minutes before serving.

To make the roasted tomatoes and zucchini:
1 1/2 T olive oil
1 T brown sugar
1 t balsamic vinegar
pinch fine sea salt
8 cherry tomatoes
1/2 medium zucchini

1. Preheat the oven to 350 degrees.
2. Stir together the olive oil, brown sugar, balsamic vinegar, and fine sea salt in a small bowl.
3. Slice the zucchini into 1/4" rounds. Cut the cherry tomatoes in half.
4. Place the zucchini rounds and cherry tomato halves in an oven-safe baking dish.
5. Pour the prepared olive oil mixture over the veggies. Toss to evenly coat. Flip any tomatoes over so that they are seed-side up if necessary.
6. Roast in the oven for 45 minutes. About halfway through cooking, flip over the zucchini slices and bake for 25 minutes more.
7. Remove from the oven. Use immediately or refrigerate until ready to use.

For the caramelized onions:
1 medium onion, cut into 1/4" slices
2 T olive oil

1. Heat the olive oil in a skillet over medium heat. Add the sliced onions.
2. Stir occasionally during the first 15 minutes of cooking. The onions will soften and become translucent.
3. During the next 10 minutes of cooking, stir the onions about every minute or so to prevent them from sticking to the skillet bottom and burning.
4. The caramelized onions are done once the onions are lightly browned; the entire cooking process should take about 25-30 minutes.
SHARE:

What's Baking: Zucchini Bread


Last Friday I was uninspired in the kitchen, so D and I decided to head to Lovejoy's for dinner. We finished dinner just as the farmers market was beginning to shut down, and noticed the stall closest to the restaurant had some lovely (and kind of ginormous) zucchini for sale. We had enough cash on hand to bring home one beautiful yellow zucchini. I knew just what I wanted to make with it too -- zucchini bread, one of my faves. However, the only recipe I have for this bread requires equally large portions of oil and sugar, so I decided to do a quick Internet search to find a more figure-friendly recipe. I ended up finding a Cooking Light recipe that met my requirements -- I made a few tweaks, and the resulting bread is excellent!

Zucchini Bread
makes 1 loaf

1 1/2 cups unbleached all-purpose flour
1/2 teaspoon baking powder
1/2 teaspoon ground cinnamon
1/4 teaspoon ground ginger
1/4 teaspoon ground nutmeg
1/4 teaspoon fine sea salt
1/4 teaspoon baking soda
1 whole egg
1 egg white
3 tablespoons organic canola oil
1/2 teaspoon lemon zest
1 teaspoon vanilla extract
3/4 cup raw sugar
2 cups shredded zucchini (about half my ginormous zucchini)
1/4 cup toasted walnuts, coarsely chopped

1. Preheat oven to 350 degrees.
2. Spray an 8"x4" bread pan with cooking spray. Set aside.
3. Add the flour, baking powder, ground cinnamon, fine sea salt, and baking soda in a medium-sized bowl. Whisk together to combine.
4. In a separate bowl, mix together the egg and egg white, oil, and lemon zest. Stir in the sugar.
5. Add in the shredded zucchini and stir to combine.
6. Slowly add the flour mixture to the wet mixture, stir until just combined. Gently stir in the walnuts.
7. Pour the batter into the prepared bread pan.
8. Bake for 45-60 minutes, or until a toothpick or knife inserted into the center of the loaf comes out clean.
9. Once baked, remove the pan from the oven and set on a cooling rack for 10 minutes to cool.
10. After 10 minutes, remove the bread from the pan and let cool completely.

 (adapted from this Cooking Light recipe)

SHARE:

What's For Breakfast: Buttermilk Pancakes and Scrambled Eggs


After a night out on the town in Fort Collins, I was ready for some carbs and a bit of protein to combat the after-effects of a black russian and rather strong (but quite delicious) Long Island iced tea I had imbibed at The Drunken Monkey. Since I had a big carton of lowfat buttermilk in the fridge, I decided to make some buttermilk pancakes. I also used the buttermilk in my scrambled eggs, substituting the buttermilk for the tablespoon of milk I typically add to my eggs before cooking them to keep them nice and soft. Both dishes turned out rather well, tasted delicious, and did the job!


Buttermilk Pancakes (printer-friendly version)
makes 2 servings

1 C unbleached all-purpose flour
1 T raw sugar
1 t aluminum-free baking powder
1/4 t baking soda
1/4 t fine sea salt
1 C buttermilk
1 cage-free egg, lightly beaten
2 T organic canola oil

1. Preheat an electric skillet to 350 degrees.
2. In a medium-sized bowl, whisk together the flour, sugar, baking powder, baking soda, and sea salt.
3. Make a well in the center of the dry ingredients.
4. Combine the beaten egg, buttermilk, and canola oil.
5. Pour the liquid ingredients into the well in the dry ingredients. Stir to combine. The batter will be slightly lumpy. Add in more buttermilk to thin out the batter if necessary.
6. Pour the batter onto the prepared skillet in the to make the pancake size you prefer. Flip the pancakes when bubbles form on top.
7. Cook for an additional minute or two, or until the other side is lightly browned. Remove from the skillet and place on a plate.
8. Put the plate in a oven set at around 200 degrees to keep the pancakes warm while you make the rest of the batch.
9. Serve with pure maple syrup or fresh fruit.


Buttermilk Scrambled Eggs (printer-friendly version)
makes 2 servings

3 cage-free eggs
1 T buttermilk
fine sea salt
freshly ground black pepper

1. Whisk together the three eggs and buttermilk.
2. Pour the prepared eggs into an electric skillet heated to 350 degrees.
3. Use a spatula to constantly move the eggs around the skillet to scramble them and avoid any overcooking.
4. Season the eggs with salt and pepper.
5. Serve immediately.
SHARE:

Cocktail Hour: Pomegranate Rum Punch

I still have some POM Wonderful juice in the house, so decided to use it to make another cocktail. This time around, I've concocted a cocktail with pomegranate juice, lime juice, and rum, made slightly fancy with a bit of raw sugar on the rim of the glass. Plus, who doesn't love a cocktail that also includes a rich source of antioxidants?

Pomegranate Rum Punch (printer-friendly version)
makes 1 cocktail

1 oz lime juice (about 1 lime)
1 1/2 oz Bacardi rum
seltzer water
ice cubes
lime wedge

1. Rub the edge of a pint glass with a lime wedge. Cover the glass edge with raw sugar.
2. Add the pomegranate juice, lime juice, and rum to the glass.
3. Add ice cubes.
4. Pour in the seltzer water to fill the glass.
5. Garnish with the lime wedge.


And for the teetotalers -- or those looking for a refreshing option for any time of day -- here's a simple recipe for a pomegranate spritzer. (Plus, making spritzers with your POM Wonderful juice is an excellent way to make it last longer, thus making the juice's high price a little more palatable!)


Pomegranate Spritzer (printer-friendly version)
makes 1 mocktail

seltzer water
ice cubes

1. Fill a pint glass with ice cubes.
2. Add in the pomegranate juice.
3. Pour in seltzer water to fill the glass.
4. Stir to combine.
SHARE:

What's For Dinner: Rotini with Spinach, Cherry Tomatoes, and Baby Portobello Mushrooms

I had some leftover cherry tomatoes, a bag of wilting spinach, and a carton of baby portobello mushrooms in the fridge, so I decided to combine the ingredients in an easy, no-sauce pasta dish.

Rotini with Spinach, Cherry Tomatoes, and Baby Portobello Mushrooms
makes 2 (generous) servings

2 cups rotini pasta
2 tablespoons olive oil, divided
1 cup sliced baby portobello mushrooms
1 garlic clove, minced
8 oz baby spinach (about half a bag)
10 cherry tomatoes, rinsed and halved
1/4 cup fresh parmesan cheese, grated
6 fresh mozzarella balls, quartered
freshly ground pepper

1. Bring a large pot of water to a boil. Add in a healthy pinch of salt. Add the rotini and cook the pasta according to the manufacturer's instructions.
2. Meanwhile, add 1 T of olive oil to a large skillet pan and heat over medium heat. Saute the sliced mushrooms for about 2-3 minutes, stirring constantly. Once sauteed, remove the mushrooms from the pan and set aside.
3. Reduce the heat to medium-low and add another tablespoon of olive oil to the skillet pan. Add in the minced garlic and saute for about 1 minute, stirring constantly. Add the baby spinach and saute until wilted. Add in the halved cherry tomatoes.
4. Once the pasta is nearly cooked, add the sauteed mushrooms back into the skillet. Stir to combine all the ingredients.
5. Remove the pasta from the water, reserving one cup of the cooking water.
6. Add the pasta to the skillet pan.
7. Grate the parmesan cheese over the pasta. Stir to combine. Add in some of the pasta water if the pasta is too dry. Season liberally with freshly ground black pepper.
8. Spoon the pasta onto two individual plates; garnish with the fresh mozzarella and serve.
SHARE:

What's For Dinner: Portobello Mushrooms Stuffed with Sauteed Veggies

I haven't had a portobello mushroom in a while, so I decided it was about time I added it back into my cooking repertoire. Since I was going to roast the mushrooms in the oven rather than grilling them as I have previously, I decided to amp up the flavor a little bit by stuffing them with some sauteed eggplant, onion, and tomato in addition to marinating them in a balsamic vinaigrette mixture. And while I was at it, I opted to add in some fresh mozzarella as well. Because who doesn't love some ooey-gooey mozzarella? To finish 'em off, after roasting in the oven, I drizzled the stuffed mushrooms with a little pesto. Though they might not look all that appetizing, the end result was a rather satisfying dinner entree.


Portobello Mushrooms Stuffed with Sauteed Veggies
makes 2 servings

For the marinated portobello mushrooms:
1/3 cup balsamic vinaigrette
1 teaspoon Dijon mustard
2 cloves garlic, minced
freshly ground pepper
2 portobello mushrooms, destemmed

1. To make the marinade, combine the balsamic vinaigrette, mustard, and minced garlic cloves in a bowl. Stir to combine. Season with black pepper. Set aside.
2. Clean off the mushrooms with a damp paper towel.
3. Brush the mushrooms with a generous amount of the marinade (cover both sides). Place the mushrooms on a plate and cover with plastic wrap. Let sit in the fridge for at least one hour.

For the sauteed veggies:
2 tablespoons olive oil
1 small onion, chopped
1/3 eggplant, peeled and chopped
6 cherry tomatoes, halved and deseeded
oregano
freshly ground black pepper

1. Add the olive oil to a large saute pan and heat over medium heat.
2. Add the chopped onions, eggplant, and tomatoes.
3. Saute for about 10 minutes, until the onions and eggplant are slightly browned.
4. Season with oregano and black pepper.

For the stuffed mushrooms:
1. Preheat the oven to 425 degrees.
2. Cover a baking sheet with a piece of aluminum foil.
3. Brush the aluminum foil with olive oil.
4. Remove the marinated mushrooms from the fridge and place on the foil, stem side up.


5. Add a layer of fresh mozzarella cheese atop the marinated mushroom.

6. Add a generous amount of the sauteed eggplant, onion, and tomato mixture atop the mozzarella cheese.
7. Roast in the pre-heated oven for 10 minutes.

8. After 10 minutes, remove the mushrooms from the oven and add another layer of mozzarella atop the sauteed veggie layer.
9. Roast for another 10 minutes.
10. Remove from the oven and let cool for a few minutes.
11. Add a drizzle of pesto to garnish and mangia!
SHARE:

What's For Dinner: Enhanced Pizza

Frozen pizza is definitely one of my go-to meal options when I'm feeling lazy and can't think of something to make from scratch for dinner. Since I was eating dinner on my own, I opted to cook up a 9" Full of Life tomato sauce and three cheeses flatbread pizza. I love this brand given the relatively short ingredient list and organically-grown ingredients. In order to amp up the nutrition just a bit more, I topped the pizza with several tomato slices (from a tomato bought at the local farmers' market) before I tossed it in the oven, and then added about a cup of fresh basil leaves from our herb garden once it was out of the oven.
SHARE:

What's For Dessert: Ricotta Chocolate Chip Ice Cream

Perhaps the name of this blog should be "A More Dessert-Filled Life" rather than "A Less Processed Life," given all the dessert recipes I've posted of late? Clearly I have a bit of a sweet tooth. But heck, at least I'm making these things from scratch -- that's got to count for something, right? This dessert recipe comes from a recent episode of Everyday Italian -- I was quite intrigued by the idea of making an ice cream with ricotta cheese. To be honest, the resulting texture is a bit funky -- there's a bit of graininess from the ricotta cheese. If I make this again, I think I will whip up the ingredients in the electric mixer to try to smooth things out a bit more. However, I think the addition of the chocolate chips does help to draw attention away from the ice cream's odd texture a bit.

Ricotta Ice Cream
makes 12 servings

For the simple syrup:
1 cup raw sugar
1/2 cup water

15 oz part-skim ricotta cheese
1 cup organic whole milk
1/2 teaspoon vanilla extract
chocolate chips

1. Make the simple syrup by combing the water and sugar in a medium-sized sauce pot. Stirring constantly, bring the mixture to a boil, then reduce the heat to low and let simmer for about 5 minutes, or until all of the sugar has dissolved.
2. In a medium-sized mixing bowl, whisk together the ricotta cheese and whole milk. Stir in the simple syrup and vanilla.
3. Pour the mixture into an ice cream maker, and follow the manufacturer's instructions to make the ice cream.
4. When the ice cream is nearly ready, add in a couple handfuls of chocolate chips.
5. Serve immediately.

 (adapted from this Everyday Italian recipe)

SHARE:
© A Less Processed Life. All rights reserved.
BLOGGER TEMPLATE MADE BY pipdig