 A sure sign of spring is the arrival of verdant bunches of asparagus at the local grocery store. The other day we picked a bunch up as a side for a meal we planned to cook on the grill. Rather than roast the spears in the oven or steam them on the stovetop, we instead opted to pop the spears on the grill as well. First, we marinated the asparagus in a mix of olive oil and balsamic vinegar for about a half an hour. When the meat was nearly finished grilling, we added the spears to the grill, and cooked them for a few minutes on each side. Season to taste with sea salt and freshly ground black pepper.
What's On The Side: Grilled Asparagus
A sure sign of spring is the arrival of verdant bunches of asparagus at the local grocery store. The other day we picked a bunch up as a side for a meal we planned to cook on the grill. Rather than roast the spears in the oven or steam them on the stovetop, we instead opted to pop the spears on the grill as well. First, we marinated the asparagus in a mix of olive oil and balsamic vinegar for about a half an hour. When the meat was nearly finished grilling, we added the spears to the grill, and cooked them for a few minutes on each side. Season to taste with sea salt and freshly ground black pepper.
What's For Lunch: Veggie Burger
 Since we had a bunch of leftover burger fixin's, a veggie burger seemed to be a good option for lunch today. I slathered my portabella Gardenburger with half a wedge of Laughing Cow swiss cheese, and topped it off with a couple raw onion rings and tomato slices. Plus a little 365 ketchup. This hearty burger definitely kept my hunger at bay until dinnertime. Though Gardenburgers are great for the sake of convenience, I think I may have to try my hand at making my own veggie burgers sometime soon.
What's For Dinner (or Breakfast!): Buttermilk Pancakes
 Since I had a bit of buttermilk left over from the other night's baked onion ring escapade, I thought what better way to use it up than by making a batch of buttermilk pancakes? They turned out rather well, even thought I completely forgot to add in the sugar. Whoops! You can find the recipe on Martha Stewart's site here. And of course, these pancakes are best enjoyed with a little (or a lot) of pure maple syrup poured on top.
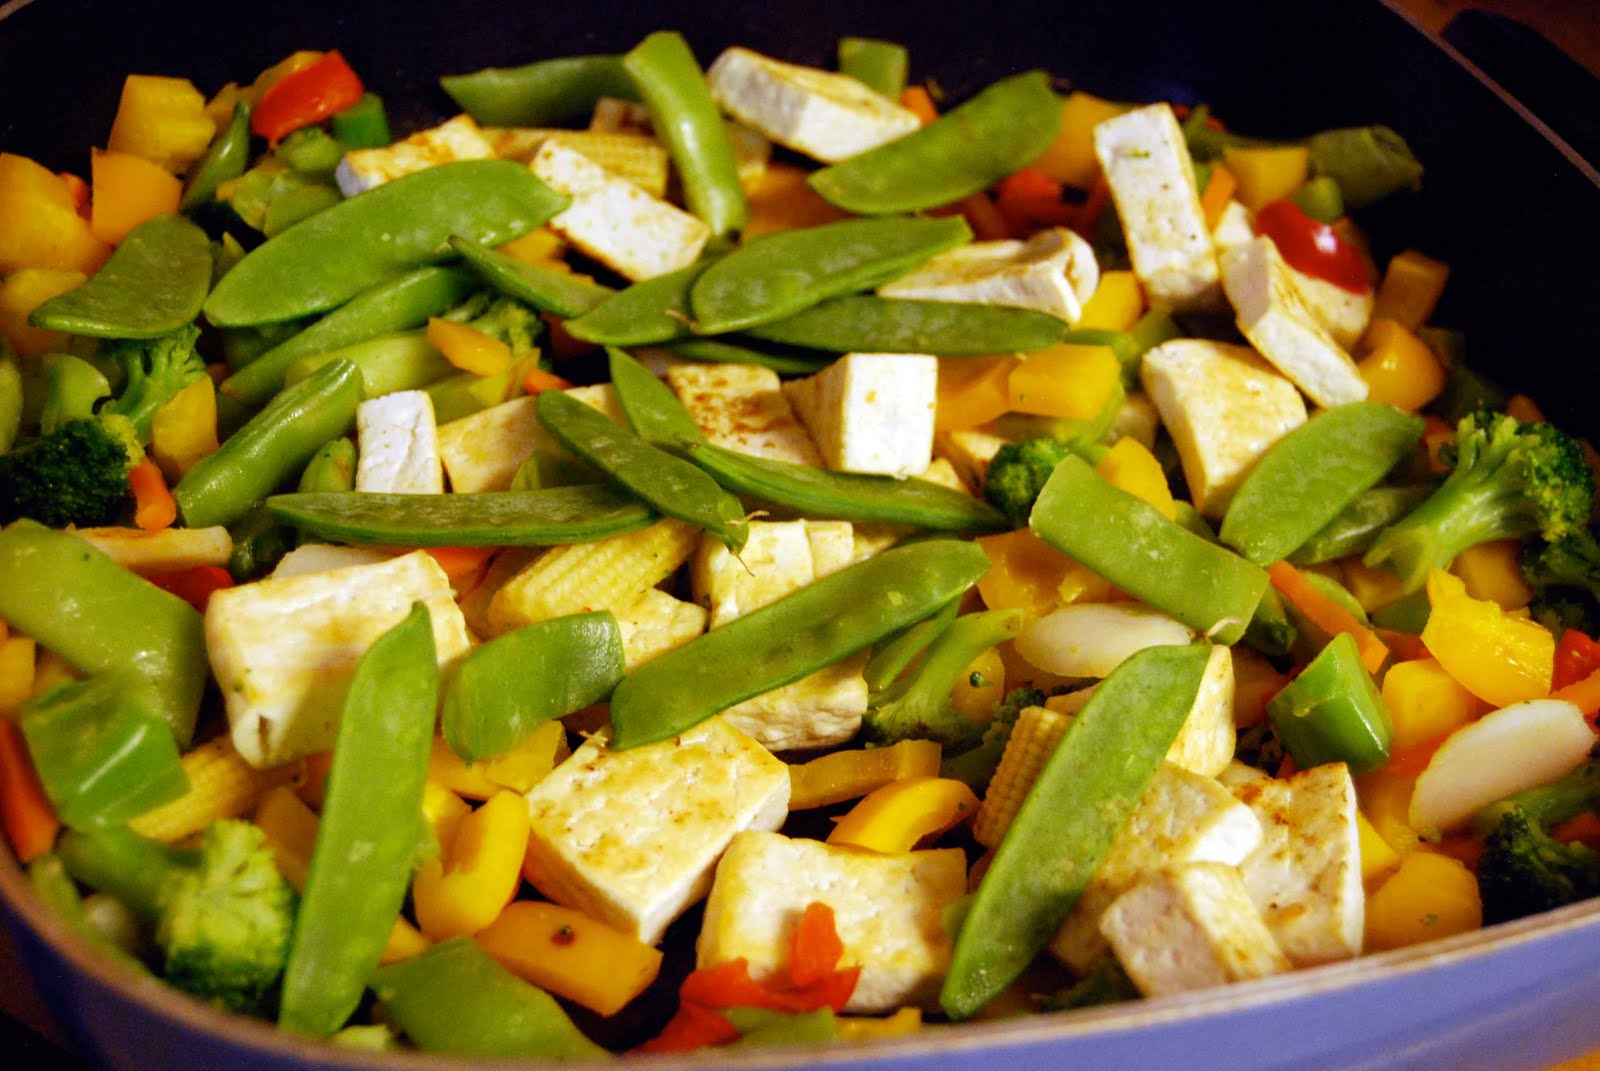
What's For Dinner: Ginger-Sesame Stir Fried Veggies with Tofu

The other week when I was at the co-op a ginger-sesame marinade caught my eye and I decided it'd be a great addition to a veggie stir fry. As I was planning my stir fry, I realized I had some firm tofu in the fridge that was about to expire, and decided it would make an excellent addition to the meal. Plus, I had never really cooked tofu to my liking before, so figured I might as well give it a try.
 To cook the tofu, first I opened the package and drained off the liquid. Then I cut the block in several rows lengthwise and cross-wise, until I had a bunch of 2-inch cubes. I placed all the cubes on a towel and folded the towel overtop the tofu cubes, and lightly pressed to remove as much liquid as possible. Next, I heated a skillet over medium heat and dry-fried the tofu in two batches. Once in the skillet, I used a spatula to press out additional moisture. As each piece turned golden brown, I flipped the cubes over. When both sides were golden brown, the cubes were done. I placed the cubes in a bowl and set it aside.
 Next, I added a couple tablespoons of light sesame oil to an electric skillet and heated it to 375 degrees. Once the skillet was up to temperature, I added in a package of "deluxe" stir fry vegetables. I stirred the veggies every so often to make sure they were getting even heat. When they were nearly completely cooked, I added in about 1 cup of fresh snow peas and the pre-cooked tofu cubes. Finally, I added in about 1 1/2 C of the ginger-sesame marinade, reduced the heat to simmer, and cooked for another few minutes.

Meanwhile, earlier in the day I had cooked up a couple of cups of jasmine rice in the rice cooker (have I mentioned how much I love that thing?). One of the great things about the Zojirushi is the warming feature which keeps cooked rice warm for 12+ hours. Great stuff. Once the veggies and tofu were ready, I served them over a bed of jasmine rice. All in all, the ginger-sesame marinade made for some really great flavors and a fun weekday dinner.
What's On The Side: Baked Onion Rings
 Though once again it's snowing outside, we saw no reason to put off our plans to do a little grilling. Porkelope burgers were on the menu as the main course, and I decided tonight would be the perfect occasion to try out a recipe for baked onion rings I had seen on a recent episode of Everyday Food. I made a couple of substitutions to recipe -- opting to use Organic Golden Flakes Medley with Flax Cereal in lieu of the corn flakes and organic canola oil in place of the olive oil. I think next time I will add a bit more salt, but otherwise I think they did turn out rather well!
Baked Onion Rings adapted from Everyday Food
makes 2+ servings
6 slices bread (we had some wheat bread on hand)
1 egg
1/2 cup reduced-fat buttermilk
1/4 cup unbleached all-purpose flour
1/8 teaspoon cayenne pepper
freshly ground pepper
fine sea salt
1 medium yellow onion
2 tablespoons canola oil
1. Preheat an oven to 300 degrees.
2. Place the slices of bread on a baking sheet and bake for 10 minutes, flipping halfway through.
3. Remove the bread from the oven and let cool for a few minutes. Increase the oven temperature to 450 degrees.
4. Tear the bread into small pieces and place in a food processor. Process until fine bread crumbs are formed.
5. Pour the crumbs into a clean bowl.
6. Place 1/2 C of the bread crumbs back into the food processor. Add in the cereal. Process until coarse crumbs form. Pour into a shallow bowl.
7. In another bowl, whisk together the egg, buttermilk, flour, cayenne pepper, salt, and pepper.
8. Cut the onion cross-wise into four sections. Remove the smallest rings, and then pop out the remaining rings.
9. Dip each ring into the liquid mixture, and allow excess to drip off. Then dredge the ring in the dry crumb mixture. Place on a plate. Continue the process until all rings are prepared.
10. Pour 2 T canola oil on a rimmed baking sheet. Place the baking sheet in the 450 degree oven for 2 minutes.
11. After two minutes, remove the baking sheet from the oven, and tilt it to cover the entire surface with the oil. Be sure not to pour the oil on yourself!
12. Place the prepared rings on the baking sheet. You should hear them sizzle a little bit.
13. Place the rings in the oven for 8 minutes. After the time is up, remove from the oven and use tongs to flip each ring over. Put back in the oven and continue baking for another 8 minutes.
14. Remove the onion rings from the oven and serve immediately!

What's On The Side: Southwest Wheat Berry Salad
 My rice cooker is quickly becoming my new favorite kitchen gadget--we've used it every day this week! Tonight I thought I'd give a new grain a whirl and see how well the machine cooks up wheat berries. Not surprisingly, they turned out really well! After cooking I stirred in a bunch of ingredients; I think I could have actually added them all at the beginning of the cooking process but at the point that I started making this dish I hadn't quite decided what things I wanted to add in. I'll have to try tossing in all the ingredients at the beginning the next time!
Southwest Wheat Berry Salad
makes 4 servings
1 cup wheat berries
2 cups water
1 teaspoon taco seasoning
1 can black beans, drained and rinsed
I can whole peeled tomatoes (or fresh you if have 'em!), quartered and seeded
1 tablespoon olive oil
1/2 cup mushrooms (I used shiitake)
1. Toast the wheat berries in a dry skillet over medium heat for a few minutes. The wheat berries should become fragrant and turn a deeper red color.
2. Place the wheat berries in the rice cooker and cover with hot water. Soak wheat berries for one hour.
3. After the hour has elapsed, drain off the hot water and replace with two cup of water. Add one teaspoon of taco seasoning.
4. Cook the wheat berries using the "brown rice" setting.
5. Let the wheat berries sit for an additional 15 minutes after the cooking phase is complete.
6. Add the black beans and tomatoes in with the wheat berries. Stir to combine.
7. Heat the olive oil over medium-high heat. Saute the shiitake mushrooms. Add the mushrooms in with the wheat berry mixture and stir to combine.

What's To Drink: Passionfruit Martini

Passionfruit Martini
makes 1 drink
2 oz Grey Goose vodka
3 oz passionfruit juice
1 oz diet 7-Up
fresh fruit to garnish
1. Chill a martini glass.
2. Pour together the vodka, passionfruit juice, and 7-Up in a cocktail shaker with a few pieces of ice.
3. Shake to mix.
4. Pour into the martini glass.
5. Garnish with a couple of orange slices and raspberries.
And, I've got a bonus cocktail, too:

Passionfruit Mango Martini aka I'd-Rather-Be-On-A-Tropical-Island-Tini
makes 1 drink
2 oz Stoli raspberry vodka
1 oz mango nectar
2 oz passionfruit juice
fresh raspberry to garnish
1. Chill a martini glass.
2. Pour together the vodka, mango nectar, and passionfruit juice in a cocktail shaker with a few pieces of ice.
3. Shake to mix.
4. Pour into the chilled martini glass.
5. Garnish the rim with a raspberry.
What's For Breakfast: Oatmeal with Fun Toppings!
 We set the timer on the rice cooker to make this morning's batch of oatmeal. There was a little bit of spillover, so looks like we need to work on our proportions a little bit. I think the oats soaking/our elevation is throwing some stuff off a little bit. Ah well, we're up for experimenting until we get the steel-cut oats down pat!
For my bowl of oatmeal, I decided to top it Elvis-style with half a sliced banana, a dollop of natural peanut butter, and a few roasted unsalted peanuts for garnish.

D opted to top his oats with brown sugar and pecans. We shared a few slices of super-juicy oranges to round out our breakfasts.
What's To Drink: Mango Smoothie
 The other day, D brought back Indian food from Taj Mahal, our favorite Indian restaurant in Fort Collins. The last time we hit up the local Indian restaurant here in Laramie, D and I both got a mango smoothie (mango lassi) with our meal. It was quite refreshing and tasty. So, I decided to see if I could re-create the smoothie concoction here at home. It appears that to make an authentic lassi, you need mango pulp -- I had to make due with mango nectar, which I happened to have on hand. I think the resulting smoothie was pretty spot on with what we had tasted before, though of course fresh fruit would always trump bottled juice.
Mango lassi
makes 2+ servings
1 cup organic vanilla yogurt
2 cups mango nectar
1/2 cup organic skim milk
1. Blend together all three ingredients. Pour into glasses (I was feeling fancy so poured myself one in a martini glass; D got his in a pint glass) and serve immediately.
What's In My Kitchen: A Zojirushi Rice Cooker
 I have had my eye on a rice cooker for awhile. And ironically, not so much for its rice cooking abilities (which will of course come in handy) but for its ability to cook oatmeal. Earlier in the year I was on a major steel-cut oats kick, but the 25-30 minute cooking time definitely put a damper in my interest to cook it every day. Of course, I could have made a big batch and then re-heated servings throughout the week, bit it just isn't the same. Hence, a rice cooker with a timer that I could set the night before to have the oatmeal ready in the morning when I wanted it. I did a little research and determined that Zojirushi rice cookers are highly-rated and not completely insanely priced. I'd been keeping my eye on Zojirushi prices on Amazon.com for awhile, and all of a sudden last week there was a price I could not refuse. Even better, the 10-cup machine was being offered at a lower price than a similar, but lower-capacity, machine. I jumped on it, and we are now the proud owners of our very own Zojirushi rice cooker!
Today was our first chance to give it a try -- if I had been more on it, I would have set it up to have the oatmeal ready in the morning. But, looks like I'll have to try out the timer some other time. The great thing about the timer system is that you set it for the time you want the rice/oatmeal to be done, rather than when you want it to start. Such a brilliant feature! Plus, with a warming system, you don't have to worry about eating it once it's ready. So great.
To make two hearty servings of steel-cut oats, I combined 3/4 C of steel-cut oats with 2 3/4 C water in the inner pot, shut the lid, chose the Porridge setting, and hit the Cooking button. Couldn't be easier. The entire cooking process took just over an hour, so clearly using the rice cooker is not the best option when you're starving. But again, for oats, we're really looking forward to using the timer feature, so today was really just a test run.
When the oats were ready, the rice cooker plays a short tune, letting you know the food inside is ready to be served. There was a bit of liquid on top of the oats when I opened the lid, but a quick stir with the provided spatula took care of that.

I've seen a lot of interesting oatmeal toppings while surfing through blogland lately, so I thought I would branch out from my typical nut, dried fruit, or brown sugar toppings and tried out a spoonful of natural peanut butter and a spoonful of organic raspberry preserves. These toppings were quite tasty when stirred into the oats. Mmm! I'm definitely looking forward to exploring more exotic toppings in the future!
Afternoon Snack

Mid-afternoon is when the munchies (no, not those kind of munchies) tend to strike for me. I'm always looking for something new to snack on, and I think I've found a winner with this recent find -- a handful of Kashi crackers and a wedge of Laughing Cow cheese. The cheese was another score at Costco -- a pack of three tubs for under $8. Thus far I've tried both the 7 grain and honey sesame cracker flavors and think both taste great. And you gotta love the whole grain ingredients!
What's For Dinner: Soba Noodles

The other day I got the thought in my head that I wanted to make a dish with soba (buckwheat) noodles. A quick search on the web resulted in finding a pretty yummy-looking recipe on Whole Food's website. This dish came together in about 20 minutes.
Soba Noodles (adapted from the above-mentioned Whole Foods recipe)
makes 2+ servings
1/2 package (4 oz) soba noodles
1 tablespoon sesame oil
1/2 cup shiitake mushrooms
1 red pepper, sliced into thin strips
1 clove garlic, finely minced
2 teaspoons fresh ginger, minced
1 cup organic veggie broth
1 1/2 tablespoons tamari sauce
1 teaspoon balsamic vinegar
3 tablespoons fresh cilantro, roughly chopped
6 green onions, diced
1/2 cup snow peas
2 tablespoons unsalted roasted peanuts, roughly chopped (optional)
1. Bring a large pot of water to a boil. Cook the soba noodles in the boiling water for 6-8 minutes.
2. Meanwhile, heat 1 T of sesame oil in a large skillet over medium heat.
3. Add the mushrooms, red pepper, garlic, and ginger, and saute for 3 minutes.
4. Add in the veggie broth, tamari sauce, and balsamic vinegar, and simmer for 3 more minutes.
5. Stir in the cilantro, green onion, and snow peas. Cook for 3 more minutes, or until the snow peas are a vivid green color.
6. Add the cooked noodles to the skillet and toss to combine. Serve immediately or allow to cool to room temperature before serving.
7. Garnish each plate of noodles with chopped roasted peanuts.
What's For Dessert: Homemade Vanilla Bean Ice Cream
 The other night we were craving some ice cream, but nary a carton was to be found in our house. However, we did have all the ingredients in the fridge and pantry -- and fortuitously, our ice cream maker insert was nice and chilled in the freezer.
Vanilla Bean Ice Cream (adapted from the Donvier ice cream maker manual)
makes 6+ servings
2 eggs
2/3 cup raw sugar
1 3/4 cups organic skim milk
2 cups organic heavy cream
2 teaspoon vanilla
1 vanilla bean
1. Use an electric or stand mixer to beat together the eggs and sugar and it is thick and creamy.
2. Mix in the milk, heavy cream, and vanilla.
3. Split the vanilla bean in half and use a knife to scrape out the seeds. Stir in to the mix.
4. Pour the mixture into your chilled ice cream maker and follow the manufacturer's instructions to make the ice cream. (We have a hand-cranked Donvier ice cream maker; to make ice cream, give the ice cream mixture a stir every couple of minutes until the ice cream has set up. In our experience, homemade ice cream tends to be softer than the store bought stuff; however, it's also about 100% more delicious.
5. Serve (and eat!) immediately.
What I'm Watching: FRESH

{Credit: Specialty Studios/Ripple Effect}
Recently, D and I had a chance to attend a screening of FRESH on campus. This documentary covers issues such as sustainable agriculture, the problems with industrial agriculture, and the movement to return to small-scale farming. An interesting aspect of this film was a discussion of urban agriculture, focusing on the work of Will Allen, owner of a 3-acre farm in Milwaukee and founder of Growing Power, a non-profit that helps inform and train people in urban farming techniques. Michael Pollan, author of The Omnivore's Dilemma and In Defense of Food and Joel Salatin, owner of pasture-based Polyface Farms, are also prominent figures in this documentary. Overall, another excellent film that delves into where our food comes from and the role sustainable agricultural techniques could play to help improve the welfare of farm animals and the nutritional content of our foods.
Where to Eat: Laramie

{wild mushroom ragu -- leftovers from a recent visit to Luciano's}
D and I were lamenting the fact recently that Laramie lacked an Italian restaurant. (Well, there is one "sort-of" Italian restaurant in town . . . but it shall remain nameless as it really isn't all that great.) So, we were excited to note a few months ago that a new Italian restaurant was set to open in the space formerly occupied by the Overland Restaurant. We had gone to the Overland a couple of times for breakfast -- good food but s-l-o-o-o-o-w service. We weren't all that shocked when it went out of business.
A couple of nights ago D and I were too lazy to cook our own dinner and decided to head to one of the local restaurants to eat. We were planning to hit up Anong's Thai restaurant when we noticed that the Italian restaurant -- Luciano's -- was open for business. Throwing caution to the wind, we decided to check it out.
Turns out that the restaurant has only been open for a few weeks, having had its grand opening on March 22nd. Though the place was busy, we were seated immediately. The space itself is a bit sparse in terms of decoration, and the tables are closely packed. (I think someone needs to do a little feng shui analysis of the space.)
The menu isn't that elaborate and sticks mainly to classic dishes and sauces. I opted to try the wild mushroom ragu with spaghetti; D had the gnocchi alla carbonara. We each chose a salad to go with our meal; I had a house salad with their house vinaigrette on the side and D tried the Caesar salad. The house salad was quite generously proportioned and included red and orange pepper slices, which was a nice touch. The vinaigrette dressing was also quite flavorful.
The entrees were served in a timely manner and also proved to be generous portions. I really liked my spaghetti entree -- the sauce was quite flavorful with a hint of spiciness, and nearly every forkful including a mushroom of one kind or another. D wasn't that big of a fan of his gnocchi, and found the bacon flavor a bit overpowering; he would have preferred a better balance in the dish's overall flavor profile.
The restaurant has a small wine list but includes bottles at a variety of price points. D and I opted to share a bottle of Gnarly Head Old Vine Zinfandel (restaurant price $18, recent purchase at Wilbur's in FC $8). Most bottles ranged in the $20-$30 range. The only options for wines by the glass were of the Menage a Trois blends, including a red, white, and rose.
For dessert, D and I shared a tiramisu (of course). The portion was small, but I think we both agreed the best of the tiramisu's we have tried in Laramie. (Which, honestly, isn't that great of praise.)
All in all, the restaurant fits a missing niche in Laramie, though the menu needs some work. It will be interesting to see how the restaurant fares and if the menu will grow.
Luciano's
100 East Ivinson Avenue
Laramie, WY 82070
What's On The Side: Rustic Twice-Baked Potatoes
 For Easter dinner, D and I had bbq'd skirt steaks on the grill which we had with twice-baked potatoes and grilled asparagus on the side. Once we mastered getting the potatoes baked (there may or may not have been an incident involving a potato that blew out of its jacket), putting together these rustic twice-baked potatoes was really quite simple. We played the recipe by ear, adding a little bit of this and a little bit of that. They turned out rather well, if I do say so myself!
Rustic Twice-Baked Potatoes (printer-friendly version)
makes 10 servings (these keep well in the fridge)
5 russet potatoes, scrubbed and dried
1 stick unsalted butter
1/2 C sour cream
1/2 C shredded vintage white cheddar cheese, plus a bit more for topping
1/4 C green onions, sliced
fine sea salt
freshly ground pepper
1. Preheat the oven to 400 degrees.
2. Poke each scrubbed and dried potato with a fork several times.
3. Place the potatoes in the oven and bake for about an hour, or until a knife inserted into the potato is easily removed.
4. Once the potatoes are baked, remove them from the oven and place them on a cooling rack. Let them rest until they are cool to the touch. Reduce the heat of the oven to 350 degrees.
5. Cut each potato in half and scoop out the innards into a large mixing bowl. Be sure not to tear the skin. You may want to leave a little bit of potato left in the skin to provide it with a little heft.
6. Add the butter, sour cream, and cheddar cheese into the bowl with the scooped potato bits. Stir together to combine. Season to taste with salt and pepper.
7. Stir in the green onions.
8. Fill each potato skin with a heaping scoop of the potato stuffing.
9. Top each potato with some more shredded cheese.
10. Bake in a 350 degree oven for about 20 minutes, or until the cheese is nice and melty.
11. Remove from the oven and top with a few more sliced green onions, if preferred.
What's For Dinner: Herb-Crusted Salmon with Roasted Veggies
 When we were in Fort Collins over the weekend, we made the requisite stop at Whole Foods to pick up a few things. Among the items we added to our basket were two 6 oz fillets of wild sockeye salmon. Such a great source of protein and omega-3 fatty acids! We opt for wild salmon given the environmental issues and potential decreased nutritional-content related to farmed fish.
I've only ever made mustard-roasted salmon with lingonberries before, so I figured it was about time I tried a new recipe. I finally decided to go the herb-crusted route. Luckily, I still had plenty of Italian breadcrumbs on hand from when I made them awhile ago (stored in the freezer). The great thing about cooking salmon is that it is so fast! Less than 20 minutes, and the fish is on the table. I think I've definitely got a new go-to salmon recipe!
Herb-Crusted Salmon
makes 2 servings
3/4 cup Italian breadcrumbs
dried rosemary
dried thyme
dried parsley
1/2 cup organic dijon mustard
1/4 cup honey
2 6-oz salmon fillets
1. Pre-heat the oven to 450 degrees.
2. In a small bowl, stir together the mustard and honey.
3. In another small bowl, mix together the breadcrumbs and seasonings. I used about a shake or two of each seasoning listed; the Italian breadcrumbs already had a number of seasonings added in (see the link above for the recipe).
4. Line a baking sheet with aluminum foil.
5. Place the salmon fillets on the foil, skin-side down.
6. Cover the top of each fillet with the mustard-honey mixture.
7. Coat the mustard-covered fillets generously with the breadcrumb-herb mixture.
8. Place the baking sheet into the oven and cook for about 14 minutes, or until the fillets are opaque and flaky, and the toppings are lightly browned.
I served our salmon fillets alongside some roasted eggplant and Brussels sprouts. (I rinsed, trimmed, and halved the sprouts and cubed the eggplant; tossed all with two minced cloves of garlic and 2 T of olive oil, then roasted in a 450-degree oven on a baking sheet for about 30 minutes, flipping once half-way through.)

What's For Dinner: Lazy Ciabatta Pizza
 Tonight I had pizza on the mind, but I was feeling a little lazy. A loaf of ciabatta bread to the rescue! To make this pizza, I sliced a loaf of ciabatta bread in half, and put toppings on both slices. On the bottom, some pizza sauce (admittedly with a few more ingredients than I typically prefer, but well, might as well use it and not waste it since I already had a bottle open in the fridge), then a few arugula leaves, some slices of fresh mozzarella, and all topped with a few slices of roma tomato. Popped in a 400 degree oven for about 20 minutes (until the cheese was nice and melted). Simple and satisfying--exactly what I was looking for.
What's On The Side: Kale Chips
 About a month of so ago, kale chips were all the rage on a number of foodie blogs. I remained unconvinced. Leaf chips? Sure didn't sound good to me. However, I saw some kale in the supermarket the other day and decided I had no room to judge without trying them first. I searched around the web for kale chip recipes and ended up melding a few, ending up with the following.
Kale Chips
makes 1+ servings
1 bunch kale, washed, dried, and torn into pieces
2 teaspoons olive oil
coarse sea salt
seasoning (I used a parmesan pesto seasoning mix from the Savory Spice Shop)
1. Preheat the oven to 375 degrees.
2. Spread the torn kale pieces on a baking sheet.
3. Drizzle the kale with 2 t of olive oil; shake the baking pan a bit to evenly coat each kale piece.
4. Sprinkle the kale with coarse sea salt and seasonings to taste.
5. Bake in the oven for about 10-15 minutes, or until slightly brown.
What's Baking: Easter Cupcakes
 Finally! I have found a cupcake that not only works, but is also super-delicious. I found the recipe for devil's food cupcakes at the Cheeky Kitchen, a recipe blog written by a woman in Colorado Springs. I tweaked the recipe slightly by added about 1 t of espresso powder to the batter to enrich the chocolate taste.
For the frosting, I looked to Martha Stewart for advice and ended up using her super-simple recipe for vanilla frosting. After the icing was whipped together and the cupcakes were cool, it was time to break out my new toy, a Wilton dessert decorator pro, a recent birthday gift from my mother-in-law. I scooped the icing in, and tried my hand at making some stars (long story short, I need a bit more practice.) D also took a turn icing some cupcakes.

And of course, the piece de resistance -- in honor of the Easter holiday, a not-so-natural Peep was plopped atop a couple of the cupcakes.

What's For Dinner: Pita Stuffed with Quinoa
 Another pita-filled meal for tonight. Turns out I made a TON of quinoa the other day and I need to find some creative ways to use it up! So, for tonight's dinner, I stuffed a pita with about a cup of quinoa, some arugula, the last of the roasted eggplant, and about a quarter-cup of salsa. Really filling and a nice kick of spice, to boot!
What's For Lunch: Veggie-Stuffed Pita
 Time to start using up some of this week's leftovers! For lunch today I took advantage of some leftover veggies and sauce, plus a few new ingredients, to make an overstuffed veggie pita. To make this pita pouch, I cut a pita in half, opened up the pocket, and stuffed it with organic arugula, cucumber slices, tomato slices, leftover eggplant rounds, and some feta cheese crumbles. I dressed the whole shebang with some leftover tahini-yogurt sauce. Since I had more veggies than I could stuff in the pita pocket, I also made a small salad with the same ingredients. Super-easy to make and really tasty!
{a few of the veggies, ready to be stuffed in a pita pocket}
Subscribe to:
Posts (Atom)
© A Less Processed Life. All rights reserved.